Quantcast
Channel: IT瘾博客推荐
Viewing all 532 articles
Browse latest View live

NAT穿透(UDP打洞) - heaventouch - 博客园

$
0
0

1、NAT(Network Address Translator)介绍

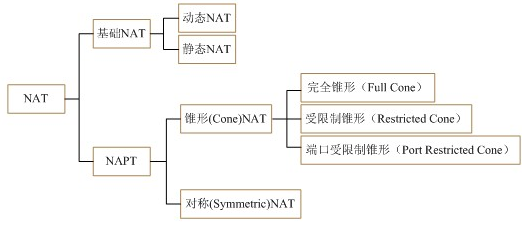
NAT有两大类,基本NAT和NAPT。

1.1、基本NAT

静态NAT:一个公网IP对应一个内部IP,一对一转换

动态NAT:N个公网IP对应M个内部IP,不固定的一对一转换关系

 1.2、NAPT(Network Address/Port Translator)

现在基本使用这种,又分为对称和锥型NAT。

锥型NAT,有完全锥型、受限制锥型、端口受限制锥型三种:

  • a) Full Cone  NAT(完全圆锥型):从同一私网地址端口192.168.0.8:4000发至公网的所有请求都映射成同一个公网地址端口1.2.3.4:62000 ,192.168.0.8可以收到任意外部主机发到1.2.3.4:62000的数据报。
  • b) Address Restricted Cone  NAT (地址限制圆锥型):从同一私网地址端口192.168.0.8:4000发至公网的所有请求都映射成同一个公网地址端口1.2.3.4:62000,只有当内部主机192.168.0.8先给服务器C 6.7.8.9发送一个数据报后,192.168.0.8才能收到6.7.8.9发送到1.2.3.4:62000的数据报。
  • c) Port Restricted Cone  NAT(端口限制圆锥型):从同一私网地址端口192.168.0.8:4000发至公网的所有请求都映射成同一个公网地址端口1.2.3.4:62000,只有当内部主机192.168.0.8先向外部主机地址端口6.7.8.9:8000发送一个数据报后,192.168.0.8才能收到6.7.8.9:8000发送到1.2.3.4:62000的数据报。

 对称NAT

  把所有来自相同内部IP地址和端口号,到特定目的IP地址和端口号的请求映射到相同的外部IP地址和端口。如果同一主机使用不同的源地址和端口对,发送的目的地址不同,则使用不同的映射。只有收到了一个IP包的外部主机才能够向该内部主机发送回一个UDP包。对称的NAT不保证所有会话中的(私有地址,私有端口)和(公开IP,公开端口)之间绑定的一致性。相反,它为每个新的会话分配一个新的端口号。


对称NAT是一个请求对应一个端口,非对称NAT是多个请求对应一个端口(象锥形,所以叫Cone NAT)。

1.3、检测NAT类型:

连接服务器为A,NAT检测服务器为B。

第一步:当一个接收客户端(Endpoint-Receiver ,简称 EP-R)需要接收文件信息时,在其向连接服务器发送文件请求的同时紧接着向检测服务器发送NAT检测请求。此处再次强调是“紧接着”,因为对于对称型NAT来说,这个操作可以直接算出其地址分配的增量(⊿p)。

第二步:当EP-R收到A或B的反馈信息时发现其外部地址与自身地址不同时就可以确定自己在NAT后面;否则,就是公网IP。

第三步:由服务器A向B发送其获得的EP-R的外部映射地址(IPa/Porta),服务器B获得后进行比较,如果端口不同,则说明这是对称型NAT,同时可以直接计算出其分配增量:

⊿p=Portb-Porta

第四步:如果端口号相同,则由B向EP-R的Porta发送连接请求,如果EP-R有响应,则说明EP-R没有IP和Port的限制,属于全ConeNAT类型。

第五步:如果没有响应,则由服务器B使用其新端口b’向EP-R的Portb端口发送连接请求,如果有响应,则说明EP-R只对IP限制,属于限制性ConeNAT类型;否则就是对IP和port都限制,属于端口限制性ConeNAT类型。    

通过上述五步基本可以全部检测出EP-R是否在公网,还是在某种NAT后面。


 1.4、NAT映射老化时间

这也是一项可选配置任务,可根据需要为NAT 地址映射表配置老化时间,以控制用户对NAT 配置的使用,确保内、外网的通信安全。

配置NAT 地址映射表项老化时间的方法也很简单,只须在系统视图下使用firewall-nat session { dns | ftp | ftp-data | http | icmp | tcp | tcp-proxy | udp | sip | sip-media | rtsp |rtsp-media }aging-time time-value 命令配置即可。参数 time-value的取值范围为1~65 535的整数秒。如果要配置多个会话表项的超时时间需要分别用本命令配置。

缺省情况下,各协议的老化时间为:DNS(120 s)、ftp(120 s)、ftp-data(120 s)、HTTP(120 s)、icmp(20 s)、tcp(600 s)、tcp-proxy(10 s)、udp(120 s)、sip(1 800 s)、sip-media ( 120 s )、rtsp ( 60 s )、rtsp-media ( 120 s ), 可用undo firewall-natsession { all | dns | ftp | ftp-data | http | icmp | tcp | tcp-proxy | udp | sip | sip-media | rtsp |rtsp-media } aging-time 命令恢复对应会话表项的超时时间为缺省值。


2、UDP打洞

2.1、p2p可实现的条件需要:

1、 中间服务器保存信息、并能发出建立UDP隧道的命令

2、 网关均要求为Cone NAT类型。Symmetric NAT不适合。

3、 完全圆锥型网关可以无需建立udp隧道,但这种情况非常少,要求双方均为这种类型网关的更少。

4、 假如X1网关为Symmetric NAT, Y1为Address Restricted Cone NAT 或Full Cone NAT型网关,各自建立隧道后,A1可通过X1发送数据报给Y1到B1(因为Y1最多只进行IP级别的甄别),但B2发送给X1的将会被丢弃(因为发送来的数据报中端口与X1上存在会话的端口不一致,虽然IP地址一致),所以同样没有什么意义。

5、 假如双方均为Symmetric NAT的情形,新开了端口,对方可以在不知道的情况下尝试猜解,也可以达到目的,但这种情形成功率很低,且带来额外的系统开支,不是个好的解决办法。

6、 不同网关型设置的差异在于,对内会采用替换IP的方式、使用不同端口不同会话的方式,使用相同端口不同会话的方式;对外会采用什么都不限制、限制IP地址、限制IP地址及端口。

7、 这里还没有考虑同一内网不同用户同时访问同一服务器的情形,如果此时网关采用AddressRestricted Cone NAT 或Full Cone NAT型,有可能导致不同用户客户端可收到别人的数据包,这显然是不合适的。


2.2、udp和tcp打洞

为什么网上讲到的P2P打洞基本上都是基于UDP协议的打洞?难道TCP不可能打洞?还是TCP打洞难于实现?
    假设现在有内网客户端A和内网客户端B,有公网服务端S。
    如果A和B想要进行UDP通信,则必须穿透双方的NAT路由。假设为NAT-A和NAT-B。
    
    A发送数据包到公网S,B发送数据包到公网S,则S分别得到了A和B的公网IP,
S也和A B 分别建立了会话,由S发到NAT-A的数据包会被NAT-A直接转发给A,
由S发到NAT-B的数据包会被NAT-B直接转发给B,除了S发出的数据包之外的则会被丢弃。
所以:现在A B 都能分别和S进行全双工通讯了,但是A B之间还不能直接通讯。

    解决办法是:A向B的公网IP发送一个数据包,则NAT-A能接收来自NAT-B的数据包
并转发给A了(即B现在能访问A了);再由S命令B向A的公网IP发送一个数据包,则
NAT-B能接收来自NAT-A的数据包并转发给B了(即A现在能访问B了)。

以上就是“打洞”的原理。


为了保证A的路由器有与B的session,A要定时与B做心跳包,同样,B也要定时与A做心跳,这样,双方的通信通道都是通的,就可以进行任意的通信了。


    但是TCP和UDP在打洞上却有点不同。这是因为伯克利socket(标准socket规范)的
API造成的。
    UDP的socket允许多个socket绑定到同一个本地端口,而TCP的socket则不允许。
    这是这样一个意思:A B要连接到S,肯定首先A B双方都会在本地创建一个socket,
去连接S上的socket。创建一个socket必然会绑定一个本地端口(就算应用程序里面没写
端口,实际上也是绑定了的,至少java确实如此),假设为8888,这样A和B才分别建立了到
S的通信信道。接下来就需要打洞了,打洞则需要A和B分别发送数据包到对方的公网IP。但是
问题就在这里:因为NAT设备是根据端口号来确定session,如果是UDP的socket,A B可以
分别再创建socket,然后将socket绑定到8888,这样打洞就成功了。但是如果是TCP的
socket,则不能再创建socket并绑定到8888了,这样打洞就无法成功。


UDP打洞的过程大致如此: 

1、双方都通过UDP与服务器通讯后,网关默认就是做了一个外网IP和端口号 与你内网IP与端口号的映射,这个无需设置的,服务器也不需要知道客户的真正内网IP 

2、用户A先通过服务器知道用户B的外网地址与端口  

3、用户A向用户B的外网地址与端口发送消息,  

4、在这一次发送中,用户B的网关会拒收这条消息,因为它的映射中并没有这条规则。  

5、但是用户A的网关就会增加了一条允许规则,允许接收从B发送过来的消息  

6、服务器要求用户B发送一个消息到用户A的外网IP与端口号  

7、用户B发送一条消息,这时用户A就可以接收到B的消息,而且网关B也增加了允许规则  

8、之后,由于网关A与网关B都增加了允许规则,所以A与B都可以向对方的外网IP和端口号发送消息。


TCP打洞技术:
tcp打洞也需要NAT设备支持才行。
tcp的打洞流程和udp的基本一样,但tcp的api决定了tcp打洞的实现过程和udp不一样。
tcp按cs方式工作,一个端口只能用来connect或listen,所以需要使用端口重用,才能利用本地nat的端口映射关系。(设置SO_REUSEADDR,在支持SO_REUSEPORT的系统上,要设置这两个参数。)

连接过程:(以udp打洞的第2种情况为例(典型情况))
nat后的两个peer,A和B,A和B都bind自己listen的端口,向对方发起连接(connect),即使用相同的端口同时连接和等待连接。因为A和B发出连接的顺序有时间差,假设A的syn包到达B的nat时,B的syn包还没有发出,那么B的nat映射还没有建立,会导致A的连接请求失败(连接失败或无法连接,如果nat返回RST或者icmp差错,api上可能表现为被RST;有些nat不返回信息直接丢弃syn包(反而更好)),(应用程序发现失败时,不能关闭socket,closesocket()可能会导致NAT删除端口映射;隔一段时间(1-2s)后未连接还要继续尝试);但后发B的syn包在到达A的nat时,由于A的nat已经建立的映射关系,B的syn包会通过A的nat,被nat转给A的listen端口,从而进去三次握手,完成tcp连接。

从应用程序角度看,连接成功的过程可能有两种不同表现:(以上述假设过程为例)
1、连接建立成功表现为A的connect返回成功。即A端以TCP的同时打开流程完成连接。
2、A端通过listen的端口完成和B的握手,而connect尝试持续失败,应用程序通过accept获取到连接,最终放弃connect(这时可closesocket(conn_fd))。
多数Linux和Windows的协议栈表现为第2种。

但有一个问题是,建立连接的client端,其connect绑定的端口号就是主机listen的端口号,或许这个peer后续还会有更多的这种socket。虽然理论上说,socket是一个五元组,端口号是一个逻辑数字,传输层能够因为五元组的不同而区分开这些socket,但是是否存在实际上的异常,还有待更多观察。


2.3、另外的问题

1、Windows XP SP2操作系统之前的主机,这些主机不能正确处理TCP同时开启,或者TCP套接字不支持SO_REUSEADDR的参数。需要让AB有序的发起连接才可能完成。

上述tcp连接过程,仅对NAT1、2、3有效,对NAT4(对称型)无效。
由于对称型nat通常采用规律的外部端口分配方法,对于nat4的打洞,可以采用端口预测的方式进行尝试。


2.4、一些常用技术

ALG(应用层网关):它可以是一个设备或插件,用于支持SIP协议,主要类似与在网关上专门开辟一个通道,用于建立内网与外网的连接,也就是说,这是一种定制的网关。更多只适用于使用他们的应用群体内部之间。

UpnP:它是让网关设备在进行工作时寻找一个全球共享的可路由IP来作为通道,这样避免端口造成的影响。要求设备支持且开启upnp功能,但大部分时候,这些功能处于安全考虑,是被关闭的。即时开启,实际应用效果还没经过测试。

STUN(Simple Traversalof UDP Through Network):这种方式即是类似于我们上面举例中服务器C的处理方式。也是目前普遍采用的方式。但具体实现要比我们描述的复杂许多,光是做网关Nat类型判断就由许多工作,RFC3489中详细描述了。

TURN(Traveral Using Relay NAT):该方式是将所有的数据交换都经由服务器来完成,这样NAT将没有障碍,但服务器的负载、丢包、延迟性就是很大的问题。目前很多游戏均采用该方式避开NAT的问题。这种方式不叫p2p。

ICE(Interactive Connectivity Establishment):是对上述各种技术的综合,但明显带来了复杂性。


参考与引用:

http://pennlee.blog.163.com/blog/static/5259930200752511814652/

https://www.zhihu.com/question/38729355/answer/86531260

http://blog.csdn.net/byxdaz/article/details/52785697

 http://book.51cto.com/art/201408/449058.htm

http://blog.csdn.net/weiyuefei/article/details/52247497


Spring Boot干货系列:(十)开发常用的热部署方式汇总 | 嘟嘟独立博客

$
0
0

前言

平时开发Sprig Boot的时候,经常改动个小小的地方就要重新启动项目,这无疑是一种很差的体验。在此,博主收集了3种热部署的方案供大家选择。

正文

目前博主用过的有三种:

  • Spring Loaded
  • spring-boot-devtools
  • JRebel插件

博主开发环境

  • 系统:win10
  • 开发工具:IDE:IntelliJ IDEA 2017.1
  • spring-boot版本:1.5.3RELEASE
  • JDK:1.8

Spring Loaded 实现热部署

Spring Loaded是一个用于在JVM运行时重新加载类文件更改的JVM代理,Spring Loaded允许你动态的新增/修改/删除某个方法/字段/构造方法,同样可以修改作用在类/方法/字段/构造方法上的注解.也可以新增/删除/改变枚举中的值。

spring-loaded是一个开源项目,项目地址: https://github.com/spring-projects/spring-loaded

Spring Loaded有两种方式实现,分别是Maven引入依赖方式或者添加启动参数方式

Maven依赖方式

1            
2
3
4
5
6
7
8
9
10
11
<plugin>            
<groupId>org.springframework.boot</groupId>
<artifactId>spring-boot-maven-plugin</artifactId>
<dependencies>
<dependency>
<groupId>org.springframework</groupId>
<artifactId>springloaded</artifactId>
<version>1.2.6.RELEASE</version>
</dependency>
</dependencies>
</plugin>

启动: mvn spring-boot:run
如果你也是IDEA的话,直接界面上双击运行即可,如下图

Paste_Image.png

注意:maven依赖的方式只适合spring-boot:run的启动方式,右键那种方式不行。

出现如下配置表实配置成功:

1            
[INFO] Attaching agents: [C:\Users\tengj\.m2\repository\org\springframework\springloaded\1.2.6.RELEASE\springloaded-1.2.6.RELEASE.jar]            

添加启动参数方式

这种方式是右键运行启动类
首先先下载对应的springloaded-1.2.6.RELEASE.jar,可以去上面提到的官网获取
博主这里直接引用maven依赖已经下载好的路径哈

然后打开下图所示的Edit Configurations配置,在VM options中输入:

1             
-javaagent:C:\Users\tengj\.m2\repository\org\springframework\springloaded\1.2.6.RELEASE\springloaded-1.2.6.RELEASE.jar -noverify             

Paste_Image.png

然后直接右键运行启动类即可启动项目。

上面2种方式小伙伴随便选择一种即可,当系统通过 mvn spring-boot:run启动或者 右键application debug启动Java文件时,系统会监视classes文件,当有classes文件被改动时,系统会重新加载类文件,不用重启启动服务。

注:IDEA下需要重新编译文件 Ctrl+Shift+F9或者编译项目 Ctrl+F9

如何测试热部署是否可用呢,你可以先写个简单的Controller方法,返回个字符串,然后启动项目,接着修改下这个方法返回的字符串,Ctrl+Shift+F9编译下当前类,然后再刷新下页面看看是否内容改变了。

在 Spring Boot,模板引擎的页面默认是开启缓存,如果修改页面内容,刷新页面是无法获取修改后的页面内容,所以,如果我们不需要模板引擎的缓存,可以进行关闭。

1             
2
3
spring.freemarker.cache=false             
spring.thymeleaf.cache=false
spring.velocity.cache=false

经过博主简单的测试,发现大多数情况可以使用热部署,有效的解决了文章头部中提到的那个痛点,不过还是有一些情况下需要重新启动,不可用的情况如下:
1:对于一些第三方框架的注解的修改,不能自动加载,比如:spring mvc的@RequestMapping
2:application.properties的修改也不行
3:log4j的配置文件的修改不能即时生效

spring-boot-devtools 实现热部署

spring-boot-devtools为应用提供一些开发时特性,包括默认值设置,自动重启,livereload等。

想要使用devtools热部署功能,maven添加依赖如下:

1             
2
3
4
5
6
7
<dependencies>             
<dependency>
<groupId>org.springframework.boot</groupId>
<artifactId>spring-boot-devtools</artifactId>
<optional>true</optional>
</dependency>
</dependencies>

将依赖关系标记为可选 <optional>true</optional>是一种最佳做法,可以防止使用项目将devtools传递性地应用于其他模块。

默认属性

在Spring Boot集成Thymeleaf时, spring.thymeleaf.cache属性设置为false可以禁用模板引擎编译的缓存结果。

现在,devtools会自动帮你做到这些,禁用所有模板的缓存,包括Thymeleaf, Freemarker, Groovy Templates, Velocity, Mustache等。

更多的属性,请参考 DevToolsPropertyDefaultsPostProcessor

自动重启

自动重启的原理在于spring boot使用两个classloader:不改变的类(如第三方jar)由base类加载器加载,正在开发的类由restart类加载器加载。应用重启时,restart类加载器被扔掉重建,而base类加载器不变,这种方法意味着应用程序重新启动通常比“冷启动”快得多,因为base类加载器已经可用并已填充。

所以,当我们开启devtools后,classpath中的文件变化会导致应用自动重启。
当然不同的IDE效果不一样,Eclipse中保存文件即可引起classpath更新(注:需要打开自动编译),从而触发重启。而IDEA则需要自己手动CTRL+F9重新编译一下(感觉IDEA这种更好,不然每修改一个地方就重启,好蛋疼)

排除静态资源文件

静态资源文件在改变之后有时候没必要触发应用程序重启,例如thymeleaf模板文件就可以实时编辑,默认情况下,更改/META-INF/maven, /META-INF/resources ,/resources ,/static ,/public 或/templates下的资源不会触发重启,而是触发live reload(devtools内嵌了一个LiveReload server,当资源发生改变时,浏览器刷新,下面会介绍)。

可以使用spring.devtools.restart.exclude属性配置,例如

1             
spring.devtools.restart.exclude=static/**,public/**             

如果想保留默认配置,同时增加新的配置,则可使用

1             
spring.devtools.restart.additional-exclude属性             

观察额外的路径

如果你想观察不在classpath中的路径的文件变化并触发重启,则可以配置 spring.devtools.restart.additional-paths 属性。

不在classpath内的path可以配置spring.devtools.restart.additionalpaths属性来增加到监视中,同时配置spring.devtools.restart.exclude可以选择这些path的变化是导致restart还是live reload。

关闭自动重启

设置 spring.devtools.restart.enabled 属性为false,可以关闭该特性。可以在application.properties中设置,也可以通过设置环境变量的方式。

1             
2
3
4
public static void main(String[] args) {             
System.setProperty("spring.devtools.restart.enabled", "false");
SpringApplication.run(MyApp.class, args);
}

使用一个触发文件

若不想每次修改都触发自动重启,可以设置spring.devtools.restart.trigger-file指向某个文件,只有更改这个文件时才触发自动重启。

自定义自动重启类加载器

默认时,IDE中打开的项目都会由restart加载器加载,jar文件由Base加载器加载,但是若你使用multi-module的项目,并且不是所有模块都被导入到IDE中,此时会导致加载器不一致。这时你可以创建META-INF/spring-devtools.properties文件,并增加restart.exclude.XXX,restart.include.XXX来配置哪些jar被restart加载,哪些被base加载。如:

1            
2
restart.include.companycommonlibs=/mycorp-common-[\\w-]+\.jar            
restart.include.projectcommon=/mycorp-myproj-[\\w-]+\.jar

LiveReload

DevTools内置了一个LiveReload服务,可以在资源变化时用来触发浏览器刷新。当然这个需要你浏览器安装了LiveReload插件,并且启动这个插件才行。很有意思,这里介绍下如何弄。

先去谷歌商店安装LiveReload插件,自己准备梯子。

Paste_Image.png

安装好在要自动刷新的页面点击下图中图标,启动应用后更新页面内容或者css等都会触发页面自动刷新了。如下图,圈中的就是,点一下会变黑就是启动了。

Paste_Image.png

最后展示效果,修改完html页面后,Ctrl+Shift+F9,没有重启,页面也会自动刷新了,太有趣了。

livereload.gif

如果您不想在应用程序运行时启动LiveReload服务器,则可以将spring.devtools.livereload.enabled属性设置为false。

一次只能运行一个LiveReload服务器。开始应用程序之前,请确保没有其他LiveReload服务器正在运行。
如果你的IDE启动多个应用程序,则只有第一个应用程序将支持LiveReload。

JRebel插件方式

在IDEA中打开插件管理界面,按照下面的提示先安装上

Paste_Image.png

安装完插件后,需要去获取正版的激活码,这个可以直接去官网 https://my.jrebel.com获取(需自备梯子)

1:通过fackbook登录,没有就去注册一个

image

2:填写一些资料后(资料必须填写完整,否则JRebel激活不了),复制激活码即可

image

3:重启IDEA后,在IDEA的Settings中找到JRebel输入复制的激活码即可

Paste_Image.png

出现绿色,即表示激活成功了。
Paste_Image.png
4: 接着就如下所示,勾中JRebel方式后启动即可,即可享受JRebel带来的超爽体验

Paste_Image.png

总结

以上就是平时Spring Boot开发中常用的热部署方式,小伙伴可以自己试试喜欢哪种就用哪种。

订阅博主微信公众号:嘟爷java超神学堂(javaLearn)三大好处:

  • 获取最新博主博客更新信息,首发公众号
  • 获取大量教程视频分享(Spring Boot,Spring Cloud)
  • 大量电子书,破解软件分享

博主最近发起了《嘟爷电子书互惠组》计划,里面包含了《精通Spring4.X企业应用开发实战》、《MyBatis从入门到精通__刘增辉》相关书籍在内的至少272本Java相关的电子书,也有博主花钱买的电子书。可谓新手必备之物,详情可前往书单末尾查看: Java后端2018书单推荐

EntityFramework DbContext 线程安全 - 田园里的蟋蟀 - 博客园

$
0
0

先看这一段异常信息:

A second operation started on this context before a previous asynchronous operation completed. Use 'await' to ensure that any asynchronous operations have completed before calling another method on this context. Any instance members are not guaranteed to be thread safe.

不要被提示信息中的 Use 'await' 所迷惑,如果你仔细查看下代码,发现并没有什么问题,上面这段异常信息,是我们在 async/await 操作的时候经常遇到的,什么意思呢?我们分解下:

  • A second operation started on this context before a previous asynchronous operation completed. :在这个上下文,第二个操作开始于上一个异步操作完成之前。可能有点绕,简单说就是,在同一个上下文,一个异步操作还没完成,另一个操作就开始了。
  • Use 'await' to ensure that any asynchronous operations have completed before calling another method on this context. :在这个上下文,使用 await 来确保所有的异步操作完成于另一个方法调用之前。
  • Any instance members are not guaranteed to be thread safe.:所有实例成员都不能保证是线程安全的。

什么是线程安全呢?

  • 线程安全,指某个函数、函数库在多线程环境中被调用时,能够正确地处理各个线程的局部变量,使程序功能正确完成。(来自维基百科)

DbContext 是不是线程安全的呢?

  • The context is not thread safe. You can still create a multithreaded application as long as an instance of the same entity classis not trackedby multiple contexts at the same time.(来自 MSDN)

我们来解析这段话,首先,DbContext 不是线程安全的,也就是说,你在当前线程中,只能创建一个 DbContext 实例对象(特定情况下),并且这个对象并不能被共享,后面那句话是什么意思呢?注意其中的关键字,不被追踪的实体类,在同一时刻的多线程应用程序中,可以被多个上下文创建,不被追踪是什么意思呢?可以理解为不被修改的实体,通过这段代码获取: context.Entry(entity).State

我们知道 DbContext 就像一个大的数据容器,通过它,我们可以很方便的进行数据查询和修改,在之前的 一篇博文中,有一段 EF DbContext SaveChanges 的源码:

[DebuggerStepThrough]
public virtual int SaveChanges(bool acceptAllChangesOnSuccess)
{
    var entriesToSave = Entries
        .Where(e => e.EntityState == EntityState.Added
                    || e.EntityState == EntityState.Modified
                    || e.EntityState == EntityState.Deleted)
        .Select(e => e.PrepareToSave())
        .ToList();
    if (!entriesToSave.Any())
    {
        return 0;
    }
    try
    {
        var result = SaveChanges(entriesToSave);
        if (acceptAllChangesOnSuccess)
        {
            AcceptAllChanges(entriesToSave);
        }
        return result;
    }
    catch
    {
        foreach (var entry in entriesToSave)
        {
            entry.AutoRollbackSidecars();
        }
        throw;
    }
}

在 DbContext 执行 AcceptAllChanges 之前,会检测实体状态的改变,所以,SaveChanges 会和当前上下文一一对应,如果是同步方法,所有的操作都是等待,这是没有什么问题的,但试想一下,如果是异步多线程,当一个线程创建 DbContext 对象,然后进行一些实体状态修改,在还没有 AcceptAllChanges 执行之前,另一个线程也进行了同样的操作,虽然第一个线程可以 SaveChanges 成功,但是第二个线程肯定会报错,因为实体状态已经被另外一个线程中的 DbContext 应用了。

在多线程调用时,能够正确地处理各个线程的局部变量,使程序功能正确完成,这是线程安全,但显然 DbContext 并不能保证它一定能正确完成,所以它不是线程安全,MSDN 中的说法:Any public static members of this type are thread safe. Any instance members are not guaranteed to be thread safe.

下面我们做一个测试,测试代码:

using (var context = new TestDbContext2())
{
    var clients = await context.Clients.ToListAsync();
    var servers = await context.Servers.ToListAsync();
}

上面代码是我们常写的,一个 DbContext 下可能有很多的操作,测试结果也没什么问题,我们接着再修改下代码:

using (var context = new TestDbContext2())
{
    var clients = context.Clients.ToListAsync();
    var servers = context.Servers.ToListAsync();
    await Task.WhenAll(clients, servers);
}

Task.WhenAll 的意思是将所有等待的异步操作同时执行,执行后你会发现,会时不时的报一开始的那个错误,为什么这样会报错?并且还是时不时的呢?我们先分析下上面两段代码,有什么不同,其实都是异步,只是下面的同时执行异步方法,但并不是绝对同时,所以会时不时的报错,根据一开始对 DbContext 的分析,和上面的测试,我们就明白了:同一时刻,一个上下文只能执行一个异步方法,第一种写法其实也会报错的,但几率非常非常小,可以忽略不计,第二种写法我们只是把这种几率提高了,但也并不是绝对。

还有一种情况是,如果项目比较复杂,我们会一般会设计基于 DbContext 的 UnitOfWork,然后在项目开始的时候,进行 IoC 注入映射类型,比如下面这段代码:

UnityContainer container = new UnityContainer();
container.RegisterType<IUnitOfWork, UnitOfWork>(new PerResolveLifetimeManager());

除了映射类型之外,我们还会对 UnitOfWork 对象的生命周期进行管理,PerResolveLifetimeManager 的意思是每次请求进行解析对象,也就是说每次请求下,UnitOfWork 是唯一的,只是针对当前请求,为什么要这样设计?一方面为了共享 IUnitOfWork 对象的注入,比如 Application 中会对多个 Repository 进行操作,但现在我觉得,还有一个好处是减少线程安全错误几率的出现,因为之前说过,多线程情况下,一个线程创建 DbContext,然后进行修改实体状态,在应用更改之前,另一个线程同时创建了 DbContext,并也修改了实体状态,这时候,第一个线程创建的 DbContext 应用更改了,第二个线程创建的 DbContext 应用更改就会报错,所以,一个解决方法就是,减少 DbContext 的创建,比如,上面一个请求只创建一个 DbContext。

因为 DbContext 不是线程安全的,所以我们在多线程应用程序运用它的时候,要注意下面两点:

  • 同一时刻,一个上下文只能执行一个异步方法。
  • 实体状态改变,对应一个上下文,不能跨上下文修改实体状态,也不能跨上下文应用实体状态。

异步下使用 DbContext,我个人觉得,不管代码怎么写,还是会报线程安全的错误,只不过这种几率会很小很小,可能应用程序运行了几年,也不会出现一次错误,但出错几率会随着垃圾代码和高并发,慢慢会提高上来。

参考资料:

Joint Face Detection and Alignment using Multi-task Cascaded Convolutional Neural Networks | 邹进屹的博客

$
0
0

MTCNN

MTCNN算法由3个网络构成,分别是PNet,RNet以及ONet组成,其中PNet输出人脸位置和是人脸的概率,并且PNet是一个全卷积网络,在图像金字塔上不同尺度获得feature map每个pixel对应的人脸位置编码和人脸概率,然后通过阈值和NMS获得ROI人脸区域.第二个网络叫RNet主要对第一个网络获得的ROI区域进行refine,将第一个网络获得的所有ROI resize到24*24,重新分类获得所有ROI区域的人脸区域坐标和是人脸的概率。第三个网络叫ONet,对第二个CNN获得的人脸区域进行再次训练获得是否是人脸,人脸坐标以及五个特征点。

算法框架

1

2

测试图片

3

测试结果

4

以下项目时MTCNN的具体代码实现

项目地址:https://github.com/pangyupo/mxnet_mtcnn_face_detection

# coding: utf-8

# main.py

import mxnet as mx
from mtcnn_detector import MtcnnDetector
import cv2
import os
import time

detector = MtcnnDetector(model_folder='model', ctx=mx.cpu(0), num_worker = 4 , accurate_landmark = False)


img = cv2.imread('test.jpg')

for i in range(4):
    t1 = time.time()
    results = detector.detect_face(img)
    print 'time: ',time.time() - t1

if results is not None:

    total_boxes = results[0]
    points = results[1]

    draw = img.copy()
    for b in total_boxes:
        cv2.rectangle(draw, (int(b[0]), int(b[1])), (int(b[2]), int(b[3])), (100, 255, 0))

    for p in points:
        for i in range(5):
            cv2.circle(draw, (p[i], p[i + 5]), 1, (0, 0, 255), 2)

    cv2.imshow("detection result", draw)
    cv2.waitKey(0)
    path = os.path.join('resutl'+'.jpg')
    cv2.imwrite(path,draw)

# --------------
# test on camera
# --------------
'''
camera = cv2.VideoCapture(0)
while True:
    grab, frame = camera.read()
    img = cv2.resize(frame, (320,180))

    t1 = time.time()
    results = detector.detect_face(img)
    print 'time: ',time.time() - t1

    if results is None:
        continue

    total_boxes = results[0]
    points = results[1]

    draw = img.copy()
    for b in total_boxes:
        cv2.rectangle(draw, (int(b[0]), int(b[1])), (int(b[2]), int(b[3])), (255, 255, 255))

    for p in points:
        for i in range(5):
            cv2.circle(draw, (p[i], p[i + 5]), 1, (255, 0, 0), 2)
    cv2.imshow("detection result", draw)
    cv2.waitKey(30)'''
# coding: utf-8
# mtcnn_detector.py
import os
import mxnet as mx
import numpy as np
import math
import cv2
from multiprocessing import Pool
from itertools import repeat
from itertools import izip
from helper import nms, adjust_input, generate_bbox, detect_first_stage_warpper

class MtcnnDetector(object):
    """
        Joint Face Detection and Alignment using Multi-task Cascaded Convolutional Neural Networks
        see https://github.com/kpzhang93/MTCNN_face_detection_alignment
        this is a mxnet version"""
    def __init__(self,
                 model_folder='.',
                 minsize = 20,
                 threshold = [0.6, 0.7, 0.7],
                 factor = 0.709,
                 num_worker = 1,
                 accurate_landmark = False,
                 ctx=mx.gpu()):"""
            Initialize the detector

            Parameters:
            ----------
                model_folder : string
                    path for the models
                minsize : float number
                    minimal face to detect
                threshold : float number
                    detect threshold for 3 stages
                factor: float number
                    scale factor for image pyramid
                num_worker: int number
                    number of processes we use for first stage
                accurate_landmark: bool
                    use accurate landmark localization or not

       """
        self.num_worker = num_worker
        self.accurate_landmark = accurate_landmark

        # load 4 models from folder
        models = ['det1', 'det2', 'det3','det4']
        models = [ os.path.join(model_folder, f) for f in models]
        self.PNets = []
        for i in range(num_worker):
            workner_net = mx.model.FeedForward.load(models[0], 1, ctx=ctx)
            self.PNets.append(workner_net)

        self.Pool = Pool(num_worker)

        self.RNet = mx.model.FeedForward.load(models[1], 1, ctx=ctx)
        self.ONet = mx.model.FeedForward.load(models[2], 1, ctx=ctx)
        self.LNet = mx.model.FeedForward.load(models[3], 1, ctx=ctx)

        self.minsize   = float(minsize)
        self.factor    = float(factor)
        self.threshold = threshold


    def convert_to_square(self, bbox):
        """
            convert bbox to square

        Parameters:
        ----------
            bbox: numpy array , shape n x 5
                input bbox

        Returns:
        -------
            square bbox
        """
        square_bbox = bbox.copy()

        h = bbox[:, 3] - bbox[:, 1] + 1
        w = bbox[:, 2] - bbox[:, 0] + 1
        max_side = np.maximum(h,w)
        square_bbox[:, 0] = bbox[:, 0] + w*0.5 - max_side*0.5
        square_bbox[:, 1] = bbox[:, 1] + h*0.5 - max_side*0.5
        square_bbox[:, 2] = square_bbox[:, 0] + max_side - 1
        square_bbox[:, 3] = square_bbox[:, 1] + max_side - 1
        return square_bbox

    def calibrate_box(self, bbox, reg):
        """
            calibrate bboxes

        Parameters:
        ----------
            bbox: numpy array, shape n x 5
                input bboxes
            reg:  numpy array, shape n x 4
                bboxex adjustment

        Returns:
        -------
            bboxes after refinement

        """
        w = bbox[:, 2] - bbox[:, 0] + 1
        w = np.expand_dims(w, 1)
        h = bbox[:, 3] - bbox[:, 1] + 1
        h = np.expand_dims(h, 1)
        reg_m = np.hstack([w, h, w, h])
        aug = reg_m * reg
        bbox[:, 0:4] = bbox[:, 0:4] + aug
        return bbox

 
    def pad(self, bboxes, w, h):
        """
            pad the the bboxes, alse restrict the size of it

        Parameters:
        ----------
            bboxes: numpy array, n x 5
                input bboxes
            w: float number
                width of the input image
            h: float number
                height of the input image
        Returns :
        ------s
            dy, dx : numpy array, n x 1
                start point of the bbox in target image
            edy, edx : numpy array, n x 1
                end point of the bbox in target image
            y, x : numpy array, n x 1
                start point of the bbox in original image
            ex, ex : numpy array, n x 1
                end point of the bbox in original image
            tmph, tmpw: numpy array, n x 1
                height and width of the bbox

        """
        tmpw, tmph = bboxes[:, 2] - bboxes[:, 0] + 1,  bboxes[:, 3] - bboxes[:, 1] + 1
        num_box = bboxes.shape[0]

        dx , dy= np.zeros((num_box, )), np.zeros((num_box, ))
        edx, edy  = tmpw.copy()-1, tmph.copy()-1

        x, y, ex, ey = bboxes[:, 0], bboxes[:, 1], bboxes[:, 2], bboxes[:, 3]

        tmp_index = np.where(ex > w-1)
        edx[tmp_index] = tmpw[tmp_index] + w - 2 - ex[tmp_index]
        ex[tmp_index] = w - 1

        tmp_index = np.where(ey > h-1)
        edy[tmp_index] = tmph[tmp_index] + h - 2 - ey[tmp_index]
        ey[tmp_index] = h - 1

        tmp_index = np.where(x < 0)
        dx[tmp_index] = 0 - x[tmp_index]
        x[tmp_index] = 0

        tmp_index = np.where(y < 0)
        dy[tmp_index] = 0 - y[tmp_index]
        y[tmp_index] = 0

        return_list = [dy, edy, dx, edx, y, ey, x, ex, tmpw, tmph]
        return_list = [item.astype(np.int32) for item in return_list]

        return  return_list

    def slice_index(self, number):
        """
            slice the index into (n,n,m), m < n
        Parameters:
        ----------
            number: int number
                number"""
        def chunks(l, n):"""Yield successive n-sized chunks from l."""
            for i in range(0, len(l), n):
                yield l[i:i + n]
        num_list = range(number)
        return list(chunks(num_list, self.num_worker))

    def detect_face(self, img):
        """
            detect face over img
        Parameters:
        ----------
            img: numpy array, bgr order of shape (1, 3, n, m)
                input image
        Retures:
        -------
            bboxes: numpy array, n x 5 (x1,y2,x2,y2,score)
                bboxes
            points: numpy array, n x 10 (x1, x2 ... x5, y1, y2 ..y5)
                landmarks"""

        # check input
        MIN_DET_SIZE = 12

        if img is None:
            return None

        # only works for color image
        if len(img.shape) != 3:
            return None

        # detected boxes
        total_boxes = []

        height, width, _ = img.shape
        minl = min( height, width)

        # get all the valid scales
        scales = []
        m = MIN_DET_SIZE/self.minsize
        minl *= m
        factor_count = 0
        while minl > MIN_DET_SIZE:
            scales.append(m*self.factor**factor_count)
            minl *= self.factor
            factor_count += 1

        #############################################
        # first stage
        #############################################
        #for scale in scales:
        #    return_boxes = self.detect_first_stage(img, scale, 0)
        #    if return_boxes is not None:
        #        total_boxes.append(return_boxes)
        
        sliced_index = self.slice_index(len(scales))
        total_boxes = []
        for batch in sliced_index:
            local_boxes = self.Pool.map( detect_first_stage_warpper, \
                    izip(repeat(img), self.PNets[:len(batch)], [scales[i] for i in batch], repeat(self.threshold[0])) )
            total_boxes.extend(local_boxes)
        
        # remove the Nones 
        total_boxes = [ i for i in total_boxes if i is not None]

        if len(total_boxes) == 0:
            return None
        
        total_boxes = np.vstack(total_boxes)

        if total_boxes.size == 0:
            return None

        # merge the detection from first stage
        pick = nms(total_boxes[:, 0:5], 0.7, 'Union')
        total_boxes = total_boxes[pick]

        bbw = total_boxes[:, 2] - total_boxes[:, 0] + 1
        bbh = total_boxes[:, 3] - total_boxes[:, 1] + 1

        # refine the bboxes
        total_boxes = np.vstack([total_boxes[:, 0]+total_boxes[:, 5] * bbw,
                                 total_boxes[:, 1]+total_boxes[:, 6] * bbh,
                                 total_boxes[:, 2]+total_boxes[:, 7] * bbw,
                                 total_boxes[:, 3]+total_boxes[:, 8] * bbh,
                                 total_boxes[:, 4]
                                 ])

        total_boxes = total_boxes.T
        total_boxes = self.convert_to_square(total_boxes)
        total_boxes[:, 0:4] = np.round(total_boxes[:, 0:4])

        #############################################
        # second stage
        #############################################
        num_box = total_boxes.shape[0]

        # pad the bbox
        [dy, edy, dx, edx, y, ey, x, ex, tmpw, tmph] = self.pad(total_boxes, width, height)
        # (3, 24, 24) is the input shape for RNet
        input_buf = np.zeros((num_box, 3, 24, 24), dtype=np.float32)

        for i in range(num_box):
            tmp = np.zeros((tmph[i], tmpw[i], 3), dtype=np.uint8)
            tmp[dy[i]:edy[i]+1, dx[i]:edx[i]+1, :] = img[y[i]:ey[i]+1, x[i]:ex[i]+1, :]
            input_buf[i, :, :, :] = adjust_input(cv2.resize(tmp, (24, 24)))

        output = self.RNet.predict(input_buf)

        # filter the total_boxes with threshold
        passed = np.where(output[1][:, 1] > self.threshold[1])
        total_boxes = total_boxes[passed]

        if total_boxes.size == 0:
            return None

        total_boxes[:, 4] = output[1][passed, 1].reshape((-1,))
        reg = output[0][passed]

        # nms
        pick = nms(total_boxes, 0.7, 'Union')
        total_boxes = total_boxes[pick]
        total_boxes = self.calibrate_box(total_boxes, reg[pick])
        total_boxes = self.convert_to_square(total_boxes)
        total_boxes[:, 0:4] = np.round(total_boxes[:, 0:4])

        #############################################
        # third stage
        #############################################
        num_box = total_boxes.shape[0]

        # pad the bbox
        [dy, edy, dx, edx, y, ey, x, ex, tmpw, tmph] = self.pad(total_boxes, width, height)
        # (3, 48, 48) is the input shape for ONet
        input_buf = np.zeros((num_box, 3, 48, 48), dtype=np.float32)

        for i in range(num_box):
            tmp = np.zeros((tmph[i], tmpw[i], 3), dtype=np.float32)
            tmp[dy[i]:edy[i]+1, dx[i]:edx[i]+1, :] = img[y[i]:ey[i]+1, x[i]:ex[i]+1, :]
            input_buf[i, :, :, :] = adjust_input(cv2.resize(tmp, (48, 48)))

        output = self.ONet.predict(input_buf)

        # filter the total_boxes with threshold
        passed = np.where(output[2][:, 1] > self.threshold[2])
        total_boxes = total_boxes[passed]

        if total_boxes.size == 0:
            return None

        total_boxes[:, 4] = output[2][passed, 1].reshape((-1,))
        reg = output[1][passed]
        points = output[0][passed]

        # compute landmark points
        bbw = total_boxes[:, 2] - total_boxes[:, 0] + 1
        bbh = total_boxes[:, 3] - total_boxes[:, 1] + 1
        points[:, 0:5] = np.expand_dims(total_boxes[:, 0], 1) + np.expand_dims(bbw, 1) * points[:, 0:5]
        points[:, 5:10] = np.expand_dims(total_boxes[:, 1], 1) + np.expand_dims(bbh, 1) * points[:, 5:10]

        # nms
        total_boxes = self.calibrate_box(total_boxes, reg)
        pick = nms(total_boxes, 0.7, 'Min')
        total_boxes = total_boxes[pick]
        points = points[pick]
        if not self.accurate_landmark:
            return total_boxes, points

        #############################################
        # extended stage
        #############################################
        num_box = total_boxes.shape[0]
        patchw = np.maximum(total_boxes[:, 2]-total_boxes[:, 0]+1, total_boxes[:, 3]-total_boxes[:, 1]+1)
        patchw = np.round(patchw*0.25)

        # make it even
        patchw[np.where(np.mod(patchw,2) == 1)] += 1

        input_buf = np.zeros((num_box, 15, 24, 24), dtype=np.float32)
        for i in range(5):
            x, y = points[:, i], points[:, i+5]
            x, y = np.round(x-0.5*patchw), np.round(y-0.5*patchw)
            [dy, edy, dx, edx, y, ey, x, ex, tmpw, tmph] = self.pad(np.vstack([x, y, x+patchw-1, y+patchw-1]).T,
                                                                    width,
                                                                    height)
            for j in range(num_box):
                tmpim = np.zeros((tmpw[j], tmpw[j], 3), dtype=np.float32)
                tmpim[dy[j]:edy[j]+1, dx[j]:edx[j]+1, :] = img[y[j]:ey[j]+1, x[j]:ex[j]+1, :]
                input_buf[j, i*3:i*3+3, :, :] = adjust_input(cv2.resize(tmpim, (24, 24)))

        output = self.LNet.predict(input_buf)

        pointx = np.zeros((num_box, 5))
        pointy = np.zeros((num_box, 5))

        for k in range(5):
            # do not make a large movement
            tmp_index = np.where(np.abs(output[k]-0.5) > 0.35)
            output[k][tmp_index[0]] = 0.5

            pointx[:, k] = np.round(points[:, k] - 0.5*patchw) + output[k][:, 0]*patchw
            pointy[:, k] = np.round(points[:, k+5] - 0.5*patchw) + output[k][:, 1]*patchw

        points = np.hstack([pointx, pointy])
        points = points.astype(np.int32)

        return total_boxes, points
# coding: utf-8
# helper.py
import math
import cv2
import numpy as np


def nms(boxes, overlap_threshold, mode='Union'):"""
        non max suppression

    Parameters:
    ----------
        box: numpy array n x 5
            input bbox array
        overlap_threshold: float number
            threshold of overlap
        mode: float number
            how to compute overlap ratio, 'Union' or 'Min'
    Returns:
    -------
        index array of the selected bbox"""
    # if there are no boxes, return an empty list
    if len(boxes) == 0:
        return []

    # if the bounding boxes integers, convert them to floats
    if boxes.dtype.kind == "i":
        boxes = boxes.astype("float")

    # initialize the list of picked indexes
    pick = []

    # grab the coordinates of the bounding boxes
    x1, y1, x2, y2, score = [boxes[:, i] for i in range(5)]

    area = (x2 - x1 + 1) * (y2 - y1 + 1)
    idxs = np.argsort(score)

    # keep looping while some indexes still remain in the indexes list
    while len(idxs) > 0:
        # grab the last index in the indexes list and add the index value to the list of picked indexes
        last = len(idxs) - 1
        i = idxs[last]
        pick.append(i)

        xx1 = np.maximum(x1[i], x1[idxs[:last]])
        yy1 = np.maximum(y1[i], y1[idxs[:last]])
        xx2 = np.minimum(x2[i], x2[idxs[:last]])
        yy2 = np.minimum(y2[i], y2[idxs[:last]])

        # compute the width and height of the bounding box
        w = np.maximum(0, xx2 - xx1 + 1)
        h = np.maximum(0, yy2 - yy1 + 1)

        inter = w * h
        if mode == 'Min':
            overlap = inter / np.minimum(area[i], area[idxs[:last]])
        else:
            overlap = inter / (area[i] + area[idxs[:last]] - inter)

        # delete all indexes from the index list that have
        idxs = np.delete(idxs, np.concatenate(([last],
                                               np.where(overlap > overlap_threshold)[0])))

    return pick

def adjust_input(in_data):
    """
        adjust the input from (h, w, c) to ( 1, c, h, w) for network input

    Parameters:
    ----------
        in_data: numpy array of shape (h, w, c)
            input data
    Returns:
    -------
        out_data: numpy array of shape (1, c, h, w)
            reshaped array
    """
    if in_data.dtype is not np.dtype('float32'):
        out_data = in_data.astype(np.float32)
    else:
        out_data = in_data

    out_data = out_data.transpose((2,0,1))
    out_data = np.expand_dims(out_data, 0)
    out_data = (out_data - 127.5)*0.0078125
    return out_data

def generate_bbox(map, reg, scale, threshold):
     """
         generate bbox from feature map
     Parameters:
     ----------
         map: numpy array , n x m x 1
             detect score for each position
         reg: numpy array , n x m x 4
             bbox
         scale: float number
             scale of this detection
         threshold: float number
             detect threshold
     Returns:
     -------
         bbox array"""
     stride = 2
     cellsize = 12

     t_index = np.where(map>threshold)

     # find nothing
     if t_index[0].size == 0:
         return np.array([])

     dx1, dy1, dx2, dy2 = [reg[0, i, t_index[0], t_index[1]] for i in range(4)]

     reg = np.array([dx1, dy1, dx2, dy2])
     score = map[t_index[0], t_index[1]]
     boundingbox = np.vstack([np.round((stride*t_index[1]+1)/scale),
                              np.round((stride*t_index[0]+1)/scale),
                              np.round((stride*t_index[1]+1+cellsize)/scale),
                              np.round((stride*t_index[0]+1+cellsize)/scale),
                              score,
                              reg])

     return boundingbox.T


def detect_first_stage(img, net, scale, threshold):
    """
        run PNet for first stage
    Parameters:
    ----------
        img: numpy array, bgr order
            input image
        scale: float number
            how much should the input image scale
        net: PNet
            worker
    Returns:
    -------
        total_boxes : bboxes"""
    height, width, _ = img.shape
    hs = int(math.ceil(height * scale))
    ws = int(math.ceil(width * scale))
    im_data = cv2.resize(img, (ws,hs))
    # adjust for the network input
    input_buf = adjust_input(im_data)
    output = net.predict(input_buf)
    boxes = generate_bbox(output[1][0,1,:,:], output[0], scale, threshold)

    if boxes.size == 0:
        return None

    # nms
    pick = nms(boxes[:,0:5], 0.5, mode='Union')
    boxes = boxes[pick]
    return boxes

def detect_first_stage_warpper( args ):
    return detect_first_stage(*args)

caffe的实现版本

_init_paths.py

import os.path as osp
import sys

def add_path(path):
    if path not in sys.path:
        sys.path.insert(0, path)

caffe_path = '/home/zou/caffe'

# Add caffe to PYTHONPATH
caffe_path = osp.join(caffe_path, 'python')
add_path(caffe_path)

demo.py

#!/usr/bin/env python
# -*- coding: utf-8 -*-

import _init_paths
import caffe
import cv2
import numpy as np

def bbreg(boundingbox, reg):
    reg = reg.T 
    
    # calibrate bouding boxes
    if reg.shape[1] == 1:
        pass # reshape of reg
    w = boundingbox[:,2] - boundingbox[:,0] + 1
    h = boundingbox[:,3] - boundingbox[:,1] + 1

    bb0 = boundingbox[:,0] + reg[:,0]*w
    bb1 = boundingbox[:,1] + reg[:,1]*h
    bb2 = boundingbox[:,2] + reg[:,2]*w
    bb3 = boundingbox[:,3] + reg[:,3]*h
    
    boundingbox[:,0:4] = np.array([bb0, bb1, bb2, bb3]).T
    #print "bb", boundingbox
    return boundingbox


def pad(boxesA, w, h):
    boxes = boxesA.copy() # shit, value parameter!!!
    
    tmph = boxes[:,3] - boxes[:,1] + 1
    tmpw = boxes[:,2] - boxes[:,0] + 1
    numbox = boxes.shape[0]

    dx = np.ones(numbox)
    dy = np.ones(numbox)
    edx = tmpw 
    edy = tmph

    x = boxes[:,0:1][:,0]
    y = boxes[:,1:2][:,0]
    ex = boxes[:,2:3][:,0]
    ey = boxes[:,3:4][:,0]
   
   
    tmp = np.where(ex > w)[0]
    if tmp.shape[0] != 0:
        edx[tmp] = -ex[tmp] + w-1 + tmpw[tmp]
        ex[tmp] = w-1

    tmp = np.where(ey > h)[0]
    if tmp.shape[0] != 0:
        edy[tmp] = -ey[tmp] + h-1 + tmph[tmp]
        ey[tmp] = h-1

    tmp = np.where(x < 1)[0]
    if tmp.shape[0] != 0:
        dx[tmp] = 2 - x[tmp]
        x[tmp] = np.ones_like(x[tmp])

    tmp = np.where(y < 1)[0]
    if tmp.shape[0] != 0:
        dy[tmp] = 2 - y[tmp]
        y[tmp] = np.ones_like(y[tmp])
    # for python index from 0, while matlab from 1
    dy = np.maximum(0, dy-1)
    dx = np.maximum(0, dx-1)
    y = np.maximum(0, y-1)
    x = np.maximum(0, x-1)
    edy = np.maximum(0, edy-1)
    edx = np.maximum(0, edx-1)
    ey = np.maximum(0, ey-1)
    ex = np.maximum(0, ex-1)

    #print 'boxes', boxes
    return [dy, edy, dx, edx, y, ey, x, ex, tmpw, tmph]


def rerec(bboxA):
    # convert bboxA to square
    w = bboxA[:,2] - bboxA[:,0]
    h = bboxA[:,3] - bboxA[:,1]
    l = np.maximum(w,h).T

    bboxA[:,0] = bboxA[:,0] + w*0.5 - l*0.5
    bboxA[:,1] = bboxA[:,1] + h*0.5 - l*0.5 
    bboxA[:,2:4] = bboxA[:,0:2] + np.repeat([l], 2, axis = 0).T 
    return bboxA


def nms(boxes, threshold, type):
    """nms
    :boxes: [:,0:5]
    :threshold: 0.5 like
    :type: 'Min' or others
    :returns: TODO"""
    if boxes.shape[0] == 0:
        return np.array([])
    x1 = boxes[:,0]
    y1 = boxes[:,1]
    x2 = boxes[:,2]
    y2 = boxes[:,3]
    s = boxes[:,4]
    area = np.multiply(x2-x1+1, y2-y1+1)
    I = np.array(s.argsort()) # read s using I
    pick = [];
    while len(I) > 0:
        xx1 = np.maximum(x1[I[-1]], x1[I[0:-1]])
        yy1 = np.maximum(y1[I[-1]], y1[I[0:-1]])
        xx2 = np.minimum(x2[I[-1]], x2[I[0:-1]])
        yy2 = np.minimum(y2[I[-1]], y2[I[0:-1]])
        w = np.maximum(0.0, xx2 - xx1 + 1)
        h = np.maximum(0.0, yy2 - yy1 + 1)
        inter = w * h
        if type == 'Min':
            o = inter / np.minimum(area[I[-1]], area[I[0:-1]])
        else:
            o = inter / (area[I[-1]] + area[I[0:-1]] - inter)
        pick.append(I[-1])
        I = I[np.where( o <= threshold)[0]]
    return pick


def generateBoundingBox(map, reg, scale, t):
    stride = 2
    cellsize = 12
    map = map.T
    dx1 = reg[0,:,:].T
    dy1 = reg[1,:,:].T
    dx2 = reg[2,:,:].T
    dy2 = reg[3,:,:].T
    (x, y) = np.where(map >= t)

    yy = y
    xx = x
    
    '''
    if y.shape[0] == 1: # only one point exceed threshold
        y = y.T
        x = x.T
        score = map[x,y].T
        dx1 = dx1.T
        dy1 = dy1.T
        dx2 = dx2.T
        dy2 = dy2.T
        # a little stange, when there is only one bb created by PNet
        #print "1: x,y", x,y
        a = (x*map.shape[1]) + (y+1)
        x = a/map.shape[0]
        y = a%map.shape[0] - 1
        #print "2: x,y", x,y
    else:
        score = map[x,y]'''

    score = map[x,y]
    reg = np.array([dx1[x,y], dy1[x,y], dx2[x,y], dy2[x,y]])

    if reg.shape[0] == 0:
        pass
    boundingbox = np.array([yy, xx]).T

    bb1 = np.fix((stride * (boundingbox) + 1) / scale).T # matlab index from 1, so with "boundingbox-1"
    bb2 = np.fix((stride * (boundingbox) + cellsize - 1 + 1) / scale).T # while python don't have to
    score = np.array([score])

    boundingbox_out = np.concatenate((bb1, bb2, score, reg), axis=0)

    return boundingbox_out.T


def drawBoxes(im, boxes):
    x1 = boxes[:,0]
    y1 = boxes[:,1]
    x2 = boxes[:,2]
    y2 = boxes[:,3]
    for i in range(x1.shape[0]):
        cv2.rectangle(im, (int(x1[i]), int(y1[i])), (int(x2[i]), int(y2[i])), (0,255,0), 1)
    return im

def drawPoints(im,points):
    for i in range(points.shape[0]):
        left_eye = (int(points[i][0]),int(points[i][5]))
        cv2.circle(im, left_eye,2, (0,0,255), 2)

        right_eye = (int(points[i][1]),int(points[i][6]))
        cv2.circle(im, right_eye,2, (0,0,255), 2)

        nose = (int(points[i][2]),int(points[i][7]))
        cv2.circle(im, nose,2, (0,0,255), 2)

        left_mouth = (int(points[i][3]),int(points[i][8]))
        cv2.circle(im, left_mouth,2, (0,0,255), 2)

        right_mouth = (int(points[i][4]),int(points[i][9]))
        cv2.circle(im, right_mouth,2, (0,0,255), 2)
    return im

def drawPatch(im,points):
    for i in range(points.shape[0]):
        left_eye = (int(points[i][0]),int(points[i][5]))

        right_eye = (int(points[i][1]),int(points[i][6]))

        nose = (int(points[i][2]),int(points[i][7]))

        left_mouth = (int(points[i][3]),int(points[i][8]))

        right_mouth = (int(points[i][4]),int(points[i][9]))

        eye_length = np.sqrt((left_eye[0]-right_eye[0])*(left_eye[0]-right_eye[0])+(left_eye[1]-right_eye[1])*(left_eye[1]-right_eye[1]))
	mouth_length = np.sqrt((left_mouth[0]-right_mouth[0])*(left_mouth[0]-right_mouth[0])+(left_mouth[1]-right_mouth[1])*(left_mouth[1]-right_mouth[1]))

	t11_x = left_eye[0]
        t11_y = left_eye[1] - 0.8*eye_length
        t12_x = left_eye[0] + eye_length
        t12_y = left_eye[1] - 0.4*eye_length
        cv2.rectangle(im, (int(t11_x), int(t11_y)), (int(t12_x), int(t12_y)), (0,255,0), 1)

	t21_x = (left_eye[0] + right_eye[0])/2 - 0.15*eye_length
        t21_y = (left_eye[1] + right_eye[1])/2 - 0.3*eye_length
        t22_x = (left_eye[0] + right_eye[0])/2 + 0.15*eye_length
        t22_y = (left_eye[1] + right_eye[1])/2
	cv2.rectangle(im, (int(t21_x), int(t21_y)), (int(t22_x), int(t22_y)), (0,255,0), 1)

	t31_x = (left_eye[0] +nose[0])/2-0.1*eye_length
        t31_y = ((left_eye[1] + right_eye[1])/2 + nose[1])/2 - 0.1*eye_length
        t32_x = (left_eye[0] +nose[0])/2+0.1*eye_length
        t32_y = ((left_eye[1] + right_eye[1])/2 + nose[1])/2 + 0.1*eye_length
	cv2.rectangle(im, (int(t31_x), int(t31_y)), (int(t32_x), int(t32_y)), (0,255,0), 1)

	t41_x = (right_eye[0] +nose[0])/2-0.1*eye_length
        t41_y = ((left_eye[1] + right_eye[1])/2 + nose[1])/2 - 0.1*eye_length
        t42_x = (right_eye[0] +nose[0])/2+0.1*eye_length
        t42_y = ((left_eye[1] + right_eye[1])/2 + nose[1])/2 + 0.1*eye_length
	cv2.rectangle(im, (int(t41_x), int(t41_y)), (int(t42_x), int(t42_y)), (0,255,0), 1)

	t51_x = nose[0]-0.1*eye_length
        t51_y = nose[1]-0.1*eye_length
        t52_x = nose[0]+0.1*eye_length
        t52_y = nose[1]+0.1*eye_length
	cv2.rectangle(im, (int(t51_x), int(t51_y)), (int(t52_x), int(t52_y)), (0,255,0), 1)

	t61_x = nose[0]-0.1*eye_length
        t61_y = nose[1]+0.2*eye_length
        t62_x = nose[0]+0.1*eye_length
        t62_y = nose[1]+0.4*eye_length
	cv2.rectangle(im, (int(t61_x), int(t61_y)), (int(t62_x), int(t62_y)), (0,255,0), 1)

	t71_x = left_mouth[0] - 0.7*mouth_length
        t71_y = left_mouth[1] - mouth_length
        t72_x = left_mouth[0]
        t72_y = left_mouth[1]
	cv2.rectangle(im, (int(t71_x), int(t71_y)), (int(t72_x), int(t72_y)), (0,255,0), 1)

	t81_x = right_mouth[0]
        t81_y = right_mouth[1] - mouth_length
        t82_x = right_mouth[0] + 0.7*mouth_length
        t82_y = left_mouth[1]
	cv2.rectangle(im, (int(t81_x), int(t81_y)), (int(t82_x), int(t82_y)), (0,255,0), 1)

    return im


from time import time
_tstart_stack = []
def tic():
    _tstart_stack.append(time())
def toc(fmt="Elapsed: %s s"):
    print fmt % (time()-_tstart_stack.pop())


def detect_face(img, minsize, PNet, RNet, ONet, threshold, fastresize, factor):
    
    img2 = img.copy()

    factor_count = 0
    total_boxes = np.zeros((0,9), np.float)
    points = []
    h = img.shape[0]
    w = img.shape[1]
    minl = min(h, w)
    img = img.astype(float)
    m = 12.0/minsize
    minl = minl*m

    # create scale pyramid
    scales = []
    while minl >= 12:
        scales.append(m * pow(factor, factor_count))
        minl *= factor
        factor_count += 1
    # first stage
    for scale in scales:
        hs = int(np.ceil(h*scale))
        ws = int(np.ceil(w*scale))

        if fastresize:
            im_data = (img-127.5)*0.0078125 # [0,255] -> [-1,1]
            im_data = cv2.resize(im_data, (ws,hs)) # default is bilinear
        else: 
            im_data = cv2.resize(img, (ws,hs)) # default is bilinear
            im_data = (im_data-127.5)*0.0078125 # [0,255] -> [-1,1]

        im_data = np.swapaxes(im_data, 0, 2)
        im_data = np.array([im_data], dtype = np.float)
        PNet.blobs['data'].reshape(1, 3, ws, hs)
        PNet.blobs['data'].data[...] = im_data
        out = PNet.forward()
        boxes = generateBoundingBox(out['prob1'][0,1,:,:], out['conv4-2'][0], scale, threshold[0])
        if boxes.shape[0] != 0:
            pick = nms(boxes, 0.5, 'Union')
            if len(pick) > 0 :
                boxes = boxes[pick, :]

        if boxes.shape[0] != 0:
            total_boxes = np.concatenate((total_boxes, boxes), axis=0)

    #####
    # 1 #
    #####
    numbox = total_boxes.shape[0]
    if numbox > 0:
        # nms
        pick = nms(total_boxes, 0.7, 'Union')
        total_boxes = total_boxes[pick, :]
        # revise and convert to square
        regh = total_boxes[:,3] - total_boxes[:,1]
        regw = total_boxes[:,2] - total_boxes[:,0]
        t1 = total_boxes[:,0] + total_boxes[:,5]*regw
        t2 = total_boxes[:,1] + total_boxes[:,6]*regh
        t3 = total_boxes[:,2] + total_boxes[:,7]*regw
        t4 = total_boxes[:,3] + total_boxes[:,8]*regh
        t5 = total_boxes[:,4]
        total_boxes = np.array([t1,t2,t3,t4,t5]).T

        total_boxes = rerec(total_boxes) # convert box to square
        total_boxes[:,0:4] = np.fix(total_boxes[:,0:4])
        [dy, edy, dx, edx, y, ey, x, ex, tmpw, tmph] = pad(total_boxes, w, h)

    #print total_boxes.shape
    #print total_boxes

    numbox = total_boxes.shape[0]
    if numbox > 0:
        # second stage
        # construct input for RNet
        tempimg = np.zeros((numbox, 24, 24, 3)) # (24, 24, 3, numbox)
        for k in range(numbox):
            tmp = np.zeros((tmph[k], tmpw[k],3))
            tmp[dy[k]:edy[k]+1, dx[k]:edx[k]+1] = img[y[k]:ey[k]+1, x[k]:ex[k]+1]
            tempimg[k,:,:,:] = cv2.resize(tmp, (24, 24))

        tempimg = (tempimg-127.5)*0.0078125 # done in imResample function wrapped by python

        # RNet

        tempimg = np.swapaxes(tempimg, 1, 3)
        
        RNet.blobs['data'].reshape(numbox, 3, 24, 24)
        RNet.blobs['data'].data[...] = tempimg
        out = RNet.forward()

        score = out['prob1'][:,1]
        pass_t = np.where(score>threshold[1])[0]
        score =  np.array([score[pass_t]]).T
        total_boxes = np.concatenate( (total_boxes[pass_t, 0:4], score), axis = 1)
        mv = out['conv5-2'][pass_t, :].T
        if total_boxes.shape[0] > 0:
            pick = nms(total_boxes, 0.7, 'Union')
            if len(pick) > 0 :
                total_boxes = total_boxes[pick, :]
                total_boxes = bbreg(total_boxes, mv[:, pick])
                total_boxes = rerec(total_boxes)
        #####
        # 2 #
        #####
        numbox = total_boxes.shape[0]
        if numbox > 0:
            # third stage
            total_boxes = np.fix(total_boxes)
            [dy, edy, dx, edx, y, ey, x, ex, tmpw, tmph] = pad(total_boxes, w, h)

            tempimg = np.zeros((numbox, 48, 48, 3))
            for k in range(numbox):
                tmp = np.zeros((tmph[k], tmpw[k],3))
                tmp[dy[k]:edy[k]+1, dx[k]:edx[k]+1] = img[y[k]:ey[k]+1, x[k]:ex[k]+1]
                tempimg[k,:,:,:] = cv2.resize(tmp, (48, 48))
            tempimg = (tempimg-127.5)*0.0078125 # [0,255] -> [-1,1]
            # ONet
            tempimg = np.swapaxes(tempimg, 1, 3)
            ONet.blobs['data'].reshape(numbox, 3, 48, 48)
            ONet.blobs['data'].data[...] = tempimg
            out = ONet.forward()
            score = out['prob1'][:,1]
            points = out['conv6-3']
            pass_t = np.where(score>threshold[2])[0]
            points = points[pass_t, :]
            score = np.array([score[pass_t]]).T
            total_boxes = np.concatenate( (total_boxes[pass_t, 0:4], score), axis=1)
            mv = out['conv6-2'][pass_t, :].T
            w = total_boxes[:,3] - total_boxes[:,1] + 1
            h = total_boxes[:,2] - total_boxes[:,0] + 1

            points[:, 0:5] = np.tile(w, (5,1)).T * points[:, 0:5] + np.tile(total_boxes[:,0], (5,1)).T - 1 
            points[:, 5:10] = np.tile(h, (5,1)).T * points[:, 5:10] + np.tile(total_boxes[:,1], (5,1)).T -1

            if total_boxes.shape[0] > 0:
                total_boxes = bbreg(total_boxes, mv[:,:])
                pick = nms(total_boxes, 0.7, 'Min')
                if len(pick) > 0 :
                    total_boxes = total_boxes[pick, :]
                    points = points[pick, :]

    #####
    # 3 #
    #####
    return total_boxes, points


def initFaceDetector():
    minsize = 20
    caffe_model_path = "/home/duino/iactive/mtcnn/model"
    threshold = [0.6, 0.7, 0.7]
    factor = 0.709
    caffe.set_mode_cpu()
    PNet = caffe.Net(caffe_model_path+"/det1.prototxt", caffe_model_path+"/det1.caffemodel", caffe.TEST)
    RNet = caffe.Net(caffe_model_path+"/det2.prototxt", caffe_model_path+"/det2.caffemodel", caffe.TEST)
    ONet = caffe.Net(caffe_model_path+"/det3.prototxt", caffe_model_path+"/det3.caffemodel", caffe.TEST)
    return (minsize, PNet, RNet, ONet, threshold, factor)

def haveFace(img, facedetector):
    minsize = facedetector[0]
    PNet = facedetector[1]
    RNet = facedetector[2]
    ONet = facedetector[3]
    threshold = facedetector[4]
    factor = facedetector[5]
    
    if max(img.shape[0], img.shape[1]) < minsize:
        return False, []

    img_matlab = img.copy()
    tmp = img_matlab[:,:,2].copy()
    img_matlab[:,:,2] = img_matlab[:,:,0]
    img_matlab[:,:,0] = tmp
    
    #tic()
    boundingboxes, points = detect_face(img_matlab, minsize, PNet, RNet, ONet, threshold, False, factor)
    #toc()
    containFace = (True, False)[boundingboxes.shape[0]==0]
    return containFace, boundingboxes

def main():
    minsize = 50

    caffe_model_path = "/home/zou/mtcnn/model"

    threshold = [0.6, 0.7, 0.7]
    factor = 0.709
    
    caffe.set_mode_gpu()
    PNet = caffe.Net(caffe_model_path+"/det1.prototxt", caffe_model_path+"/det1.caffemodel", caffe.TEST)
    RNet = caffe.Net(caffe_model_path+"/det2.prototxt", caffe_model_path+"/det2.caffemodel", caffe.TEST)
    ONet = caffe.Net(caffe_model_path+"/det3.prototxt", caffe_model_path+"/det3.caffemodel", caffe.TEST)

    camera = cv2.VideoCapture(0)
    while True:
        _, img = camera.read()
        h,w = img.shape[:2]
        if h>=w:
            w = int(w/(h/500.0))
            h = 500;
        else:
            h = int(h/(w/500.0))
            w = 500

        img = cv2.resize(img,(w,h))
        img_matlab = img.copy()
        tmp = img_matlab[:,:,2].copy()
        img_matlab[:,:,2] = img_matlab[:,:,0]
        img_matlab[:,:,0] = tmp

        # check rgb position
        tic()
        boundingboxes, points = detect_face(img_matlab, minsize, PNet, RNet, ONet, threshold, False, factor)
        toc()

        if (len(boundingboxes)>0)&1:
            img = drawBoxes(img, boundingboxes)
            img = drawPoints(img, points)
        if (len(boundingboxes)>0)&0:
            img = drawBoxes(img, boundingboxes)
            img = drawPatch(img, points)
        cv2.imshow('img', img)

        ch = cv2.waitKey(1)
        if ch == 27:
            break


        #if boundingboxes.shape[0] > 0:
        #    error.append[imgpath]
    #print error

if __name__ == "__main__":
    main()
C++实现

stdafx.h

// stdafx.h : 标准系统包含文件的包含文件,
// 或是经常使用但不常更改的
// 特定于项目的包含文件
//

#pragma once

#include "targetver.h"

#include <stdio.h>
#include <tchar.h>

#include <caffe/caffe.hpp>
#ifdef USE_OPENCV
#include <opencv2/core/core.hpp>
#include <opencv2/highgui/highgui.hpp>
#include <opencv2/imgproc/imgproc.hpp>
#include <opencv2/videoio.hpp>
#endif  // USE_OPENCV
#include <algorithm>
#include <iosfwd>
#include <memory>
#include <string>
#include <utility>
#include <vector>

#ifdef WITH_PYTHON_LAYER
#include <boost/python.hpp>
#endif
#include <string>
#include <vector>

#include "caffe/layer.hpp"
#include "caffe/layer_factory.hpp"
#include "caffe/layers/input_layer.hpp"
#include "caffe/layers/inner_product_layer.hpp"
#include "caffe/layers/prelu_layer.hpp"
#include "caffe/layers/conv_layer.hpp"
#include "caffe/layers/pooling_layer.hpp"
#include "caffe/layers/softmax_layer.hpp"
#include "caffe/layers/memory_data_layer.hpp"
#include "caffe/layers/dropout_layer.hpp"
#include "caffe/proto/caffe.pb.h"

#ifdef USE_CUDNN
#include "caffe/layers/cudnn_conv_layer.hpp"
#include "caffe/layers/cudnn_pooling_layer.hpp"
#include "caffe/layers/cudnn_relu_layer.hpp"
#include "caffe/layers/cudnn_softmax_layer.hpp"
#endif

#ifdef WITH_PYTHON_LAYER
#include "caffe/layers/python_layer.hpp"
#endif

using namespace caffe;  // NOLINT(build/namespaces)

extern INSTANTIATE_CLASS(InputLayer);
extern INSTANTIATE_CLASS(InnerProductLayer);
extern INSTANTIATE_CLASS(ConvolutionLayer);
extern INSTANTIATE_CLASS(PReLULayer);
extern INSTANTIATE_CLASS(PoolingLayer);
extern INSTANTIATE_CLASS(SoftmaxLayer);
extern INSTANTIATE_CLASS(MemoryDataLayer);
extern INSTANTIATE_CLASS(DropoutLayer);
// TODO:  在此处引用程序需要的其他头文件

MTCNN.cpp

// MTCNN_VS2015.cpp : 定义控制台应用程序的入口点。
//

#include "stdafx.h"
// c++
#include <string>
#include <vector>
// boost
#include "boost/make_shared.hpp"
//#define CPU_ONLY
using namespace caffe;

#define FROM_VIDEO 1

string resultdir = "result";

typedef struct FaceRect {
	float x1;
	float y1;
	float x2;
	float y2;
	float score; /**< Larger score should mean higher confidence. */
} FaceRect;

typedef struct FacePts {
	float x[5], y[5];
} FacePts;

typedef struct FaceInfo {
	FaceRect bbox;
	cv::Vec4f regression;
	FacePts facePts;
	double roll;
	double pitch;
	double yaw;
} FaceInfo;

template<typename Dtype>
Dtype max(Dtype x, Dtype y)
{
	return x>=y ? x : y;
}

template<typename Dtype>
Dtype min(Dtype x, Dtype y)
{
	return x < y ? x : y;
}

class MTCNN {
public:
	MTCNN(const string& proto_model_dir);
	void Detect(const cv::Mat& img, std::vector<FaceInfo> &faceInfo, int minSize, double* threshold, double factor);

private:
	bool CvMatToDatumSignalChannel(const cv::Mat& cv_mat, Datum* datum);
	//void Preprocess(const cv::Mat& img,
	//	std::vector<cv::Mat>* input_channels);
	void WrapInputLayer(std::vector<cv::Mat>* input_channels, Blob<float>* input_layer,
		const int height, const int width);
	//void SetMean();
	void GenerateBoundingBox(Blob<float>* confidence, Blob<float>* reg,
		float scale, float thresh, int image_width, int image_height);
	void ClassifyFace_MulImage(const std::vector<FaceInfo> &regressed_rects, cv::Mat &sample_single,
		boost::shared_ptr<Net<float> >& net, double thresh, char netName);
	std::vector<FaceInfo> NonMaximumSuppression(std::vector<FaceInfo>& bboxes, float thresh, char methodType);
	void Bbox2Square(std::vector<FaceInfo>& bboxes);
	void Padding(int img_w, int img_h);
	std::vector<FaceInfo> BoxRegress(std::vector<FaceInfo> &faceInfo_, int stage);
	//void RegressPoint(const std::vector<FaceInfo>& faceInfo);

private:
	boost::shared_ptr<Net<float> > PNet_;
	boost::shared_ptr<Net<float> > RNet_;
	boost::shared_ptr<Net<float> > ONet_;

	// x1,y1,x2,t2 and score
	std::vector<FaceInfo> condidate_rects_;
	std::vector<FaceInfo> total_boxes_;
	std::vector<FaceInfo> regressed_rects_;
	std::vector<FaceInfo> regressed_pading_;

	std::vector<cv::Mat> crop_img_;
	int curr_feature_map_w_;
	int curr_feature_map_h_;
	int num_channels_;
};

// compare score
bool CompareBBox(const FaceInfo & a, const FaceInfo & b) {
	return a.bbox.score > b.bbox.score;
}

// methodType : u is IoU(Intersection Over Union)
// methodType : m is IoM(Intersection Over Maximum)
std::vector<FaceInfo> MTCNN::NonMaximumSuppression(std::vector<FaceInfo>& bboxes,
	float thresh, char methodType) {
	std::vector<FaceInfo> bboxes_nms;
	std::sort(bboxes.begin(), bboxes.end(), CompareBBox);

	int32_t select_idx = 0;
	int32_t num_bbox = static_cast<int32_t>(bboxes.size());
	std::vector<int32_t> mask_merged(num_bbox, 0);
	bool all_merged = false;

	while (!all_merged) {
		while (select_idx < num_bbox && mask_merged[select_idx] == 1)
			select_idx++;
		if (select_idx == num_bbox) {
			all_merged = true;
			continue;
		}

		bboxes_nms.push_back(bboxes[select_idx]);
		mask_merged[select_idx] = 1;

		FaceRect select_bbox = bboxes[select_idx].bbox;
		float area1 = static_cast<float>((select_bbox.x2 - select_bbox.x1 + 1) * (select_bbox.y2 - select_bbox.y1 + 1));
		float x1 = static_cast<float>(select_bbox.x1);
		float y1 = static_cast<float>(select_bbox.y1);
		float x2 = static_cast<float>(select_bbox.x2);
		float y2 = static_cast<float>(select_bbox.y2);

		select_idx++;
		for (int32_t i = select_idx; i < num_bbox; i++) {
			if (mask_merged[i] == 1)
				continue;

			FaceRect& bbox_i = bboxes[i].bbox;
			float x = std::max<float>(x1, static_cast<float>(bbox_i.x1));
			float y = std::max<float>(y1, static_cast<float>(bbox_i.y1));
			float w = std::min<float>(x2, static_cast<float>(bbox_i.x2)) - x + 1;
			float h = std::min<float>(y2, static_cast<float>(bbox_i.y2)) - y + 1;
			if (w <= 0 || h <= 0)
				continue;

			float area2 = static_cast<float>((bbox_i.x2 - bbox_i.x1 + 1) * (bbox_i.y2 - bbox_i.y1 + 1));
			float area_intersect = w * h;

			switch (methodType) {
			case 'u':
				if (static_cast<float>(area_intersect) / (area1 + area2 - area_intersect) > thresh)
					mask_merged[i] = 1;
				break;
			case 'm':
				if (static_cast<float>(area_intersect) / min(area1, area2) > thresh)
					mask_merged[i] = 1;
				break;
			default:
				break;
			}
		}
	}
	return bboxes_nms;
}

void MTCNN::Bbox2Square(std::vector<FaceInfo>& bboxes) {
	for (int i = 0; i < bboxes.size(); i++) {
		float h = bboxes[i].bbox.x2 - bboxes[i].bbox.x1;
		float w = bboxes[i].bbox.y2 - bboxes[i].bbox.y1;
		float side = h > w ? h : w;
		bboxes[i].bbox.x1 += (h - side)*0.5;
		bboxes[i].bbox.y1 += (w - side)*0.5;

		bboxes[i].bbox.x2 = (int)(bboxes[i].bbox.x1 + side);
		bboxes[i].bbox.y2 = (int)(bboxes[i].bbox.y1 + side);
		bboxes[i].bbox.x1 = (int)(bboxes[i].bbox.x1);
		bboxes[i].bbox.y1 = (int)(bboxes[i].bbox.y1);

	}
}

std::vector<FaceInfo> MTCNN::BoxRegress(std::vector<FaceInfo>& faceInfo, int stage) {
	std::vector<FaceInfo> bboxes;
	for (int bboxId = 0; bboxId < faceInfo.size(); bboxId++) {
		FaceRect faceRect;
		FaceInfo tempFaceInfo;
		float regw = faceInfo[bboxId].bbox.y2 - faceInfo[bboxId].bbox.y1;
		regw += (stage == 1) ? 0 : 1;
		float regh = faceInfo[bboxId].bbox.x2 - faceInfo[bboxId].bbox.x1;
		regh += (stage == 1) ? 0 : 1;
		faceRect.y1 = faceInfo[bboxId].bbox.y1 + regw * faceInfo[bboxId].regression[0];
		faceRect.x1 = faceInfo[bboxId].bbox.x1 + regh * faceInfo[bboxId].regression[1];
		faceRect.y2 = faceInfo[bboxId].bbox.y2 + regw * faceInfo[bboxId].regression[2];
		faceRect.x2 = faceInfo[bboxId].bbox.x2 + regh * faceInfo[bboxId].regression[3];
		faceRect.score = faceInfo[bboxId].bbox.score;

		tempFaceInfo.bbox = faceRect;
		tempFaceInfo.regression = faceInfo[bboxId].regression;
		if (stage == 3)
			tempFaceInfo.facePts = faceInfo[bboxId].facePts;
		bboxes.push_back(tempFaceInfo);
	}
	return bboxes;
}

// compute the padding coordinates (pad the bounding boxes to square)
void MTCNN::Padding(int img_w, int img_h) {
	for (int i = 0; i < regressed_rects_.size(); i++) {
		FaceInfo tempFaceInfo;
		tempFaceInfo = regressed_rects_[i];
		tempFaceInfo.bbox.y2 = (regressed_rects_[i].bbox.y2 >= img_w) ? img_w : regressed_rects_[i].bbox.y2;
		tempFaceInfo.bbox.x2 = (regressed_rects_[i].bbox.x2 >= img_h) ? img_h : regressed_rects_[i].bbox.x2;
		tempFaceInfo.bbox.y1 = (regressed_rects_[i].bbox.y1 < 1) ? 1 : regressed_rects_[i].bbox.y1;
		tempFaceInfo.bbox.x1 = (regressed_rects_[i].bbox.x1 < 1) ? 1 : regressed_rects_[i].bbox.x1;
		regressed_pading_.push_back(tempFaceInfo);
	}
}

void MTCNN::GenerateBoundingBox(Blob<float>* confidence, Blob<float>* reg,
	float scale, float thresh, int image_width, int image_height) {
	int stride = 2;
	int cellSize = 12;

	int curr_feature_map_w_ = std::ceil((image_width - cellSize)*1.0 / stride) + 1;
	int curr_feature_map_h_ = std::ceil((image_height - cellSize)*1.0 / stride) + 1;

	//std::cout << "Feature_map_size:"<< curr_feature_map_w_ <<" "<<curr_feature_map_h_<<std::endl;
	int regOffset = curr_feature_map_w_*curr_feature_map_h_;
	// the first count numbers are confidence of face
	int count = confidence->count() / 2;
	const float* confidence_data = confidence->cpu_data();
	confidence_data += count;
	const float* reg_data = reg->cpu_data();

	condidate_rects_.clear();
	for (int i = 0; i < count; i++) {
		if (*(confidence_data + i) >= thresh) {
			int y = i / curr_feature_map_w_;
			int x = i - curr_feature_map_w_ * y;

			float xTop = (int)((x*stride + 1) / scale);
			float yTop = (int)((y*stride + 1) / scale);
			float xBot = (int)((x*stride + cellSize - 1 + 1) / scale);
			float yBot = (int)((y*stride + cellSize - 1 + 1) / scale);
			FaceRect faceRect;
			faceRect.x1 = xTop;
			faceRect.y1 = yTop;
			faceRect.x2 = xBot;
			faceRect.y2 = yBot;
			faceRect.score = *(confidence_data + i);
			FaceInfo faceInfo;
			faceInfo.bbox = faceRect;
			faceInfo.regression = cv::Vec4f(reg_data[i + 0 * regOffset], reg_data[i + 1 * regOffset], reg_data[i + 2 * regOffset], reg_data[i + 3 * regOffset]);
			condidate_rects_.push_back(faceInfo);
		}
	}
}

MTCNN::MTCNN(const std::string &proto_model_dir) {
#ifdef CPU_ONLY
	Caffe::set_mode(Caffe::CPU);
#else
	Caffe::set_mode(Caffe::GPU);
#endif
	/* Load the network. */
	PNet_.reset(new Net<float>((proto_model_dir + "/det1.prototxt"), TEST));
	PNet_->CopyTrainedLayersFrom(proto_model_dir + "/det1.caffemodel");

	CHECK_EQ(PNet_->num_inputs(), 1) << "Network should have exactly one input.";
	CHECK_EQ(PNet_->num_outputs(), 2) << "Network should have exactly two output, one"" is bbox and another is confidence.";

	//RNet_.reset(new Net<float>((proto_model_dir+"/det2.prototxt"), TEST));
	RNet_.reset(new Net<float>((proto_model_dir + "/det2_input.prototxt"), TEST));
	RNet_->CopyTrainedLayersFrom(proto_model_dir + "/det2.caffemodel");

	//  CHECK_EQ(RNet_->num_inputs(), 0) << "Network should have exactly one input.";
	//  CHECK_EQ(RNet_->num_outputs(),3) << "Network should have exactly two output, one"
	//                                     " is bbox and another is confidence.";

	ONet_.reset(new Net<float>((proto_model_dir + "/det3_input.prototxt"), TEST));
	ONet_->CopyTrainedLayersFrom(proto_model_dir + "/det3.caffemodel");

	//  CHECK_EQ(ONet_->num_inputs(), 1) << "Network should have exactly one input.";
	//  CHECK_EQ(ONet_->num_outputs(),3) << "Network should have exactly three output, one"
	//                                     " is bbox and another is confidence.";

	Blob<float>* input_layer;
	input_layer = PNet_->input_blobs()[0];
	num_channels_ = input_layer->channels();
	CHECK(num_channels_ == 3 || num_channels_ == 1) << "Input layer should have 1 or 3 channels.";
}

void MTCNN::WrapInputLayer(std::vector<cv::Mat>* input_channels,
	Blob<float>* input_layer, const int height, const int width) {
	float* input_data = input_layer->mutable_cpu_data();
	for (int i = 0; i < input_layer->channels(); ++i) {
		cv::Mat channel(height, width, CV_32FC1, input_data);
		input_channels->push_back(channel);
		input_data += width * height;
	}
}
// multi test image pass a forward
void MTCNN::ClassifyFace_MulImage(const std::vector<FaceInfo>& regressed_rects, cv::Mat &sample_single,
	boost::shared_ptr<Net<float> >& net, double thresh, char netName) {
	condidate_rects_.clear();

	int numBox = regressed_rects.size();
	std::vector<Datum> datum_vector;

	boost::shared_ptr<MemoryDataLayer<float> > mem_data_layer;
	mem_data_layer = boost::static_pointer_cast<MemoryDataLayer<float>>(net->layers()[0]);
	int input_width = mem_data_layer->width();
	int input_height = mem_data_layer->height();

	// load crop_img data to datum
	for (int i = 0; i < numBox; i++) {
		int pad_top = std::abs(regressed_pading_[i].bbox.x1 - regressed_rects[i].bbox.x1);
		int pad_left = std::abs(regressed_pading_[i].bbox.y1 - regressed_rects[i].bbox.y1);
		int pad_right = std::abs(regressed_pading_[i].bbox.y2 - regressed_rects[i].bbox.y2);
		int pad_bottom = std::abs(regressed_pading_[i].bbox.x2 - regressed_rects[i].bbox.x2);

		cv::Mat crop_img = sample_single(cv::Range(regressed_pading_[i].bbox.y1 - 1, regressed_pading_[i].bbox.y2),
			cv::Range(regressed_pading_[i].bbox.x1 - 1, regressed_pading_[i].bbox.x2));
		cv::copyMakeBorder(crop_img, crop_img, pad_left, pad_right, pad_top, pad_bottom, cv::BORDER_CONSTANT, cv::Scalar(0));

		cv::resize(crop_img, crop_img, cv::Size(input_width, input_height), 0, 0, cv::INTER_AREA);
		crop_img = (crop_img - 127.5)*0.0078125;
		Datum datum;
		CvMatToDatumSignalChannel(crop_img, &datum);
		datum_vector.push_back(datum);
	}
	regressed_pading_.clear();

	/* extract the features and store */
	mem_data_layer->set_batch_size(numBox);
	mem_data_layer->AddDatumVector(datum_vector);
	/* fire the network */
	float no_use_loss = 0;
	net->Forward(&no_use_loss);
	//  CHECK(reinterpret_cast<float*>(crop_img_set.at(0).data) == net->input_blobs()[0]->cpu_data())
	//          << "Input channels are not wrapping the input layer of the network.";

	// return RNet/ONet result
	std::string outPutLayerName = (netName == 'r' ? "conv5-2" : "conv6-2");
	std::string pointsLayerName = "conv6-3";

	const boost::shared_ptr<Blob<float> > reg = net->blob_by_name(outPutLayerName);
	const boost::shared_ptr<Blob<float> > confidence = net->blob_by_name("prob1");
	// ONet points_offset != NULL
	const boost::shared_ptr<Blob<float> > points_offset = net->blob_by_name(pointsLayerName);

	const float* confidence_data = confidence->cpu_data();
	const float* reg_data = reg->cpu_data();

	for (int i = 0; i<numBox; i++) {
		if (*(confidence_data + i * 2 + 1) > thresh) {
			FaceRect faceRect;
			faceRect.x1 = regressed_rects[i].bbox.x1;
			faceRect.y1 = regressed_rects[i].bbox.y1;
			faceRect.x2 = regressed_rects[i].bbox.x2;
			faceRect.y2 = regressed_rects[i].bbox.y2;
			faceRect.score = *(confidence_data + i * 2 + 1);
			FaceInfo faceInfo;
			faceInfo.bbox = faceRect;
			faceInfo.regression = cv::Vec4f(reg_data[4 * i + 0], reg_data[4 * i + 1], reg_data[4 * i + 2], reg_data[4 * i + 3]);

			// x x x x x y y y y y
			if (netName == 'o') {
				FacePts face_pts;
				const float* points_data = points_offset->cpu_data();
				float w = faceRect.y2 - faceRect.y1 + 1;
				float h = faceRect.x2 - faceRect.x1 + 1;
				for (int j = 0; j < 5; j++) {
					face_pts.y[j] = faceRect.y1 + *(points_data + j + 10 * i) * h - 1;
					face_pts.x[j] = faceRect.x1 + *(points_data + j + 5 + 10 * i) * w - 1;
				}
				faceInfo.facePts = face_pts;
			}
			condidate_rects_.push_back(faceInfo);
		}
	}
}
bool MTCNN::CvMatToDatumSignalChannel(const cv::Mat& cv_mat, Datum* datum) {
	if (cv_mat.empty())
		return false;
	int channels = cv_mat.channels();

	datum->set_channels(cv_mat.channels());
	datum->set_height(cv_mat.rows);
	datum->set_width(cv_mat.cols);
	datum->set_label(0);
	datum->clear_data();
	datum->clear_float_data();
	datum->set_encoded(false);

	int datum_height = datum->height();
	int datum_width = datum->width();
	if (channels == 3) {
		for (int c = 0; c < channels; c++) {
			for (int h = 0; h < datum_height; ++h) {
				for (int w = 0; w < datum_width; ++w) {
					const float* ptr = cv_mat.ptr<float>(h);
					datum->add_float_data(ptr[w*channels + c]);
				}
			}
		}
	}

	return true;
}

void MTCNN::Detect(const cv::Mat& image, std::vector<FaceInfo>& faceInfo, int minSize, double* threshold, double factor) {

	// 2~3ms
	// invert to RGB color space and float type
	cv::Mat sample_single, resized;
	image.convertTo(sample_single, CV_32FC3);
	cv::cvtColor(sample_single, sample_single, cv::COLOR_BGR2RGB);
	sample_single = sample_single.t();

	int height = image.rows;
	int width = image.cols;
	int minWH = min(height, width);
	int factor_count = 0;
	double m = 12. / minSize;
	minWH *= m;
	std::vector<double> scales;
	while (minWH >= 12)
	{
		scales.push_back(m * std::pow(factor, factor_count));
		minWH *= factor;
		++factor_count;
	}

	// 11ms main consum
	Blob<float>* input_layer = PNet_->input_blobs()[0];
	for (int i = 0; i < factor_count; i++)
	{
		double scale = scales[i];
		int ws = std::ceil(height*scale);
		int hs = std::ceil(width*scale);

		// wrap image and normalization using INTER_AREA method
		cv::resize(sample_single, resized, cv::Size(ws, hs), 0, 0, cv::INTER_AREA);
		resized.convertTo(resized, CV_32FC3, 0.0078125, -127.5*0.0078125);

		// input data
		input_layer->Reshape(1, 3, hs, ws);
		PNet_->Reshape();
		std::vector<cv::Mat> input_channels;
		WrapInputLayer(&input_channels, PNet_->input_blobs()[0], hs, ws);
		cv::split(resized, input_channels);

		// check data transform right
		CHECK(reinterpret_cast<float*>(input_channels.at(0).data) == PNet_->input_blobs()[0]->cpu_data())<< "Input channels are not wrapping the input layer of the network.";
		PNet_->Forward();

		// return result
		Blob<float>* reg = PNet_->output_blobs()[0];
		//const float* reg_data = reg->cpu_data();
		Blob<float>* confidence = PNet_->output_blobs()[1];
		GenerateBoundingBox(confidence, reg, scale, threshold[0], ws, hs);
		std::vector<FaceInfo> bboxes_nms = NonMaximumSuppression(condidate_rects_, 0.5, 'u');
		total_boxes_.insert(total_boxes_.end(), bboxes_nms.begin(), bboxes_nms.end());
	}

	int numBox = total_boxes_.size();
	if (numBox != 0) {
		total_boxes_ = NonMaximumSuppression(total_boxes_, 0.7, 'u');
		regressed_rects_ = BoxRegress(total_boxes_, 1);
		total_boxes_.clear();

		Bbox2Square(regressed_rects_);
		Padding(width, height);

		/// Second stage
		ClassifyFace_MulImage(regressed_rects_, sample_single, RNet_, threshold[1], 'r');
		condidate_rects_ = NonMaximumSuppression(condidate_rects_, 0.7, 'u');
		regressed_rects_ = BoxRegress(condidate_rects_, 2);

		Bbox2Square(regressed_rects_);
		Padding(width, height);

		/// three stage
		numBox = regressed_rects_.size();
		if (numBox != 0) {
			ClassifyFace_MulImage(regressed_rects_, sample_single, ONet_, threshold[2], 'o');
			regressed_rects_ = BoxRegress(condidate_rects_, 3);
			faceInfo = NonMaximumSuppression(regressed_rects_, 0.7, 'm');
		}
	}
	regressed_pading_.clear();
	regressed_rects_.clear();
	condidate_rects_.clear();
}

int main(int argc, char **argv)
{
	::google::InitGoogleLogging(argv[0]);
	double threshold[3] = { 0.6, 0.7, 0.5 };
	double factor = 0.709;
	int minSize = 50;
	string proto_model_dir = "model";

	MTCNN detector(proto_model_dir);

#if FROM_VIDEO
	cv::VideoCapture cap(0);
#else
	string imgname = "test.jpg";
#endif
	cv::Mat frame;
#if FROM_VIDEO
	while (cap.read(frame)) {
#else
		string imageName = imgname;
		frame = cv::imread(imageName);
#endif
		clock_t t1 = clock();
		std::vector<FaceInfo> faceInfo;
		detector.Detect(frame, faceInfo, minSize, threshold, factor);
		std::cout << "Detect " << frame.rows << "X" << frame.cols << " Time Using GPU-CUDNN: " << (clock() - t1)*1.0 / 1000 << std::endl;
		for (int i = 0; i < faceInfo.size(); i++) {
			float x = faceInfo[i].bbox.x1;
			float y = faceInfo[i].bbox.y1;
			float h = faceInfo[i].bbox.x2 - faceInfo[i].bbox.x1 + 1;
			float w = faceInfo[i].bbox.y2 - faceInfo[i].bbox.y1 + 1;
			cv::rectangle(frame, cv::Rect(y, x, w, h), cv::Scalar(255, 0, 0), 2);
		}
		for (int i = 0; i < faceInfo.size(); i++) {
			FacePts facePts = faceInfo[i].facePts;
			for (int j = 0; j < 5; j++)
				cv::circle(frame, cv::Point(facePts.y[j], facePts.x[j]), 3, cv::Scalar(0, 0, 255), 3);
		}
		cv::imshow("img", frame);
#if FROM_VIDEO
		if ((char)cv::waitKey(1) == 'q')
			break;
	}
#else
		string resultpath = resultdir + "/" + imgname;
		cv::imwrite(resultpath, frame);
		cv::waitKey();
#endif
	return 0;
}

短信轰炸,限制一分钟只能发送一次手机短信 - 简单的幸福 - ITeye博客

$
0
0

为什么要限制一分钟之内只能发送一次手机短信呢?

防止恶意攻击.

什么场景需要发送手机短信?

(a)手机号注册

(b)通过手机找回密码

(c)手机号绑定,手机号换绑

(d)转账时手机号接收动态口令(一次一密)


1,前端

图形验证码,一般前端会有倒计时,在倒计时的过程中是不允许点击"发送短信"按钮的:


但是如果用户刷新页面呢?

如果刷新页面,那么页面的倒计时就会中断. 

这是需要服务器端提供支持:服务器端要记录上次发送短信的时间戳


2,后台

第一次发送时lastSendSMSTime 为null,于是设置当前时间A,说明不需要倒计时

第二次访问时,lastSendSMSTime 不为null,获取其值,为时间A;

同时获取当前时间B,计算时间A,和时间B 的差量delter.

业务逻辑是:拿delter和60进行比较,如果delter>60,说明两次发短信的时间相差60秒,则允许发送,会重置时间为当前时间;

若delter<=60秒,则不允许发送,并且不会重置时间


后台获取倒计时剩余时间的方法:

Java代码   收藏代码
  1. /*** 
  2.      * 倒计时还剩余多长时间 
  3.      * @param mobile : 手机号 
  4.      * @param reallySendSMS : 是否真正发送短信 
  5.      * @return : second 
  6.      */  
  7.     public int sMSWaitingTime(String mobile,boolean reallySendSMS) {  
  8.         HttpServletRequest request = ((ServletRequestAttributes) RequestContextHolder.getRequestAttributes()).getRequest();  
  9.         HttpServletResponse response = ((ServletRequestAttributes) RequestContextHolder.getRequestAttributes()).getResponse();  
  10.         RedisHelper rdsHelper = RedisHelper.getInstance();  
  11.         String cid = getCid(request, response);  
  12.           
  13.         String lastSendSMSTime = rdsHelper.getCache(cid+mobile);  
  14.   
  15.         if(StringUtil.isNullOrEmpty(lastSendSMSTime)) {  
  16.             if(reallySendSMS){  
  17.                 saveExpxKeyCache(request, response, mobile, String.valueOf(DateTimeUtil.getCurrentTimeSecond()),60);  
  18.             }  
  19.             return 0;//不需要倒计时  
  20.         } else {  
  21.             long lastSendSMSTimeSecond=Long.parseLong(lastSendSMSTime);  
  22.             long currentTimeSecond=DateTimeUtil.getCurrentTimeSecond();  
  23.             int delter=(int) (currentTimeSecond-lastSendSMSTimeSecond);  
  24.             if(delter>=60){  
  25.                 return 0;//不需要倒计时  
  26.             }else{  
  27.                 return 60-delter;  
  28.             }  
  29.         }  
  30.     }  

 接口:

Java代码   收藏代码
  1. /** 
  2.      * @return {"result":true,"remainingSecond":39}<br> 
  3.      * {"result":false,"errorFieldName":"mobile","remainingSecond":0} 
  4.      * @api {get} /wap/countdownSMS 发送手机短信倒计时剩余时间 
  5.      * @apiName 发送手机短信倒计时剩余时间 
  6.      * @apiGroup Login 
  7.      * @apiVersion 1.0.0 
  8.      * @apiDescription 发送手机短信倒计时剩余时间 
  9.      * @apiPermission 无权限要求 
  10.      * @apiParam {String} mobile            手机号 
  11.      */  
  12.     @SessionCheck  
  13.     @RequestMapping("/countSMS")  
  14.     @ResponseBody  
  15.     public String countdownSMS(HttpSession httpSession,  
  16.                                HttpServletRequest request  
  17.             , String mobile) {  
  18.         SMSRemainingTimeDto dto = new SMSRemainingTimeDto();  
  19.         if (StringUtil.isNullOrEmpty(mobile)) {  
  20.             dto.setResult(false);  
  21.             dto.setErrorFieldName("mobile");  
  22.             dto.setErrorMessage("请输入手机号");  
  23.             return dto.toJson();  
  24.         } else {  
  25.             int remainingTime = sMSWaitingTime(mobile, false);  
  26.             dto.setResult(true);  
  27.             dto.setRemainingSecond(remainingTime);  
  28.             return dto.toJson();  
  29.         }  
  30.     }  

接口功能:返回倒计时的剩余秒数 


3,什么时候调用该接口呢?

(1)手机号输入框失去焦点时;

(2)页面加载完成时,判断手机号输入框是否有值,有值就调用.

window.onload 或者jquery的$(function)


《从0到1学习Flink》—— 介绍Flink中的Stream Windows | zhisheng的博客

$
0
0

前言

目前有许多数据分析的场景从批处理到流处理的演变, 虽然可以将批处理作为流处理的特殊情况来处理,但是分析无穷集的流数据通常需要思维方式的转变并且具有其自己的术语(例如,“windowing(窗口化)”、“at-least-once(至少一次)”、“exactly-once(只有一次)” )。

对于刚刚接触流处理的人来说,这种转变和新术语可能会非常混乱。 Apache Flink 是一个为生产环境而生的流处理器,具有易于使用的 API,可以用于定义高级流分析程序。

Flink 的 API 在数据流上具有非常灵活的窗口定义,使其在其他开源流处理框架中脱颖而出。

在这篇文章中,我们将讨论用于流处理的窗口的概念,介绍 Flink 的内置窗口,并解释它对自定义窗口语义的支持。

什么是 Windows?

下面我们结合一个现实的例子来说明。

就拿交通传感器的示例:统计经过某红绿灯的汽车数量之和?

假设在一个红绿灯处,我们每隔 15 秒统计一次通过此红绿灯的汽车数量,如下图:

可以把汽车的经过看成一个流,无穷的流,不断有汽车经过此红绿灯,因此无法统计总共的汽车数量。但是,我们可以换一种思路,每隔 15 秒,我们都将与上一次的结果进行 sum 操作(滑动聚合),如下:

这个结果似乎还是无法回答我们的问题,根本原因在于流是无界的,我们不能限制流,但可以在有一个有界的范围内处理无界的流数据。

因此,我们需要换一个问题的提法:每分钟经过某红绿灯的汽车数量之和?
这个问题,就相当于一个定义了一个 Window(窗口),window 的界限是1分钟,且每分钟内的数据互不干扰,因此也可以称为翻滚(不重合)窗口,如下图:

第一分钟的数量为8,第二分钟是22,第三分钟是27。。。这样,1个小时内会有60个window。

再考虑一种情况,每30秒统计一次过去1分钟的汽车数量之和:

此时,window 出现了重合。这样,1个小时内会有120个 window。

扩展一下,我们可以在某个地区,收集每一个红绿灯处汽车经过的数量,然后每个红绿灯处都做一次基于1分钟的window统计,即并行处理:

它有什么作用?

通常来讲,Window 就是用来对一个无限的流设置一个有限的集合,在有界的数据集上进行操作的一种机制。window 又可以分为基于时间(Time-based)的 window 以及基于数量(Count-based)的 window。

Flink 自带的 window

Flink DataStream API 提供了 Time 和 Count 的 window,同时增加了基于 Session 的 window。同时,由于某些特殊的需要,DataStream API 也提供了定制化的 window 操作,供用户自定义 window。

下面,主要介绍 Time-Based window 以及 Count-Based window,以及自定义的 window 操作,Session-Based Window 操作将会在后续的文章中讲到。

Time Windows

正如命名那样,Time Windows 根据时间来聚合流数据。例如:一分钟的 tumbling time window 收集一分钟的元素,并在一分钟过后对窗口中的所有元素应用于一个函数。

在 Flink 中定义 tumbling time windows(翻滚时间窗口) 和 sliding time windows(滑动时间窗口) 非常简单:

tumbling time windows(翻滚时间窗口)

输入一个时间参数

1            
2
3
data.keyBy(1)            
.timeWindow(Time.minutes(1))//tumbling time window 每分钟统计一次数量和
.sum(1);

sliding time windows(滑动时间窗口)

输入两个时间参数

1            
2
3
data.keyBy(1)            
.timeWindow(Time.minutes(1), Time.seconds(30))//sliding time window 每隔 30s 统计过去一分钟的数量和
.sum(1);

有一点我们还没有讨论,即“收集一分钟的元素”的确切含义,它可以归结为一个问题,“流处理器如何解释时间?”

Apache Flink 具有三个不同的时间概念,即 processing time, event time 和 ingestion time。

这里可以参考我下一篇文章:

《从0到1学习Flink》—— 介绍Flink中的Event Time、Processing Time和Ingestion Time

Count Windows

Apache Flink 还提供计数窗口功能。如果计数窗口设置的为 100 ,那么将会在窗口中收集 100 个事件,并在添加第 100 个元素时计算窗口的值。

在 Flink 的 DataStream API 中,tumbling count window 和 sliding count window 的定义如下:

tumbling count window

输入一个时间参数

1            
2
3
data.keyBy(1)            
.countWindow(100)//统计每 100 个元素的数量之和
.sum(1);

sliding count window

输入两个时间参数

1            
2
3
data.keyBy(1)            
.countWindow(100,10)//每 10 个元素统计过去 100 个元素的数量之和
.sum(1);

解剖 Flink 的窗口机制

Flink 的内置 time window 和 count window 已经覆盖了大多数应用场景,但是有时候也需要定制窗口逻辑,此时 Flink 的内置的 window 无法解决这些问题。为了还支持自定义 window 实现不同的逻辑,DataStream API 为其窗口机制提供了接口。

下图描述了 Flink 的窗口机制,并介绍了所涉及的组件:

到达窗口操作符的元素被传递给 WindowAssigner。WindowAssigner 将元素分配给一个或多个窗口,可能会创建新的窗口。
窗口本身只是元素列表的标识符,它可能提供一些可选的元信息,例如 TimeWindow 中的开始和结束时间。注意,元素可以被添加到多个窗口,这也意味着一个元素可以同时在多个窗口存在。

每个窗口都拥有一个 Trigger(触发器),该 Trigger(触发器) 决定何时计算和清除窗口。当先前注册的计时器超时时,将为插入窗口的每个元素调用触发器。在每个事件上,触发器都可以决定触发(即、清除(删除窗口并丢弃其内容),或者启动并清除窗口。一个窗口可以被求值多次,并且在被清除之前一直存在。注意,在清除窗口之前,窗口将一直消耗内存。

当 Trigger(触发器) 触发时,可以将窗口元素列表提供给可选的 Evictor,Evictor 可以遍历窗口元素列表,并可以决定从列表的开头删除首先进入窗口的一些元素。然后其余的元素被赋给一个计算函数,如果没有定义 Evictor,触发器直接将所有窗口元素交给计算函数。

计算函数接收 Evictor 过滤后的窗口元素,并计算窗口的一个或多个元素的结果。 DataStream API 接受不同类型的计算函数,包括预定义的聚合函数,如 sum(),min(),max(),以及 ReduceFunction,FoldFunction 或 WindowFunction。

这些是构成 Flink 窗口机制的组件。 接下来我们逐步演示如何使用 DataStream API 实现自定义窗口逻辑。 我们从 DataStream [IN] 类型的流开始,并使用 key 选择器函数对其分组,该函数将 key 相同类型的数据分组在一块。

1            
2
SingleOutputStreamOperator<xxx> data = env.addSource(...);            
data.keyBy()

如何自定义 Window?

1、Window Assigner

负责将元素分配到不同的 window。

Window API 提供了自定义的 WindowAssigner 接口,我们可以实现 WindowAssigner 的

1            
publicabstractCollection<W>assignWindows(T element,longtimestamp)            

方法。同时,对于基于 Count 的 window 而言,默认采用了 GlobalWindow 的 window assigner,例如:

1            
keyBy.window(GlobalWindows.create())            

2、Trigger

Trigger 即触发器,定义何时或什么情况下移除 window

我们可以指定触发器来覆盖 WindowAssigner 提供的默认触发器。 请注意,指定的触发器不会添加其他触发条件,但会替换当前触发器。

3、Evictor(可选)

驱逐者,即保留上一 window 留下的某些元素

4、通过 apply WindowFunction 来返回 DataStream 类型数据。

利用 Flink 的内部窗口机制和 DataStream API 可以实现自定义的窗口逻辑,例如 session window。

结论

对于现代流处理器来说,支持连续数据流上的各种类型的窗口是必不可少的。 Apache Flink 是一个具有强大功能集的流处理器,包括一个非常灵活的机制,可以在连续数据流上构建窗口。 Flink 为常见场景提供内置的窗口运算符,以及允许用户自定义窗口逻辑。

参考

1、 https://flink.apache.org/news/2015/12/04/Introducing-windows.html

2、 https://blog.csdn.net/lmalds/article/details/51604501

关注我

转载请务必注明原创地址为: http://www.54tianzhisheng.cn/2018/12/08/Flink-Stream-Windows/

另外我自己整理了些 Flink 的学习资料,目前已经全部放到微信公众号了。你可以加我的微信:zhisheng_tian,然后回复关键字:Flink 即可无条件获取到。

相关文章

1、 《从0到1学习Flink》—— Apache Flink 介绍

2、 《从0到1学习Flink》—— Mac 上搭建 Flink 1.6.0 环境并构建运行简单程序入门

3、 《从0到1学习Flink》—— Flink 配置文件详解

4、 《从0到1学习Flink》—— Data Source 介绍

5、 《从0到1学习Flink》—— 如何自定义 Data Source ?

6、 《从0到1学习Flink》—— Data Sink 介绍

7、 《从0到1学习Flink》—— 如何自定义 Data Sink ?

8、 《从0到1学习Flink》—— Flink Data transformation(转换)

9、 《从0到1学习Flink》—— 介绍Flink中的Stream Windows

10、 《从0到1学习Flink》—— Flink 中的几种 Time 详解

×

纯属好玩

扫码支持
扫码打赏,你说多少就多少
支付宝
微信

打开支付宝扫一扫,即可进行扫码打赏哦

iptables四个表与五个链-秋天的童话-51CTO博客

$
0
0

一、netfilter和iptables说明:

    1、   netfilter/iptables IP 信息包过滤系统是一种功能强大的工具,可用于添加、编辑和除去规则,这些规则是在做信息包过滤决定时,防火墙所遵循和组成的规则。这些规则存储在专用的信息包过滤表中,而这些表集成在 Linux 内核中。在信息包过滤表中,规则被分组放在我们所谓的链(chain)中。

  虽然 netfilter/iptables IP 信息包过滤系统被称为单个实体,但它实际上由两个组件 netfilter 和 iptables 组成。

     (1). netfilter 组件也称为 内核空间(kernelspace),是内核的一部分,由一些信息包过滤表组成,这些表包含内核用来控制信息包过滤处理的规则集。

     (2). iptables 组件是一种工具,也称为 用户空间(userspace),它使插入、修改和除去信息包过滤表中的规则变得容易。

     iptables包含4个表,5个链。其中表是按照对数据包的操作区分的,链是按照不同的Hook点来区分的,表和链实际上是netfilter的两个维度。

  2、4个表:filter,nat,mangle,raw,默认表是filter(没有指定表的时候就是filter表)。表的处理优先级:raw>mangle>nat>filter。

           filter:一般的过滤功能

           nat:用于nat功能(端口映射,地址映射等)

           mangle:用于对特定数据包的修改

          raw:有限级最高,设置raw时一般是为了不再让iptables做数据包的链接跟踪处理,提高性能

    RAW 表只使用在PREROUTING链和OUTPUT链上,因为优先级最高,从而可以对收到的数据包在连接跟踪前进行处理。一但用户使用了RAW表,在某个链 上,RAW表处理完后,将跳过NAT表和 ip_conntrack处理,即不再做地址转换和数据包的链接跟踪处理了.

         RAW表可以应用在那些不需要做nat的情况下,以提高性能。如大量访问的web服务器,可以让80端口不再让iptables做数据包的链接跟踪处理,以提高用户的访问速度。

 3、 5个链:PREROUTING,INPUT,FORWARD,OUTPUT,POSTROUTING。

          PREROUTING:数据包进入路由表之前

          INPUT:通过路由表后目的地为本机

          FORWARDING:通过路由表后,目的地不为本机

          OUTPUT:由本机产生,向外转发

          POSTROUTIONG:发送到网卡接口之前。如下图:


   iptables中表和链的对应关系如下:


二、iptables的数据包的流程是怎样的?

一个数据包到达时,是怎么依次穿过各个链和表的(图)。 


基本步骤如下: 
1. 数据包到达网络接口,比如 eth0。 
2. 进入 raw 表的 PREROUTING 链,这个链的作用是赶在连接跟踪之前处理数据包。 
3. 如果进行了连接跟踪,在此处理。 
4. 进入 mangle 表的 PREROUTING 链,在此可以修改数据包,比如 TOS 等。 
5. 进入 nat 表的 PREROUTING 链,可以在此做DNAT,但不要做过滤。 
6. 决定路由,看是交给本地主机还是转发给其它主机。 

到了这里我们就得分两种不同的情况进行讨论了,一种情况就是数据包要转发给其它主机,这时候它会依次经过: 
7. 进入 mangle 表的 FORWARD 链,这里也比较特殊,这是在第一次路由决定之后,在进行最后的路由决定之前,我们仍然可以对数据包进行某些修改。 
8. 进入 filter 表的 FORWARD 链,在这里我们可以对所有转发的数据包进行过滤。需要注意的是:经过这里的数据包是转发的,方向是双向的。 
9. 进入 mangle 表的 POSTROUTING 链,到这里已经做完了所有的路由决定,但数据包仍然在本地主机,我们还可以进行某些修改。 
10. 进入 nat 表的 POSTROUTING 链,在这里一般都是用来做 SNAT ,不要在这里进行过滤。 
11. 进入出去的网络接口。完毕。 

另一种情况是,数据包就是发给本地主机的,那么它会依次穿过: 
7. 进入 mangle 表的 INPUT 链,这里是在路由之后,交由本地主机之前,我们也可以进行一些相应的修改。 
8. 进入 filter 表的 INPUT 链,在这里我们可以对流入的所有数据包进行过滤,无论它来自哪个网络接口。 
9. 交给本地主机的应用程序进行处理。 
10. 处理完毕后进行路由决定,看该往那里发出。 
11. 进入 raw 表的 OUTPUT 链,这里是在连接跟踪处理本地的数据包之前。 
12. 连接跟踪对本地的数据包进行处理。 
13. 进入 mangle 表的 OUTPUT 链,在这里我们可以修改数据包,但不要做过滤。 
14. 进入 nat 表的 OUTPUT 链,可以对防火墙自己发出的数据做 NAT 。 
15. 再次进行路由决定。 
16. 进入 filter 表的 OUTPUT 链,可以对本地出去的数据包进行过滤。 
17. 进入 mangle 表的 POSTROUTING 链,同上一种情况的第9步。注意,这里不光对经过防火墙的数据包进行处理,还对防火墙自己产生的数据包进行处理。 
18. 进入 nat 表的 POSTROUTING 链,同上一种情况的第10步。 
19. 进入出去的网络接口。完毕。


  三、iptables raw表的使用

增加raw表,在其他表处理之前,-j NOTRACK跳过其它表处理
状态除了以前的四个还增加了一个UNTRACKED

例如:
可以使用 “NOTRACK” target 允许规则指定80端口的包不进入链接跟踪/NAT子系统

iptables -t raw -A PREROUTING -d 1.2.3.4 -p tcp --dport 80 -j NOTRACK
iptables -t raw -A PREROUTING -s 1.2.3.4 -p tcp --sport 80 -j NOTRACK
iptables -A FORWARD -m state --state UNTRACKED -j ACCEPT

  四、解决ip_conntrack: table full, dropping packet的问题


在启用了iptables web服务器上,流量高的时候经常会出现下面的错误:

ip_conntrack: table full, dropping packet


这个问题的原因是由于web服务器收到了大量的连接,在启用了iptables的情况下,iptables会把所有的连接都做链接跟踪处理,这样iptables就会有一个链接跟踪表,当这个表满的时候,就会出现上面的错误。

iptables的链接跟踪表最大容量为/proc/sys/net/ipv4/ip_conntrack_max,链接碰到各种状态的超时后就会从表中删除。

所以解決方法一般有两个:

(1) 加大 ip_conntrack_max 值

vi /etc/sysctl.conf

net.ipv4.ip_conntrack_max = 393216
net.ipv4.netfilter.ip_conntrack_max = 393216


(2): 降低 ip_conntrack timeout时间

vi /etc/sysctl.conf

net.ipv4.netfilter.ip_conntrack_tcp_timeout_established = 300
net.ipv4.netfilter.ip_conntrack_tcp_timeout_time_wait = 120
net.ipv4.netfilter.ip_conntrack_tcp_timeout_close_wait = 60
net.ipv4.netfilter.ip_conntrack_tcp_timeout_fin_wait = 120


上面两种方法打个比喻就是烧水水开的时候,换一个大锅。一般情况下都可以解决问题,但是在极端情况下,还是不够用,怎么办?

这样就得反其道而行,用釜底抽薪的办法。iptables的raw表是不做数据包的链接跟踪处理的,我们就把那些连接量非常大的链接加入到iptables raw表。

如一台web服务器可以这样:

iptables -t raw -A PREROUTING -d 1.2.3.4 -p tcp --dport 80 -j NOTRACK
iptables -A FORWARD -m state --state UNTRACKED -j ACCEPT

五、实例说明:

1、单个规则实例

iptables -F?

# -F 是清除的意思,作用就是把 FILTRE TABLE 的所有链的规则都清空

iptables -A INPUT -s 172.20.20.1/32 -m state --state NEW,ESTABLISHED,RELATED -j ACCEPT

#在 FILTER 表的 INPUT 链匹配源地址是172.20.20.1的主机,状态分别是NEW,ESTABLISHED,RELATED 的都放行。

iptables -A INPUT -s 172.20.20.1/32 -m state --state NEW,ESTABLISHED -p tcp -m multiport --dport 123,110 -j ACCEPT

# -p 指定协议,-m 指定模块,multiport模块的作用就是可以连续匹配多各不相邻的端口号。完整的意思就是源地址是172.20.20.1的主机,状态分别是NEW, ESTABLISHED,RELATED的,TCP协议,目的端口分别为123 和 110 的数据包都可以通过。

iptables -A INPUT -s 172.20.22.0/24 -m state --state NEW,ESTABLISHED -p tcp -m multiport --dport 123,110 -j ACCEPT

iptables -A INPUT -s 0/0 -m state --state NEW -p tcp -m multiport --dport 123,110 -j DROP

#这句意思为源地址是0/0的 NEW状态的的TCP数据包都禁止访问我的123和110端口。

iptables -A INPUT -s ! 172.20.89.0/24 -m state --state NEW -p tcp -m multiport --dport 1230,110 -j DROP

# "!"号的意思 取反。就是除了172.20.89.0这个IP段的地址都DROP。

iptables -R INPUT 1 -s 192.168.6.99 -p tcp --dport 22 -j ACCEPT

替换INPUT链中的第一条规则

iptables -t filter -L INPUT -vn

以数字形式详细显示filter表INPUT链的规则

#-------------------------------NAT IP--------------------------------------

#以下操作是在 NAT TABLE 里面完成的。请大家注意。

iptables -t nat -F

iptables -t nat -A PREROUTING -d 192.168.102.55 -p tcp --dport 90 -j DNAT --to 172.20.11.1:800

#-A PREROUTING 指定在路由前做的。完整的意思是在 NAT TABLE 的路由前处理,目的地为192.168.102.55 的 目的端口为90的我们做DNAT处理,给他转向到172.20.11.1:800那里去。

iptables -t nat -A POSTROUTING -d 172.20.11.1 -j SNAT --to 192.168.102.55

#-A POSTROUTING 路由后。意思为在 NAT TABLE 的路由后处理,凡是目的地为 172.20.11.1 的,我们都给他做SNAT转换,把源地址改写成 192.168.102.55 。

iptables -A INPUT -d 192.168.20.0/255.255.255.0 -i eth1 -j DROP

iptables -A INPUT -s 192.168.20.0/255.255.255.0 -i eth1 -j DROP

iptables -A OUTPUT -d 192.168.20.0/255.255.255.0 -o eth1 -j DROP

iptables -A OUTPUT -s 192.168.20.0/255.255.255.0 -o eth1 -j DROP

# 上例中,eth1是一个与外部Internet相连,而192.168.20.0则是内部网的网络号,上述规则用来防止IP欺骗,因为出入eth1的包的ip应该是公共IP

iptables -A INPUT -s 255.255.255.255 -i eth0 -j DROP

iptables -A INPUT -s 224.0.0.0/224.0.0.0 -i eth0 -j DROP

iptables -A INPUT -d 0.0.0.0 -i eth0 -j DROP

# 防止广播包从IP代理服务器进入局域网:

iptables -A INPUT -p tcp -m tcp --sport 5000 -j DROP

iptables -A INPUT -p udp -m udp --sport 5000 -j DROP

iptables -A OUTPUT -p tcp -m tcp --dport 5000 -j DROP

iptables -A OUTPUT -p udp -m udp --dport 5000 -j DROP

# 屏蔽端口 5000

iptables -A INPUT -s 211.148.130.129 -i eth1 -p tcp -m tcp --dport 3306 -j DROP

iptables -A INPUT -s 192.168.20.0/255.255.255.0 -i eth0 -p tcp -m tcp --dport 3306 -j ACCEPT

iptables -A INPUT -s 211.148.130.128/255.255.255.240 -i eth1 -p tcp -m tcp --dport 3306 -j ACCEPT

iptables -A INPUT -p tcp -m tcp --dport 3306 -j DROP

# 防止 Internet 网的用户访问 MySQL 服务器(就是 3306 端口)

iptables -A FORWARD -p TCP --dport 22 -j REJECT --reject-with tcp-reset

#REJECT, 类似于DROP,但向发送该包的主机回复由--reject-with指定的信息,从而可以很好地隐藏防火墙的存在

2、www的iptables实例

#!/bin/bash

export PATH=/sbin:/usr/sbin:/bin:/usr/bin

#加载相关模块

modprobe iptable_nat

modprobe ip_nat_ftp

modprobe ip_nat_irc

modprobe ip_conntrack

modprobe ip_conntrack_ftp

modprobe ip_conntrack_irc

modprobe ipt_limit

echo 1 >;/proc/sys/net/ipv4/icmp_echo_ignore_broadcasts

echo 0 >;/proc/sys/net/ipv4/conf/all/accept_source_route

echo 0 >;/proc/sys/net/ipv4/conf/all/accept_redirects

echo 1 >;/proc/sys/net/ipv4/icmp_ignore_bogus_error_responses

echo 1 >;/proc/sys/net/ipv4/conf/all/log_martians

echo 1 >;/proc/sys/net/ipv4/tcp_syncookies

iptables -F

iptables -X

iptables -Z

## 允许本地回路?Loopback - Allow unlimited traffic

iptables -A INPUT -i lo -j ACCEPT

iptables -A OUTPUT -o lo -j ACCEPT

## 防止SYN洪水?SYN-Flooding Protection

iptables -N syn-flood

iptables -A INPUT -i ppp0 -p tcp --syn -j syn-flood

iptables -A syn-flood -m limit --limit 1/s --limit-burst 4 -j RETURN

iptables -A syn-flood -j DROP

## 确保新连接是设置了SYN标记的包?Make sure that new TCP connections are SYN packets

iptables -A INPUT -i eth0 -p tcp ! --syn -m state --state NEW -j DROP

## 允许HTTP的规则

iptables -A INPUT -i ppp0 -p tcp -s 0/0 --sport 80 -m state --state ESTABLISHED,RELATED -j ACCEPT

iptables -A INPUT -i ppp0 -p tcp -s 0/0 --sport 443 -m state --state ESTABLISHED,RELATED -j ACCEPT

iptables -A INPUT -i ppp0 -p tcp -d 0/0 --dport 80 -j ACCEPT

iptables -A INPUT -i ppp0 -p tcp -d 0/0 --dport 443 -j ACCEPT

## 允许DNS的规则

iptables -A INPUT -i ppp0 -p udp -s 0/0 --sport 53 -m state --state ESTABLISHED -j ACCEPT

iptables -A INPUT -i ppp0 -p udp -d 0/0 --dport 53 -j ACCEPT

## IP包流量限制?IP packets limit

iptables -A INPUT -f -m limit --limit 100/s --limit-burst 100 -j ACCEPT

iptables -A INPUT -i eth0 -p icmp -j DROP

## 允许SSH

iptables -A INPUT -p tcp -s ip1/32 --dport 22 -j ACCEPT

iptables -A INPUT -p tcp -s ip2/32 --dport 22 -j ACCEPT

## 其它情况不允许?Anything else not allowed

iptables -A INPUT -i eth0 -j DROP

3、一个包过滤防火墙实例

环境:redhat9 加载了string time等模块

eth0 接外网──ppp0

eth1 接内网──192.168.0.0/24

#!/bin/sh

#

modprobe ipt_MASQUERADE

modprobe ip_conntrack_ftp

modprobe ip_nat_ftp

iptables -F

iptables -t nat -F

iptables -X

iptables -t nat -X

###########################INPUT键###################################

iptables -P INPUT DROP

iptables -A INPUT -m state --state ESTABLISHED,RELATED -j ACCEPT

iptables -A INPUT -p tcp -m multiport --dports 110,80,25 -j ACCEPT

iptables -A INPUT -p tcp -s 192.168.0.0/24 --dport 139 -j ACCEPT

#允许内网samba,smtp,pop3,连接

iptables -A INPUT -i eth1 -p udp -m multiport --dports 53 -j ACCEPT

#允许dns连接

iptables -A INPUT -p tcp --dport 1723 -j ACCEPT

iptables -A INPUT -p gre -j ACCEPT

#允许外网***连接

iptables -A INPUT -s 192.186.0.0/24 -p tcp -m state --state ESTABLISHED,RELATED -j ACCEPT

iptables -A INPUT -i ppp0 -p tcp --syn -m connlimit --connlimit-above 15 -j DROP

#为了防止DoS太多连接进来,那么可以允许最多15个初始连接,超过的丢弃

iptables -A INPUT -s 192.186.0.0/24 -p tcp --syn -m connlimit --connlimit-above 15 -j DROP

#为了防止DoS太多连接进来,那么可以允许最多15个初始连接,超过的丢弃

iptables -A INPUT -p icmp -m limit --limit 3/s -j LOG --log-level INFO --log-prefix "ICMP packet IN: "

iptables -A INPUT -p icmp -j DROP

#禁止icmp通信-ping 不通

iptables -t nat -A POSTROUTING -o ppp0 -s 192.168.0.0/24 -j MASQUERADE

#内网转发

iptables -N syn-flood

iptables -A INPUT -p tcp --syn -j syn-flood

iptables -I syn-flood -p tcp -m limit --limit 3/s --limit-burst 6 -j RETURN

iptables -A syn-flood -j REJECT

#防止SYN*** 轻量

iptables -P FORWARD DROP

iptables -A FORWARD -p tcp -s 192.168.0.0/24 -m multiport --dports 80,110,21,25,1723 -j ACCEPT

iptables -A FORWARD -p udp -s 192.168.0.0/24 --dport 53 -j ACCEPT

iptables -A FORWARD -p gre -s 192.168.0.0/24 -j ACCEPT

iptables -A FORWARD -p icmp -s 192.168.0.0/24 -j ACCEPT

#允许 ***客户走***网络连接外网

iptables -A FORWARD -m state --state ESTABLISHED,RELATED -j ACCEPT

iptables -I FORWARD -p udp --dport 53 -m string --string "tencent" -m time --timestart 8:15 --timestop 12:30 --days Mon,Tue,Wed,Thu,Fri,Sat -j DROP

#星期一到星期六的8:00-12:30禁止qq通信

iptables -I FORWARD -p udp --dport 53 -m string --string "TENCENT" -m time --timestart 8:15 --timestop 12:30 --days Mon,Tue,Wed,Thu,Fri,Sat -j DROP

#星期一到星期六的8:00-12:30禁止qq通信

iptables -I FORWARD -p udp --dport 53 -m string --string "tencent" -m time --timestart 13:30 --timestop 20:30 --days Mon,Tue,Wed,Thu,Fri,Sat -j DROP

iptables -I FORWARD -p udp --dport 53 -m string --string "TENCENT" -m time --timestart 13:30 --timestop 20:30 --days Mon,Tue,Wed,Thu,Fri,Sat -j DROP

#星期一到星期六的13:30-20:30禁止QQ通信

iptables -I FORWARD -s 192.168.0.0/24 -m string --string "qq.com" -m time --timestart 8:15 --timestop 12:30 --days Mon,Tue,Wed,Thu,Fri,Sat -j DROP

#星期一到星期六的8:00-12:30禁止qq网页

iptables -I FORWARD -s 192.168.0.0/24 -m string --string "qq.com" -m time --timestart 13:00 --timestop 20:30 --days Mon,Tue,Wed,Thu,Fri,Sat -j DROP

#星期一到星期六的13:30-20:30禁止QQ网页

iptables -I FORWARD -s 192.168.0.0/24 -m string --string "ay2000.net" -j DROP

iptables -I FORWARD -d 192.168.0.0/24 -m string --string "宽频影院" -j DROP

iptables -I FORWARD -s 192.168.0.0/24 -m string --string "色情" -j DROP

iptables -I FORWARD -p tcp --sport 80 -m string --string "广告" -j DROP

#禁止ay2000.net,宽频影院,色情,广告网页连接 !但中文 不是很理想

iptables -A FORWARD -m ipp2p --edk --kazaa --bit -j DROP

iptables -A FORWARD -p tcp -m ipp2p --ares -j DROP

iptables -A FORWARD -p udp -m ipp2p --kazaa -j DROP

#禁止BT连接

iptables -A FORWARD -p tcp --syn --dport 80 -m connlimit --connlimit-above 15 --connlimit-mask 24 -j DROP

#只允许每组ip同时15个80端口转发

#######################################################################

sysctl -w net.ipv4.ip_forward=1 &>/dev/null

#打开转发

#######################################################################

sysctl -w net.ipv4.tcp_syncookies=1 &>/dev/null

#打开 syncookie (轻量级预防 DOS ***)

sysctl -w net.ipv4.netfilter.ip_conntrack_tcp_timeout_established=3800 &>/dev/null

#设置默认 TCP 连接痴呆时长为 3800 秒(此选项可以大大降低连接数)

sysctl -w net.ipv4.ip_conntrack_max=300000 &>/dev/null

#设置支持最大连接树为 30W(这个根据你的内存和 iptables 版本来,每个 connection 需要 300 多个字节)

#######################################################################

iptables -I INPUT -s 192.168.0.50 -j ACCEPT

iptables -I FORWARD -s 192.168.0.50 -j ACCEPT

#192.168.0.50是我的机子,全部放行!

图像识别VPU——易用的嵌入式AI支持深度学习平台介绍-桐烨科技-踏上文明的征程-51CTO博客

$
0
0

公司玩了大半年的嵌入式AI平台,现在产品进入量产模式,也接触了很多嵌入式方案,有了一些心得体会,本人不才,在这里介绍一下一款简单易用的嵌入式AI方案——Movidius Myriad 2 VPU(MA2450) 和 Myriad X VPU(MA2485)。这里本人重点提示:简单易用的嵌入式AI。现在好多家半导体厂商已经推出嵌入式AI平台,比如华为海思今年4月份发布的Hi3559A,这个样品超过100美金/片,集成寒武纪AI核(遗憾不是最新的版本,因为最近寒武纪又发布最新的AI版本,同时还集成大名鼎鼎Cadence的 4核DSP);赛灵思Xilinx的FPGA—— Zynq 7020,ZU2CG开发难度大,价格不菲,还有其他家的ARM+FPGA方案也不便宜,开发难度也不小;英伟达的GPU——JETSON TX2,TX2核心板英伟达自己生产,价格太贵,不适合产品小型化生产;TI 的TDA2x系列和DAVINCI系列最新的DM505,以及后续的版本,专注辅助驾驶ADAS,他的64bit浮点DSP C66X+EYE也支持深度学习(不要小瞧这个EYE,深度学习方面一个EYE可比2个C66X 浮点DSP还牛),不过功耗太高,软件资源也不好搞到,海掏买美国D3公司DEMO板价格不菲,而且没技术支持开发周期过长,价格也不便宜。鉴于本公司的资源(小公司),我们选择了Intel的Movidius Myriad 2,在软件资源方面,Intel推出神经计算棒的免费NCSDK,这个软件资源让很多公司看到嵌入AI领域的希望,这一手Intel做得不错,很多公司都在嵌入式开发板树莓派3上面加这个神经计算棒学习,销售比较火爆。当然如果要拿到完整的MDK,直接使用Myriad 2 VPU和Myriad X VPU做控制器(比如直接使用片上LEON4运行客户软件,直接接CMOS SENSOR,接网口芯片,4K H.264和H.265编解码,USB,PCIE,SPI,I2C,UART控制等等),那就得花超过100---400万RMB不菲的门槛费,这些就是中大型公司的玩法,这点钱无所谓。

Movidius Myriad 2 VPU (Vision Processing Unit——视觉处理器)被称作为“第三次影像革命的开端”的芯片方案。Movidius 已经被Intel收购,Intel Movidius Myriad 2 VPU可在不同目标应用中提供低功耗、高性能的视觉处理解决方案,其中包括嵌入式深度神经网络、位姿估计、室内导航、3D深度感应、3D制图(3D扫描建模),视觉惯性测距,以及手势/眼部跟踪,基于深度学习的环境感知。
安防巨头海康和大华把Movidius Myriad 2(MA2450)视觉处理单元应用于视频监控摄像头,在完成监控和录制等传统任务外,提供人群密度监测、立体视觉、面部识别、人数统计、行为分析以及检测非法停放车辆等先进的视频分析功能。Myriad 2为大疆最近发布的首款迷你无人机Spark提供了视觉智能技术,该无人机早就大批量生产。
这颗芯片被一分为二,其中一部分有12个SHAVE 128位处理器,专为影像处理负载做优化,每颗都运作在600MHz的频率下,而且有超频潜能,第一代的180MHz显然是不够看的;与这些处理器相匹配的是Movidius称之SIPP过滤器(Streaming Inline Processing Pipeline filters)的硬件加速器——这玩意儿可完成一些预设的影像处理任务,比如将来自不同类型摄像头的数据融合到一起,或者将多个视频内容接合到一起;另外还有2个32位RISC处理器用于芯片管理,这就是LEON4(LEON是一款32位RISC处理器,支持SPARC V8指令集,由欧洲航天总局旗下的Gaisler Research开发、维护,目的是摆脱欧空局对美国航天级处理器的依赖。LEON的主要产品线包括LEON2、LEON3、LEON4)。SHAVE这一端对原始影像数据做计算处理,OEM厂商可以选择不同的方案;SIPP则可协力处理通常任务;集中型的寄存器结构令芯片两侧可同时对相同的数据做处理。这些对于降低延迟是相当有价值的。
鉴于这样的架构设计,Myriad 2 VPU芯片面积是6.5mm,厚度1mm,具体的性能则是可以48fps的帧率同时处理来自12个1300万像素摄像头的数据,以60fps拍摄4K视频自然也是毫无压力,功耗低于0.5W(台积电28nm HPC工艺)。按照El-Ouazzane的说法,相比能够提供同等效果的GPU,Myriad 2的功耗低了最少10倍。
深度学习框架方面,支持Caffe,Caffe的全称是Convolutional Architecture for Fast Feature Embedding,作者是博士毕业于伯克利的浙江人贾扬清,它是一个清晰、高效的开源深度学习框架,核心语言是C++,支持命令行、Python和Matlab接口,既可以在CPU上运行也可以在GPU上运行。同时也支持Google的TensorFlow。所以C/C++、Python程序员可以快速切入深度学习的架构去工作。所以说,支持深度学习易用的嵌入式平台,非VPU莫属。前面提到的Intel Movidius神经元棒,包括他们提供的免费NCSDK软件包,可以满足那些C/C++程序员、Python程序员轻松在WIN下直接开发AI软件,也可以在ubuntu下直接开发软件,很方便,而在嵌入式前端,同样也可以支持NCSDK软件包,玩得好Caffe和TensorFlow应该很快上手进行算法优化和设计。
而2017年推出的Movidius Myriad X(MA2485)超级NB,Myriad X将提供十倍于Myriad 2同样功率范围内深层神经网络(DNN)的性能。
图像识别VPU——易用的嵌入式AI支持深度学习平台介绍
Myriad X 有4个可C编程的128位VLIW矢量处理器和可配置的MIPI通道,并扩展了2.5 MB的芯片内存和更多的固定功能成像/视觉加速器。就像在Myriad X中发现的一样,Myriad X的矢量单位都是专有的SHAVE (流混合的架构矢量引擎)处理器,对计算机视觉工作负载进行了优化。Myriad X也支持最新的LPDDR4,MA2085变体只配置了外部存储器接口。
Myriad X的另一个新功能是4K硬件编码,4K在30Hz(H.264/H.265)和60 Hz(M/JPEG)支持。从接口上看,Myriad X带来了USB 3.1和PCIe 3.0支持,这两个都是Myriad VPU家族新支持的接口。与Myriad 2一样,所有这些都是在同一个小于2W的功率范围中完成的,更具体地说是在1W以内,使用台积电16nm FFC工艺。所以说,在如此低功耗下就能完成很多视频处理和深度学习,前面提到的几个平台根本无法做到。
从目前前端图像识别市场反馈的角度看,这个Myriad 2 VPU(MA2450) 和 Myriad X VPU(MA2485)芯片出货量比较大。还有在开发板-学习板方面,便宜的树莓派3,树莓派3+都可以直接拿神经计算棒进行深度学习算法开发,简单易用。如果是产品设计方面,本公司的VPU模组和ARM + VPU方案也可以快速出产品。以下是在本公司的HI3516D+VPU和Hi3519V101+VPU板子上面测试的结果图:
图像识别VPU——易用的嵌入式AI支持深度学习平台介绍
本公司开发的AI平台,是ARM+VPU组合模式,我们低端使用华为海思Hi3516A/D + VPU和高端使用Hi3519V101+VPU,国产和进口的组合,因为海思Hi3516A/D和Hi3519V101支持H.264/H.265编解码,带有ISP,还带有一个IVE(智能视频分析算法加速器,确切的说是传统机器视觉算法加速器),然后再加上Intel Movidius 这个支持深度学习的VPU,就是我们ARM+VPU支持深度学习平台。也就是说我们的平台同时支持传统机器视觉算法+深度学习算法,而且还支持H.265编解码,海思Hi3516A/D和Hi3519V101的IVE支持的功能如下:
★DMA:支持直接拷贝、间隔拷贝、内存填充。
★Filter:支持 5x5 模板滤波。
★CSC:支持 YUV2RGB、 YUV2HSV、 YUV2LAB、 RGB2YUV 颜色空间转换。
★FilterAndCSC:支持 5x5 模板滤波和 CSC 的复合功能。
★Sobel:支持 5x5 模板 Sobel-like 梯度计算。
★MagAndAng\Canny:支持 5x5 模板梯度幅值和幅角计算、 Canny 边缘提取。
★Erode:支持 5x5 模板腐蚀。
★Dilate:支持 5x5 模板膨胀。
★Thresh\Thresh_S16\Thresh_U16:支持图象阈值化处理。
★And\Or\Xor:支持两幅图象相与、或、异或。
★Add\Sub:支持两幅图象相加权加、减。
★Integ:支持积分图计算。
★Hist:支持直方图统计。
★Map:支持对图像通过 256 级 map 映射赋值。
★16BitTo8Bit:支持 16bit 数据到 8bit 数据线性转换。
★OrdStatFilter:支持顺序统计量滤波:中值滤波、最大值滤波、最小值滤波。
★Bernsen:支持 Bernsen 二值化。
★NCC:支持两相同大小图像互相关系数计算。
★CCL:支持连通区域标记。
★GMM:支持灰度图与 RGB 图的混合高斯背景建模。
★LBP:支持简单局部二值模式计算。
★NormGrad:支持归一化梯度计算。
★LKOpticalFlow:支持 LK 光流跟踪。
★STCorner:支持 ShiTomasi 角点检测。
★GradFg:支持梯度前景运算。
★MatchBgModel\UpdateBgModel:支持背景匹配、背景更新。
★ANN_MLP_Predict:支持 ANN_MLP 预测。
★SVM_Predict:支持 SVM 预测。
★支持单独进行软复位。
★支持 128bit AXI 总线和 32 bit APB 总线。
★支持链表级中断、节点级中断和超时中断。
★支持 SP 400、 SP420 (semi-plannar 420)、 SP422 (semi-plannar 422)、 package、
planar 等输入格式。
★支持 SP 400、 SP420、 SP422、 package、 plannar 等输出格式。

这些功能直接集成在芯片内部,通过加载LIB和函数调用就可以使用了,不需要ARM来运算。搞过传统算法的人对上面列的内容应该很熟悉,这里就不累赘。
至于Hi3519V101+VPU的开发攻略,本人不打算写了,因为海思的SDK包里面的手册就写得很详细了,VPU移植到ARM平台的NCSDK软件Intel官网也有,本人现在没有深入去研究,都是员工在搞,在这里写出来就比较班门弄斧。
下图就是Hi3519V101 SDK的里面的文档,看了这些详细的文档,有点嵌入式底子的工程师应该知道如何搭建环境、编译、和烧写了。
图像识别VPU——易用的嵌入式AI支持深度学习平台介绍
下面图片是我们自己做的嵌入式VPU模块和嵌入式Hi3519V101+VPU核心板硬件,没有硬件平台支持,再好的算法也不能转化价值。还有这个VPU支持Google的TensorFlow,这个对Python程序员应该很快进入嵌入式AI开发角色,而不是停留在PC端和服务端,现在很多大公司和有前沿实力的创业公司都往前端布局,嵌入式AI平台会越来越火,特别是LPDDR5出来的时候,会使嵌入式AI芯片的带宽大大提升,这样更加支持算法度更复杂的深度学习算法。
(项目双赢合作,联系QQ:2505133162)
图像识别VPU——易用的嵌入式AI支持深度学习平台介绍


图像识别——ubuntu16.04 movidius VPU NCSDK深度学习环境搭建-桐烨科技-踏上文明的征程-51CTO博客

$
0
0

这篇文章本人不打算长篇累牍去写,结合以前写的文章,从软件角度去写一些点滴,伴随人工智能AI的火爆,现在图像识别算法也异常火爆,上一篇文章提到Intel movidius Myriad 2 VPU(MA2450)是一种简单易用的深度学习平台,说到简单易用,但很多网友和客户还是一头雾水,本人还是觉得在这里班门弄釜一下,简单写一些,在ubuntu环境下搭建深度学习开发环境。
Intel movidius提供一个免费下载的深度学习开发版本,叫NCSDK,是配合Intel movidius 神经计算棒(Neural Compute Stick简写:NCS)一起使用的,目前最新的版本是V2.05.00,这个版本我们的软件工程师还在测试,这里先介绍V1.12.00。 Intel movidius官网是: https://developer.movidius.com/。很多公司都已经采购一个Intelmovidius 神经计算棒学习。NCSDK安装手册要求使用64bit ubuntu16.04,这个本公司软件工程师也正在玩的环境。这里本人也没有必要去如何安装64bit ubuntu16.04,即ubuntu-16.04.3-desktop-amd64.iso,因为本人已经写过32bit的ubuntu16.04的文章见《图像识别DM8127开发攻略——开发环境搭建》和64bit ubuntu18.04的文章《Ubuntu-18.04 LTS嵌入式linux开发环境搭建》,参考这两篇文章应该完全可以正确安装64bit ubuntu16.04,不过有两个工具需要安装:Docker和Python virtualenv,百度一下使用apt-get install docker-ce相关文章和apt-get install virtualenv,apt-get install virtualenvwrapper相关文章。
环境搭建很简单,Intel movidius已经把整个免费的NCSDK打包好,你只要保证你的64bit ubuntu16.04能上网就可以了。
#apt update (安装ubuntu时如果做了就不做这一步)
#apt-get install git (安装ubuntu时如果做了就不做这一步)
#git clone https://github.com/movidius/ncsdk.git(这个是链接下载V1.XX的版本)
#cd ncsdk
#make install
#make examples (建议先插上神经计算棒在电脑上)
注意-注意-注意:20180817补充说明:上面的git方法下载官网宣布已经失效,movidius官网现在提供新的方法:
#wget https://ncs-forum-uploads.s3.amazonaws.com/ncsdk/ncsdk-01_12_00_01-full/ncsdk-1.12.00.01.tar.gz
#tar xvf ncsdk-1.12.00.01.tar.gz
#cd ncsdk-1.12.00.01
#make install
#make examples
同样V2.05版本可以关注官网的下载方法。
使用git去官网服务器下载对应的NCSDK包,上面的命令前面两个在安装ubuntu的时候就应该安装了,没有安装git工具就做前面两个命令。实际上是简简单单4个命令,就基本保证安装好Intel movidius NCSDK深度学习开发环境(不过这个网络下载安装时间有点长,耐心等待)。然后去淘宝或者京东花550-599元买一个Intel movidius 神经计算棒,插上电脑就可以玩了,VMware虚拟机安装的64bit ubuntu16.04都可以使用,只要支持usb2.0或者同时支持USB2.0-USB3.0的电脑都可以玩。也可以采购本公司的VPU模组,不过本公司的VPU模组(新版本也同时支持USB2.0和USB3.0信号)适合在嵌入式板子上面使用。下面是PC端需要的配置:
图像识别——ubuntu16.04 movidius VPU NCSDK深度学习环境搭建

安装结束后,我们进入ncsdk目录下去看看。
图像识别——ubuntu16.04 movidius VPU NCSDK深度学习环境搭建

图像识别——ubuntu16.04 movidius VPU NCSDK深度学习环境搭建

图像识别——ubuntu16.04 movidius VPU NCSDK深度学习环境搭建

上面3个图注意一下examples里面的路径,ls看看就明白了,NCS配套的SDK中已经集成了一些网络模型比如AlexNet,GoogLeNet,SqueezeNet等,可以直接拿来使用。官方提供的API同时支持C/C++以及Python语言,让用户灵活选择自己熟悉的编程语言。
除了上面的NCSDK软件包,还有另外一个很重要的ncappzoo,NC App Zoo是一个让用户可以分享自己使用NCS做的一些应用、模型的地方,见Intel movidius官网。
还有NCSDK软件工具主要包括了mvNCCompile、mvNCProfile以及mvNCCheck:
• mvNCCompile是将Caffe/TF模型转换为NCS可识别的graph文件
• mvNCProfile是提供每层的数据用于评估Caffe/TF网络模型在NCS上的运行效率,辅助开发者优化网络模型结构
• mvNCCheck是通过在NCS和Caffe/TF上运行网络比较推断的结果
(注意:这些编译工具放在/usr/local/bin目录下,并不在ncsdk源码包里面,还有/opt/movidius目录下也有很多东西,可以进去看一下)
API则是计算神经棒的硬件调用接口,通过训练得到的网络模型可以使用mvNCCompile工具编译为能被NCS识别的graph文件,通过调用API,NCS可以通过USB接口方便的与主机(比如树莓派3B)通信,NCS利用训练好的网络模型计算出图像分析的结果,并传输到主机上,完成推理工作。
以上是PC端 64bit ubuntu16.04环境搭建movidius ncsdk,安装过程是相当简单。当然上面提到的环境搭建并不是嵌入式ARM环境的搭建,在ARM 搭建这个环境需要用到匹配的交叉编译环境,这里先不描述。

人脸识别准备 -- 基于raspberry pi 3b + movidius - wlu - 博客园

$
0
0

最近准备系统地学习一下深度学习和TensorFlow,就以人脸识别作为目的。

十年前我做过一些图像处理相关的项目和研究,涉及到图像检索。记得当时使用的是SIFT特征提取,该特征算子能很好地抵抗图像旋转、仿射变换等变化。可以说SIFT是图像特征工程方面做得很出色的算子。

现如今深度学习特别是CNN,ResNet等模型被研究者发明之后,图像特征工程似乎已经很“没有必要”了。深度神经网络通过多层表示能够更抽象地表示图像的特征(称作embedding)。

在人脸识别也得益于深度学习,其中facenet的性能非常出色。facenet基于triplet loss训练模型输出128维embedding。训练时准备M个人,每个人N张图像,目标使得同一个人的不同人脸的embedding距离尽量小,而不同人的人脸图像的embedding尽量大。

本文将描述基于raspberry 3B + movidius作为硬件平台,TensorFlow facenet作为模型实现人脸识别。后续将基于这套edge computing做一套完整的人脸识别系统,例如考勤系统。
本文将 不涉及在线人脸检测过程

raspberry 3B

当前的系统:

pi@raspberrypi:~ $ uname -a
Linux raspberrypi 4.14.34-v7+ #1110 SMP Mon Apr 16 15:18:51 BST 2018 armv7l GNU/Linux

相关外设:

  • 16G tf卡
  • 官方摄像头
  • 3.5电阻触屏

TensorFlow准备

首先在raspberry上安装TensorFlow。目前raspberry上预装了python2.7和python3.5.我们选择python3.5.
从https://github.com/lhelontra/tensorflow-on-arm/releases下载tensorflow-1.3.1-cp35-none-linux_armv7l.whl并安装:
pip3 install tensorflow-1.3.1-cp35-none-linux_armv7l.whl
可能需要pip3一些别的:

# numpy issue
sudo apt-get install libatlas-base-dev
# opencv cv2
pip3 install opencv-python
sudo apt-get install libjpeg-dev libtiff5-dev libjasper-dev libpng12-dev

pip3 install sklearn
pip3 install scipy
# qt issue
sudo apt-get install libqtgui4 libqt4-test

测试:

pi@raspberrypi:~ $ python3
Python 3.5.3 (default, Jan 19 2017, 14:11:04)
[GCC 6.3.0 20170124] on linux
Type "help", "copyright", "credits" or "license" for more information.>>> import tensorflow>>> tensorflow.__version__'1.3.1'

pi上运行facenet

有了TensorFlow之后我们可以编译facenet并在pi上运行。https://github.com/davidsandberg/facenet/tree/tl_revisited
基于模型20170512-110547运行compare.py来比较多张图像中人脸的距离。发现速度非常慢。
具体说,首先检测图像中的人脸,这里运行了mtnet网络,然后再通过facenet网络inference。单独测试inference的时间开销20+秒(inference时人脸图像都是160x160)。相比之下用dlib的开销在2秒左右。这样的性能很让人沮丧?
为了将facenet进行到底,我选择加速,movidius是神经计算神器,inference速度非常快。

movidius sdk 安装

clone代码 git clone -b ncsdk2 https://github.com/movidius/ncsdk.git
因为我们事先安装了TensorFlow,所以修改ncsdk.conf,不再安装TensorFlow,但是还需要caffe

INSTALL_DIR=/opt/movidius
INSTALL_CAFFE=yes
CAFFE_FLAVOR=ssd
CAFFE_USE_CUDA=no
INSTALL_TENSORFLOW=no
INSTALL_TOOLKIT=yes
PIP_SYSTEM_INSTALL=no
VERBOSE=yes
USE_VIRTUALENV=no
#MAKE_NJOBS=1

make install

ncs model编译

clone代码: git clone -b ncsdk2 https://github.com/movidius/ncappzoo.git
在tensorflow/facenet下,根据README一步一步编译。最终得到facenet_celeb_ncs.graph文件,这个文件是movidius识别的图模型文件。

Movidius人脸识别

这里我先不考虑在线人脸检测。先准备一张照片,离线人脸检测并保存人脸图像作为比对目标。先以一张人脸为例,多个人脸图像其实是一样的。
在线检测时我们将摄像头的resolution设置小一些,例如280x280。在线识别是,人脸尽量靠近摄像头,这样可以认为这张照片就是人脸照片。或者也可以限定人脸在显示屏上给定的一个区域。
目前inference的速度~100ms,当前对ncs还不是很了解,待进一步研究后再优化。

代码如下(保存在ncappzoo/tensorflow/facenet)

  • VALIDATED_IMAGES_DIR + '/my1.png'是一张人脸图像,通过人脸检测得到后保存的结果
#! /usr/bin/env python3

import sys
sys.path.insert(0, "../../ncapi2_shim")
import mvnc_simple_api as mvnc

import numpy
import cv2
import sys
import os

from picamera.array import PiRGBArray
from picamera import PiCamera
import time


# initialize the camera and grab a reference to the raw camera capture
camera = PiCamera()

camera.resolution = (280, 280)
camera.framerate = 32
rawCapture = PiRGBArray(camera, size=(280, 280))

frame_name=''
EXAMPLES_BASE_DIR='../../'
IMAGES_DIR = './'

VALIDATED_IMAGES_DIR = IMAGES_DIR + 'validated_images/'
validated_image_filename = VALIDATED_IMAGES_DIR + 'my1.png'

GRAPH_FILENAME = "facenet_celeb_ncs.graph"

# name of the opencv window
CV_WINDOW_NAME = "FaceNet"


# the same face will return 0.0
# different faces return higher numbers
# this is NOT between 0.0 and 1.0
FACE_MATCH_THRESHOLD = 1.2


# Run an inference on the passed image
# image_to_classify is the image on which an inference will be performed
#    upon successful return this image will be overlayed with boxes
#    and labels identifying the found objects within the image.
# ssd_mobilenet_graph is the Graph object from the NCAPI which will
#    be used to peform the inference.
def run_inference(image_to_classify, facenet_graph):

    # get a resized version of the image that is the dimensions
    # SSD Mobile net expects
    resized_image = preprocess_image(image_to_classify)

    # ***************************************************************
    # Send the image to the NCS
    # ***************************************************************
    facenet_graph.LoadTensor(resized_image.astype(numpy.float16), None)

    # ***************************************************************
    # Get the result from the NCS
    # ***************************************************************
    output, userobj = facenet_graph.GetResult()

    return output


# overlays the boxes and labels onto the display image.
# display_image is the image on which to overlay to
# image info is a text string to overlay onto the image.
# matching is a Boolean specifying if the image was a match.
# returns None
def overlay_on_image(display_image, image_info, matching):
    rect_width = 10
    offset = int(rect_width/2)
    if (image_info != None):
        cv2.putText(display_image, image_info, (30, 30), cv2.FONT_HERSHEY_SIMPLEX, 0.5, (255, 0, 0), 1)
    if (matching):
        # match, green rectangle
        cv2.rectangle(display_image, (0+offset, 0+offset),
                      (display_image.shape[1]-offset-1, display_image.shape[0]-offset-1),
                      (0, 255, 0), 10)
    else:
        # not a match, red rectangle
        cv2.rectangle(display_image, (0+offset, 0+offset),
                      (display_image.shape[1]-offset-1, display_image.shape[0]-offset-1),
                      (0, 0, 255), 10)


# whiten an image
def whiten_image(source_image):
    source_mean = numpy.mean(source_image)
    source_standard_deviation = numpy.std(source_image)
    std_adjusted = numpy.maximum(source_standard_deviation, 1.0 / numpy.sqrt(source_image.size))
    whitened_image = numpy.multiply(numpy.subtract(source_image, source_mean), 1 / std_adjusted)
    return whitened_image

# create a preprocessed image from the source image that matches the
# network expectations and return it
def preprocess_image(src):
    # scale the image
    NETWORK_WIDTH = 160
    NETWORK_HEIGHT = 160
    preprocessed_image = cv2.resize(src, (NETWORK_WIDTH, NETWORK_HEIGHT))

    #convert to RGB
    preprocessed_image = cv2.cvtColor(preprocessed_image, cv2.COLOR_BGR2RGB)

    #whiten
    preprocessed_image = whiten_image(preprocessed_image)

    # return the preprocessed image
    return preprocessed_image

# determine if two images are of matching faces based on the
# the network output for both images.
def face_match(face1_output, face2_output):
    if (len(face1_output) != len(face2_output)):
        print('length mismatch in face_match')
        return False
    total_diff = 0
    for output_index in range(0, len(face1_output)):
        this_diff = numpy.square(face1_output[output_index] - face2_output[output_index])
        total_diff += this_diff
    print('Total Difference is: ' + str(total_diff))

    if (total_diff < FACE_MATCH_THRESHOLD):
        # the total difference between the two is under the threshold so
        # the faces match.
        return True

    # differences between faces was over the threshold above so
    # they didn't match.
    return False

# handles key presses
# raw_key is the return value from cv2.waitkey
# returns False if program should end, or True if should continue
def handle_keys(raw_key):
    ascii_code = raw_key & 0xFF
    if ((ascii_code == ord('q')) or (ascii_code == ord('Q'))):
        return False

    return True


# start the opencv webcam streaming and pass each frame
# from the camera to the facenet network for an inference
# Continue looping until the result of the camera frame inference
# matches the valid face output and then return.
# valid_output is inference result for the valid image
# validated image filename is the name of the valid image file
# graph is the ncsdk Graph object initialized with the facenet graph file
#   which we will run the inference on.
# returns None
def run_camera(valid_output, validated_image_filename, graph):

    frame_count = 0

    cv2.namedWindow(CV_WINDOW_NAME)

    found_match = False

    for frame in camera.capture_continuous(rawCapture, format="bgr", use_video_port=True):
        # grab the raw NumPy array representing the image, then initialize the timestamp
        # and occupied/unoccupied text
        vid_image = frame.array

        test_output = run_inference(vid_image, graph)


        if (face_match(valid_output, test_output)):
                print('PASS!  File ' + frame_name + ' matches ' + validated_image_filename)
                found_match = True
        else:
            found_match = False
            print('FAIL!  File ' + frame_name + ' does not match ' + validated_image_filename)

        overlay_on_image(vid_image, frame_name, found_match)

        # check if the window is visible, this means the user hasn't closed
        # the window via the X button
        prop_val = cv2.getWindowProperty(CV_WINDOW_NAME, cv2.WND_PROP_ASPECT_RATIO)
        if (prop_val < 0.0):
            print('window closed')
            break

        # display the results and wait for user to hit a key
        cv2.imshow(CV_WINDOW_NAME, vid_image)
        raw_key = cv2.waitKey(1)
        if (raw_key != -1):
            if (handle_keys(raw_key) == False):
                print('user pressed Q')
                break
        # show the frame
        #cv2.imshow("Frame", image)


        key = cv2.waitKey(1) & 0xFF

        # clear the stream in preparation for the next frame
        rawCapture.truncate(0)

        # if the `q` key was pressed, break from the loop
        if key == ord("q"):
            break


# This function is called from the entry point to do
# all the work of the program
def main():

    # Get a list of ALL the sticks that are plugged in
    # we need at least one
    devices = mvnc.EnumerateDevices()
    if len(devices) == 0:
        print('No NCS devices found')
        quit()

    # Pick the first stick to run the network
    device = mvnc.Device(devices[0])

    # Open the NCS
    device.OpenDevice()

    # The graph file that was created with the ncsdk compiler
    graph_file_name = GRAPH_FILENAME

    # read in the graph file to memory buffer
    with open(graph_file_name, mode='rb') as f:
        graph_in_memory = f.read()

    # create the NCAPI graph instance from the memory buffer containing the graph file.
    graph = device.AllocateGraph(graph_in_memory)

    validated_image = cv2.imread(validated_image_filename)
    valid_output = run_inference(validated_image, graph)

    run_camera(valid_output, validated_image_filename, graph)

    # Clean up the graph and the device
    graph.DeallocateGraph()
    device.CloseDevice()


# main entry point for program. we'll call main() to do what needs to be done.
if __name__ == "__main__":
    sys.exit(main())

ARM、DSP、AVR与C51的比较 - 高原 - CSDN博客

$
0
0

ARM+DSP与AVR作为现代CPU设计范例,从现代眼光来看,都是非常先进的设计。最重要的是吸取了C51体系所显露出来的问题,在原有系列的基础上,拥有高性能、高速度,甚至是更低的功耗。本论文只针对ARM+DSP、AVR和C51单片机的特点,从不同的侧面进行了比较和阐述。

  1 单片机的介绍

  单片微型计算机(Single-Chip Micmprocessor)是微型计算机(Microcomputer,简称微机)的一个重要分支。单片微型计算机简称单片机,特别适用于工业控制领域,因此又称为微控制器(Microcontroller)。它的体积小,质量轻,价格便宜,为学习,应用和开发提供了便利条件。单片机作为控制部分的核心部件,广泛运用于汽车、红外监控设备、各种电子玩具、各类报警装置、各类军工、航空航天产品等等。

  2 ARM+DSP的优点

  2.1 ARM单片机的优点与ARM处理器的优点

  2.2.1采用RISC架构的ARM单片机的优点

  (1)体积小、低功耗、低成本、高性能;(2)支持Thumb(16位)/ARM(32位)双指令集,能很好地兼容8位/16位器件;(3)大量使用寄存器,指令执行速度更快;(4)大多数数据操作都在寄存器中完成;(5)寻址方式灵活简单,执行效率高;(6)指令长度固定。

  2.2.2 ARM处理器的优点

  ARM是微处理器行业的一家知名企业,设计了大量高性能、价格低、耗能低的RISC处理器、相关技术及软件。ARM架构是面向低预算市场设计的第一款RISC微处理器,是32位单片机的行业标准,它提供一系列内核、体系扩展、微处理器和系统芯片方案,四个功能模块可供生产厂商根据不同用户的要求来配置生产。由于所有产品均采用一个通用的软件体系,所以相同的软件可在所有产品中运行。目前ARM在手持设备市场占有90%以上的份额,可以有效地缩短应用程序开发与测试的时间,也降低了研发费用。其优点是:(1)高性能、低功耗、低价格;(2)丰富的可选择芯片;(3)广泛的第三方支持;(4)完整的产品线和发展规划。

  2.2 DSP的优点

  DSP(digital singnal processor)是一种独特的微处理器,是以数字信号来处理大量信息的器件。其工作原理是接收模拟信号,转换为0或1的数字信号,再对数字信号进行修改、删除、强化,并在其他系统芯片中把数字数据解译回模拟数据或实际环境格式。它不仅具有可编程性,而且其实时运行速度可达每秒数以千万条复杂指令程序,远远超过通用微处理器,是数字化电子世界中重要的电脑芯片。它的强大数据处理能力和高运行速度,是最值得称道的两大特色。DSP芯片,也称数字信号处理器,是一种特别适合于进行数字信号处理运算的微处理器,其主要应用是实时快速地实现各种数字信号处理算法。

  DSP的优点是可程控,修改方便,稳定性好,可重复性好,抗干扰性能好,0/1电平之间的容限大,实现自适应算法,系统特性随输入信号的改变而改变,功耗小,系统开发快,价格低。根据数字信号处理的要求,DSP芯片一般具有以下特点:(1)在一个指令周期内完成一次乘法以及一次加法;(2)程序和数据空间分开,可以同时访问指令和数据;(3)片内具有快速RAM,通常可通过独立的数据总线在两块中同时访问;(4)具有低开销或无开销循环及跳转的硬件支持;(5)快速的中断处理和硬件I/O支持;(6)具有在单周期内操作的多个硬件地址产生器;(7)可以并行执行多个操作;(8)支持流水线操作,使取指、译码和执行等操作可以重叠执行。当然,与通用微处理器相比,DSP芯片的其他通用功能相对较弱些。

  3 AVR的优点

  采用RISC精简指令集的高速8位单片机,简称AVR。与其它8-Bit MCU相比,AVR 8-Bit MCU最大的特点是:(1)哈佛结构,具备1MIPS/ MHz的高速运行处理能力;(2)超功能精简指令集(RISC),具有32个通用工作寄存器,克服了如8051MCU采用单一ACC进行处理造成的瓶颈现象;(3)快速的存取寄存器组、单周期指令系统,大大优化了目标代码的大小、执行效率,部分型号FLASH非常大,特别适应于使用高级语言进行开发;(4)作输出时与PIC的HI/LOW相同,可输出40mA(单一输出),作输入时可设置为三态高阻抗输入或带上拉电阻输入,具备10 mA~20 mA灌电流的能力;(5)片内集成多种频率的RC振荡器、上电自动复位、看门狗、启动延时等功能,外围电路更加简单,系统更加稳定可靠;(6)大部分AVR片上资源丰富:带E2PROM,PWM,RTC,SPI,UART,TWI,ISP,AD,Analog Comparator,WDT等;(7)大部分AVR除了有ISP功能外,还有IAP功能,方便升级或销毁。

  AVR的优点是:(1)简便易学,费用低廉;(2)高速、低耗、保密;(3)L/O口功能强,具有A/D转换等电路;(4)有功能强大的定时器/计算器及通讯接口。

  4 C51的优点

  (1)它从内部硬件到软件有着一套完整的按位操作系统,称作位处理器或者布尔处理器,它的处理对象不是字或字节而是位,这就意味着它不仅能对片内某些特殊功能寄存器的某位进行处理;(2)C51单片机还在片内RAM区间特别开辟了一个双重功能的地址区间,其既可作字节处理,也可作位处理,使用起来灵活方便;(3)优点是乘法和除法指令,这给编程也带来了便利。

    5 C51与ARM+DSP的比较

  作为处理器,C51、ARM、DSP都不是单独作为芯片来提供给用户的,都要加一些外围电路来支持,比如:存储器、控制器、定时器、UART、SH、I2C等,所以从处理器的角度来比较二者:(1)C51是8位的,ARM是32位的,DSP有16位的,也有更高的;(2)从运算能力上看,C51最弱,DSP最强,ARM居中;(3)结构差别较大,C51最简单,是一般的冯诺伊曼结构,ARM9以上的是哈佛结构的RISC,DSP一般使用哈佛结构;(4)C51一般芯片面积非常小,工作频率很低,一般是10多MHz,有的是24MHz,所以功耗低。DSP则频率很高,高达300MHz以上,所以功耗也大。ARM芯片面积也很小,ARM7是0.55 mm2,功耗也较小。频率大约在几十到200MHz之间;(5)C51一般主要应用于不需要太多计算量的控制类系统。一般配有丰富的外围module。DSP则主要应用于需要进行复杂计算的高端系统,例如图像处理,加密、解密,导航系统等,外围module一般较少。ARM是C51和DSP之间的一个折衷;(6)C51的性能远不如ARM和DSP,但仍然占据重要的一席之地,原因就是性能价格比。因为它太成熟了,太小了,太便宜了。而在一些需要复杂计算的领域,DSP也不可或缺。ARM的成功就是他找到了一个折衷点,并且建立了一个非常灵活的商业模型;(7)现在高端产品的一个趋势是ARM+DSP;(8)ARM具有完整的产品线和发展规划:ARM核根据不同应用需求对处理器的性能要求,有一个从ARM7、ARM9到ARM10、ARM11,以及新定义的CortexM/R/A系列完整的产品线。前几年应用较多的主要是基于V4架构的ARM7TDMI、ARM720T、ARM920T核的一些处理器芯片,如NXP的LPC2000系列、ST的STR7/9系列、Atmel的AT91系列和Samsung的S3C系列。近两年,ARM Cortex系列以更好的性能、更低的价格得到快速推广,典型的就是基于CortexM3的STM32系列。ARM CortexM/R/A系列分别针对不同的应用领域。M系列主要面向传统微控制器(MCU/单片机)应用,这类应用面很广,要求处理器有丰富的外设,并且各方面比较均衡;R系列强调实时性,主要用于实时控制,如汽车引擎;A系列面向高性能、低功耗应用系统,如智能手机。选用ARM处理器进行开发,技术积累性较强,生命周期长,设计重用度高,不易被淘汰。用户在选择ARM处理器时,可以针对应用需求,从大量的ARM芯片中选用满足性能、功能要求的产品,以获得较好的性价比。

  6 AVR和ARM的区别

  (1)ARM是IP核,可供各大芯片商集成到各自的设计中;AVR这方面就差点,ATMEL一家别无选择;(2)实际产品成本方面,AVR优于ARM,毕竟AVR是8位机,配什么外设都便宜,由于速度比ARM低,PCB版也好设计,20MHz的数字电路基本上只要通就行了,不用过多考虑信号完整性;而ARM的速度能轻易上100MIPS,32位的CPU也可以,速度上AVR根本没法与ARM相比,不过ARM带来的问题就多了,要4层PCB,而且ARM的外设也贵;(3)功能方面,ARM大大优于AVR,ARM可以做PDA,手机;AVR显然不行。功能上的优势意味着ARM比AVR有着更广的应用范围;(4)外设方面AVR稍强,实际上我们可以看到Atmel公司的基于ARM核的AT91M55800A包括了很多AVR的外设,但还缺TWI/I2C,可变增益ADC,EEPROM等好用的部件。但是,毫无疑问,ARM的外扩外设能力比AVR强的多,所以外设方面两者差不多。操作系统和软件源码资源方面,ARM拜Linux之赐,比AVR有优势点。但AVR上的嵌入式操作系统也不是没有,Uc/OS-Ⅱ就不错;(5)调试手段方面,ARM应该优于AVR,AVR就一个JTAG接口的仿真器可以,但所支持芯片有限,ARM方面书上有相当多的方法调试。

  7 AVR与C51的区别

  (1)速度快AVR是精简指令集单片机,其开关电源模块速度可以达到1MIPS/s,理论上是传统的C51的12倍,实际上在10倍左右;(2)片上资源丰富 MEGA系列片上具备JTAG仿真和下载功能。片内含有看门狗电路、片内程序Flash、片内数据RAM、同步串行接口SPI、异步串口UART、内嵌AD转换器、EEPROM、模拟比较器、PWM定时计数器、TWI(IIC)总线接口、硬件乘法器、独立振荡器的实时计算器RTC、片内标定的RC振荡器等片内外设,可以满足各种开发需求;(3)驱动能力强I/O可以直接驱动数码管、LED、继电器等器件,节省很多外围电路,既节省开发难度,又降低成本;(4)功耗低低功耗虽然比不上430单片机,但也是单片机中佼佼者;(5)可选择型号种类多 各种不同的MTD2002型号可以满足不同的需求,让你的项目有很多的选择余地;(6)性价比高在高性能的前提下,并没有增加芯片的价格,价格可以和C51相比,而功能却是C51不可以比的。

  8 结束语

  目前DSP、AVR、ARM技术应用领域非常广泛,对DSP、ARM、AVR问题的关心仍是产业界流行的趋势。同时,随着新的应用的不断产生,新的嵌入式微处理器也层出不穷,可见ARM微处理器还有很大的发展空间。相信在未来几年DSP+ARM及AVR技术的发展和应用将对我们的工作和生活等各个方面产生更大的影响,所以学习DSP+ARM以及AVR单片机将会很有前途。


从零开始搭建树莓派 + intel movidius 神经元计算棒2代深度学习环境 - Mingyong_Zhuang的技术博客 - CSDN博客

$
0
0

摘要

本文从零开始搭建,从烧写树莓派的系统开始,到最后用计算棒跑人脸检测。本教程适用二代的计算棒,不适合一代的计算棒。
参考: https://software.intel.com/en-us/articles/OpenVINO-Install-RaspberryPI

材料硬件:

1、 树莓派3B+
2、 intel movidius 神经元计算棒2代
3、 显示器、鼠标键盘、读卡器、用于做树莓派系统盘的16GTF卡
4、 烧写树莓派系统用的PC(win10)

步骤:

1、 下载树莓派镜像并解压

树莓派系统镜像使用Stretch版本——2018-11-13-raspbian-stretch,其他低于这个版本的没有尝试过可不可行
下载链接: http://downloads.raspberrypi.org/raspbian_latest
参考: http://shumeipai.nxez.com/download#os
下载并解压出img文件

2、 烧写镜像

插入16G TF卡,格式化,打开镜像烧写软件Win32DiskImager.exe加载镜像,进行下载:
在这里插入图片描述
点write,再yes
在这里插入图片描述
在这里插入图片描述
烧写成功。不要管格式化警告,直接取消,拔出TF卡
烧写参考: http://bbs.eeworld.com.cn/thread-503614-1-1.html?_t=t

3、 启动树莓派

把TF卡插上树莓派,其他的显示器、鼠标键盘也插好,然后树莓派上电
在这里插入图片描述
红绿指示灯都会闪就表示系统启动成功,然后等待显示器显示桌面
在这里插入图片描述

4、 配置树莓派

安装界面的引导配置好树莓派:
在这里插入图片描述
在这里插入图片描述
在这里插入图片描述
接下来打开首选项配置硬件
在这里插入图片描述
在这里插入图片描述
在这里插入图片描述
重启,配置完成
然后进行换源,这样下载速度会快一点稳定一点:
使用管理员权限,执行

leafpad /etc/apt/sources.list

在打开的文件中,用#注释掉原文件内容,用以下内容取代:

deb http://mirrors.tuna.tsinghua.edu.cn/raspbian/raspbian/ stretch main contrib non-free rpi
deb-src http://mirrors.tuna.tsinghua.edu.cn/raspbian/raspbian/ stretch main contrib non-free rpi

保存,退出。
使用管理员权限执行:

leafpad /etc/apt/sources.list.d/raspi.list

用#注释掉原文件内容,用以下内容取代:

deb http://mirror.tuna.tsinghua.edu.cn/raspberrypi/ stretch main ui
deb-src http://mirror.tuna.tsinghua.edu.cn/raspberrypi/ stretch main ui

保存,退出。
使用sudo apt-get update命令,更新软件源列表,同时检查您的编辑是否正确。
完成,换成了清华大学的软件源。
在这里插入图片描述
在这里插入图片描述

5、 安装cmake

再后面的安装中需要cmake,要先安装,执行:

apt install cmake

到这里树莓派的配置就完成了,接下来要开始计算棒toolkit的安装了

6、 下载OpenVINO toolkit for Raspbian安装包:

https://download.01.org/openvinotoolkit/2018_R5/packages/l_openvino_toolkit_ie_p_2018.5.445.tgz

本次使用的版本是2018.5.445,安装请在下面链接中查看最新的安装包版本:
https://software.intel.com/en-us/articles/OpenVINO-Install-RaspberryPI
在这里插入图片描述
下载完后包位于Downloads/目录下,打开命令行

cd ~/Downloads/

解压包:

tar -xf l_openvino_toolkit_ie_p_2018.5.445.tgz

7、 配置路径与环境

执行以下命令,会自动对setupvars.sh文件做修改

sed -i "s|<INSTALLDIR>|$(pwd)/inference_engine_vpu_arm|" inference_engine_vpu_arm/bin/setupvars.sh

再配置环境,有两种做法
一种是临时的,只对该次的窗口有效

source inference_engine_vpu_arm/bin/setupvars.sh

还有永久性的,执行:

leafpad /home/pi/.bashrc

打开.bashrc文件,再最后一行添加一句:

source /home/pi/Downloads/inference_engine_vpu_arm/bin/setupvars.sh

在这里插入图片描述
保存,再打开一个新的终端,如果出现:

[setupvars.sh] OpenVINO environment initialized

就表示成功了
在这里插入图片描述

8、 添加USB规则

将当前Linux用户添加到users组:

sudo usermod -a -G users "$(whoami)"

注:这里要说的是我们现在是root用户,如果打开新窗口的话起始用户是pi,所以出现[ setupvars.sh] OpenVINO environment initialized,是对于pi用户来说的,如果在新窗口中用root执行程序,其实并没有成功加载[ setupvars.sh] OpenVINO environment initialized,需要自己再执行一遍
source /home/pi/Downloads/inference_engine_vpu_arm/bin/setupvars.sh,才能给root用户配置好OpenVINO environment initialized。这一点要特别注意,很细节的东西,我在这里折腾了好久。
接下来配置USB规则,执行:

sh inference_engine_vpu_arm/install_dependencies/install_NCS_udev_rules.sh

在这里插入图片描述
到这里就成功安装好计算棒所需的所有东西了

9、 demo测试验证安装是否成功

构建和运行对象检测示例,这个例子是执行人脸检测的。
转到包含示例源代码的文件夹:

cd inference_engine_vpu_arm/deployment_tools/inference_engine/samples
mkdir build && cd build
cmake .. -DCMAKE_BUILD_TYPE=Release -DCMAKE_CXX_FLAGS="-march=armv7-a"
make -j2 object_detection_sample_ssd

在这里插入图片描述
编译完成后下载网络和权重文件:

wget --no-check-certificate https://download.01.org/openvinotoolkit/2018_R4/open_model_zoo/face-detection-adas-0001/FP16/face-detection-adas-0001.bin
wget --no-check-certificate https://download.01.org/openvinotoolkit/2018_R4/open_model_zoo/face-detection-adas-0001/FP16/face-detection-adas-0001.xml

在这里插入图片描述
然后自己在网上找一张人脸的图片,执行

./armv7l/Release/object_detection_sample_ssd -m face-detection-adas-0001.xml -d MYRIAD -i <path_to_image>
#<path_to_image>是人脸图片的绝对路径

如果运行成功,会在build文件夹下输出一副out_0.bmp图片:
在这里插入图片描述
到这里表示计算棒运行成功!

10、 Opencv + python api调用方法:

有时候我们是在python下做开发,这里也有提供了Opencv + python的运行例子
新建一个文件夹,先建立一个face_detection.py文件,写入:

import cv2 as cv
# Load the model 
net = cv.dnn.readNet('face-detection-adas-0001.xml', 'face-detection-adas-0001.bin') 
# Specify target device 
net.setPreferableTarget(cv.dnn.DNN_TARGET_MYRIAD)
# Read an image 
frame = cv.imread('/path/to/image')
# Prepare input blob and perform an inference 
blob = cv.dnn.blobFromImage(frame, size=(672, 384), ddepth=cv.CV_8U) net.setInput(blob) 
out = net.forward()
# Draw detected faces on the frame 
for detection in out.reshape(-1, 7): 
    confidence = float(detection[2]) 
    xmin = int(detection[3] * frame.shape[1]) 
    ymin = int(detection[4] * frame.shape[0]) 
    xmax = int(detection[5] * frame.shape[1]) 
    ymax = int(detection[6] * frame.shape[0])
    if confidence > 0.5:
        cv.rectangle(frame, (xmin, ymin), (xmax, ymax), color=(0, 255, 0))
# Save the frame to an image file 
cv.imwrite('out.png', frame)

在文件夹中放入刚刚我们下载的那两个文件:face-detection-adas-0001.bin和face-detection-adas-0001.xml
还有用于检测用的脸的图片face.jpeg
此时是在root权限下,我们执行:

source /home/pi/Downloads/inference_engine_vpu_arm/bin/setupvars.sh

然后执行:

python3 face_detection.py

程序成功运行没报错,则表示运行成功,然后我们会在文件夹下看见输出结果,检测成功
在这里插入图片描述

小小甜菜OpenVINO爬坑记 - oZhiZhuXia12的博客 - CSDN博客

$
0
0

小小甜菜OpenVINO爬坑记

OpenVINO是intel提供的一个深度学习优化工具,目前可以使用在win10,Ubuntu16.04两个平台上,官方已经宣布后期会支持树莓派系统。它是Movidius x的使用接口,同时支持多种框架,也提供了大量例程。
我使用的是UP Squared板卡,运行Ubuntu16.04。

在ubuntu上安装OpenVINO

//要安装在ubuntu16.04上,ubuntu18.04依赖出错。R4版有一定BUG,但不影响使用
//解压缩l_openvino_toolkit_p_2018.4.420.tgz
cd l_openvino_toolkit_p_2018.4.420
sudo ./install_GUI.sh
cd /opt/intel/computer_vision_sdk/install_dependencies
sudo -E ./install_cv_sdk_dependencies.sh
sudo gedit ~/.bashrc
//最后添加:source /opt/intel/computer_vision_sdk/bin/setupvars.sh
source ~/.bashrc
cd /opt/intel/computer_vision_sdk/deployment_tools/model_optimizer/install_prerequisites
sudo ./install_prerequisites.sh
//运行dome
cd /opt/intel/computer_vision_sdk/deployment_tools/demo
./demo_squeezenet_download_convert_run.sh
./demo_security_barrier_camera.sh
//使用Movidius,在新终端下
sudo usermod -a -G users "$(whoami)"
cat <<EOF > 97-usbboot.rules
SUBSYSTEM=="usb", ATTRS{idProduct}=="2150", ATTRS{idVendor}=="03e7", GROUP="users", MODE="0666", ENV{ID_MM_DEVICE_IGNORE}="1"
SUBSYSTEM=="usb", ATTRS{idProduct}=="2485", ATTRS{idVendor}=="03e7", GROUP="users", MODE="0666", ENV{ID_MM_DEVICE_IGNORE}="1"
SUBSYSTEM=="usb", ATTRS{idProduct}=="f63b", ATTRS{idVendor}=="03e7", GROUP="users", MODE="0666", ENV{ID_MM_DEVICE_IGNORE}="1"
EOF
sudo cp 97-usbboot.rules /etc/udev/rules.d/
sudo udevadm control --reload-rules
sudo udevadm trigger
sudo ldconfig
rm 97-usbboot.rules
//使用GPU
cd /opt/intel/computer_vision_sdk/install_dependencies/
sudo -E su
./install_NEO_OCL_driver.sh
reboot

官方说明
参考
树莓派预览版

参考例程

人脸检测

//ubuntu16.04+OpenVINO(R4)+USB摄像头
//该项目默认服务器与处理后台放在一起,和通过修改实现前后端分离。项目使用Node.js,后台使用C++构建mosquitto服务器。
sudo apt update
sudo apt install ffmpeg
sudo apt install libssl-dev
git clone https://github.com/17702513221/openVINO.git
cd /home/xs/openVINO/AI_work/face-access-control
mkdir -p build && cd build
cmake ..
make
//配置环境
sudo apt update
sudo apt install npm nodejs nodejs-dev nodejs-legacy
sudo apt install libzmq3-dev libkrb5-dev
sudo apt install sqlitebrowser
cd /home/xs/openVINO/AI_work/webservice/server
npm install
cd /home/xs/openVINO/AI_work/webservice/front-end
npm install
npm run dist
//运行程序
//1.启动Web服务,包括服务器和前端组件。
cd /home/xs/openVINO/AI_work/webservice/server/node-server
node ./server.js
cd /home/xs/openVINO/AI_work/webservice/front-end
npm run dev
//2.启动ffserver
cd /home/xs/openVINO/AI_work
sudo ffserver -f ./ffmpeg/server.conf
//4.启动cvservice和pipe到ffmpeg:(笔记本自带摄像头有BUG,我使用的是USB摄像头)
cd /home/xs/openVINO/AI_work/face-access-control/build
 export MQTT_SERVER=localhost:1883
 export MQTT_CLIENT_ID=cvservice
 export FACE_DB=./defaultdb.xml
 export FACE_IMAGES=../../webservice/server/node-server/public/profile/
 ./cvservice 0 2>/dev/null | ffmpeg -f rawvideo -pixel_format bgr24 -video_size vga -i - http://localhost:8090/fac.ffm
//5.浏览器打开
http://localhost:8080
//监控MQTT发送的数据
mosquitto_sub -t 'person/seen''commands/register' 'person/registered'

摄像头监控

//环境搭建在ubuntu16.04+OpenVINO(R3)
sudo apt update
sudo apt install ffmpeg
git clone https://github.com/17702513221/openVINO.git
//构建程序(测试版)
cd /home/xs/openVINO/reference_example/web_detector/application
source env.sh
mkdir -p build && cd build
cmake ..
make
//构建程序(web显示版)
cd /home/xs/openVINO/reference_example/web_detector/application
source env.sh
mkdir -p build && cd build
cmake ..
make CXX_DEFINES=-DUI_OUTPUT
//运行该应用程序
cd /home/xs/openVINO/reference_example/web_detector/build
//在CPU上运行
./web_detector -d CPU -m ../resources/ssd-cpu.xml -l ../resources/labels.txt
//在神经计算棒上运行
./web_detector -d MYRIAD -m ../resources/ssd-ncs.xml -l ../resources/labels.txt
//在浏览器上显示结果
google-chrome  --user-data-dir=$HOME/.config/google-chrome/Web_detector --new-window --allow-file-access-from-files --allow-file-access --allow-cross-origin-auth-prompt index.html
//查询摄像头设备号
ls /dev/video*
//修改conf.txt测试摄像头或视频
/dev/video0 person
../resources/bus_station_6094_960x540.mp4 person

人员计数器

//安装依赖环境
sudo apt update
sudo apt install npm nodejs nodejs-dev nodejs-legacy
sudo apt install libzmq3-dev libkrb5-dev
sudo apt install libssl-dev
sudo apt-get install doxygen graphviz
git clone https://github.com/17702513221/openVINO.git
cd /home/xs/openVINO/reference_example/paho.mqtt.c
make
make html
sudo make install
sudo ldconfig
cd /home/xs/openVINO/reference_example/people-counter/ieservice
mkdir -p build && cd build
source /opt/intel/computer_vision_sdk/bin/setupvars.sh
cmake ..
make
cd /home/xs/openVINO/reference_example/people-counter/webservice/ui
npm install
cd /home/xs/openVINO/reference_example/people-counter/webservice/server
npm install
sudo apt install ffmpeg
//运行程序
cd /home/xs/openVINO/reference_example/people-counter/webservice/server/node-server
node ./server.js
cd /home/xs/openVINO/reference_example/people-counter/webservice/ui
npm run dev
cd /home/xs/openVINO/reference_example/people-counter
sudo ffserver -f ./ffmpeg/server.conf
cd /home/xs/openVINO/reference_example/people-counter/ieservice/bin/intel64/Release
wget https://raw.githubusercontent.com/nealvis/media/master/traffic_vid/bus_station_6094_960x540.mp4
export MQTT_SERVER=localhost:1884
export MQTT_CLIENT_ID=cvservice
./obj_recognition -i bus_station_6094_960x540.mp4 -m ssd-cpu.xml -l  ssd-cpu.bin -d CPU -t SSD -thresh 0.7 0 2>/dev/null | ffmpeg -v warning -f rawvideo -pixel_format bgr24 -video_size 544x320 -i - http://localhost:8090/fac.ffm
//5.浏览器打开
http://localhost:8080

yolov3识别

//环境搭建ubuntu16.04+openVINO(R4)(自己根据之前的项目改写的,依赖还没统计,如果前面例子跑通,这个就能运行)
//先生成模型,默认下载官网权重转,实际项目可以使用darknet训练自己的权重
git clone https://github.com/17702513221/tensorflow_tools.git
cd tensorflow-yolo-v3
wget https://pjreddie.com/media/files/yolov3.weights
wget https://raw.githubusercontent.com/nealvis/media/master/traffic_vid/bus_station_6094_960x540.mp4
python3 demo.py --weights_file yolov3.weights --class_names coco.names --input_img Traffic.jpg --output_img out.jpg
cd /opt/intel/computer_vision_sdk/deployment_tools/model_optimizer
sudo python3 mo_tf.py --input_model /home/xs/xs/tensorflow-yolo-v3/yolo_v3.pb --tensorflow_use_custom_operations_config extensions/front/tf/yolo_v3.json --input_shape=[1,416,416,3]
将生成的yolo_v3.xml和yolo_v3.bin复制到本文件夹下
cd /home/xs/inference_engine_samples/intel64/Release
//视频测试:
./object_detection_demo_yolov3_async -i /home/xs/tensorflow_tools/tensorflow-yolo-v3/bus_station_6094_960x540.mp4 -m /home/xs/tensorflow_tools/tensorflow-yolo-v3/yolo_v3.xml -d CPU
//摄像头测试:
./object_detection_demo_yolov3_async -i cam -m /home/xs/tensorflow_tools/tensorflow-yolo-v3/yolo_v3.xml -d CPU
//下载我的开源项目运行:
git clone https://github.com/17702513221/openVINO.git
cd AI_work/yolov3-cpp
./build.sh
//测试(需先用tensorflow-yolo-v3生成模型,测试默认CPU其它需求自行修改)
./start.sh
//监视发送到本地服务器的MQTT消息,发送的是labels的序号,如:person对应0(需先使用新终端开启本地服务器)
mosquitto_sub -t 'yolov3/results'

darknet教学
yolo算法笔记
yolov3参数理解
车牌识别1
车牌识别2
HyperLPR车牌识别
Cascade车牌检测器训练
openVINO使用Intel® System Studio编写教学
System Studio许可证下载
openpose介绍

常用工具

  • 安装Intel® System Studio 2019
下载解压缩后,使用注册邮件获取激活码安装
cd /home/xs/system_studio_2019_ultimate_edition_offline
sudo ./install.sh
//启动
source /opt/intel/system_studio_2019/iss_ide_eclipse-launcher.sh
  • visual studio code
    到微软的vscode网站 (下载地址) https://code.visualstudio.com/Download,即可安装,可以使用( 命令行输入code . 在任何目录中打开该编辑器,只用deb安装的可以命令行打开,其他不行)
    sudo dpkg -i code_1.30.0-1544567151_amd64.deb
  • sqlite可视化工具
sudo apt-get install sqlitebrowser
sqlitebroswer test.db

在树莓派3B+上部署Intel NCS2神经网络计算棒 - weixin_43741611的博客 - CSDN博客

$
0
0
  • 2018.12.20日 英特尔更新了OpenVINO Toolkit R5版本。该版本添加了对树莓派的支持。作为NCS2的官方开发套件,OpenVINO在此之前只能在台式机ubuntu 16.04上使用。而在树莓派上使用的ncsdk并不支持NCS2计算棒。通过在树莓派上部署OpenVino,可实现在树莓派上使用NCS2加速神经网络计算。

本博客依照官方资料编写,博主在确认可行(排雷)后,第一时间写下此博文。官方链接:
https://software.intel.com/en-us/articles/OpenVINO-Install-RaspberryPI#install-the-package

系统要求:

你需要一个安装了Raspbian 9 OS 32位,也就是官方系统的树莓派3B+。

注意事项:

一般来说, 所有的步骤都是不可或缺的,除非您在之前已经部署过了一些模块。
OpenVINO toolkit for Raspbian OS 只包含了MYRIAD插件。

总体步骤:

  1. 安装Intel®️ Distribution of OpenVINO™️ toolkit。
  2. 设置环境变量。
  3. 添加USB规则。
  4. 运行例程确认安装正确。

安装包所含内容:

1.推理引擎
2.OpenCV 4.0
3.样本代码

安装步骤:

下载 Intel®️ Distribution of OpenVINO™️ toolkit
(此处默认下载目录,安装目录为~/Downloads)

打开终端:

1.切换目录:

cd ~/Downloads/

2.解压文件:(如后期版本更新,请自行修改版本号。)

tar -xf l_openvino_toolkit_ie_p_2018.5.445.tgz

3.修改 setupvars.sh脚本的< INSALLDIR >为安装目录的绝对路径:

sed -i "s|<INSTALLDIR>|$(pwd)/inference_engine_vpu_arm|" inference_engine_vpu_arm/bin/setupvars.sh

4.添加环境变量:
选择1:临时应用环境变量

source inference_engine_vpu_arm/bin/setupvars.sh

选择2: 长期应用环境变量

在.bashrc文件尾部添加以下代码:

source ~/Downloads/inference_engine_vpu_arm/bin/setupvars.sh

保存后,开启一个新的终端,看见
[ setupvars.sh] OpenVINO environment initialized
即成功。

5.添加USB规则:
添加当前用户到用户组:

sudo usermod -a -G users "$(whoami)"

执行完该命令后注销重新登录。

6.使用命令添加规则:

sh inference_engine_vpu_arm/install_dependencies/install_NCS_udev_rules.sh

注:如提示没有rule文件,请在当前目录建立文件97-myriad-usbboot.rules 文件内包含如下内容

SUBSYSTEM=="usb", ATTRS{idProduct}=="2150", ATTRS{idVendor}=="03e7", GROUP="users", MODE="0666", ENV{ID_MM_DEVICE_IGNORE}="1"
SUBSYSTEM=="usb", ATTRS{idProduct}=="2485", ATTRS{idVendor}=="03e7", GROUP="users", MODE="0666", ENV{ID_MM_DEVICE_IGNORE}="1"
SUBSYSTEM=="usb", ATTRS{idProduct}=="f63b", ATTRS{idVendor}=="03e7", GROUP="users", MODE="0666", ENV{ID_MM_DEVICE_IGNORE}="1"

然后使用下列命令

sudo cp 97-myriad-usbboot.rules /etc/udev/rules.d/
sudo udevadm control --reload-rules
sudo udevadm trigger
sudo ldconfig

即可添加USB规则。

至此,NCS2环境部署已完成。我们使用官方例程进行验证。

1.转到包含示例源码的文件夹:

cd inference_engine_vpu_arm/deployment_tools/inference_engine/samples

2.新建文件夹build:

mkdir build && cd build

3.构建对象检测示例:

cmake .. -DCMAKE_BUILD_TYPE=Release -DCMAKE_CXX_FLAGS="-march=armv7-a"
make -j4 object_detection_sample_ssd

4.下载预先训练的人脸检测模型:

wget --no-check-certificate https://download.01.org/openvinotoolkit/2018_R4/open_model_zoo/face-detection-adas-0001/FP16/face-detection-adas-0001.bin
wget --no-check-certificate https://download.01.org/openvinotoolkit/2018_R4/open_model_zoo/face-detection-adas-0001/FP16/face-detection-adas-0001.xml

5.运行示例测试结果:(path_to_image 为带人脸的图片路径)

./armv7l/Release/object_detection_sample_ssd -m face-detection-adas-0001.xml -d MYRIAD -i <path_to_image>

使用OpenCV API运行人脸检测模型

新建一个名为openvino_fd_myriad.py的文件,内容如下:(’/path/to/image‘替换为图片绝对路径)

import cv2 as cv

# Load the model 
net = cv.dnn.readNet('face-detection-adas-0001.xml', 'face-detection-adas-0001.bin') 

# Specify target device 
net.setPreferableTarget(cv.dnn.DNN_TARGET_MYRIAD)
      
# Read an image 
frame = cv.imread('/path/to/image')
# Prepare input blob and perform an inference 
blob = cv.dnn.blobFromImage(frame, size=(672, 384), ddepth=cv.CV_8U) net.setInput(blob) 
out = net.forward()
# Draw detected faces on the frame 
for detection in out.reshape(-1, 7): 
    confidence = float(detection[2]) 
    xmin = int(detection[3] * frame.shape[1]) 
    ymin = int(detection[4] * frame.shape[0]) 
    xmax = int(detection[5] * frame.shape[1]) 
    ymax = int(detection[6] * frame.shape[0])

    if confidence > 0.5:
        cv.rectangle(frame, (xmin, ymin), (xmax, ymax), color=(0, 255, 0))

# Save the frame to an image file 
cv.imwrite('out.png', frame)

然后运行脚本

python3 openvino_fd_myriad.py

以上完成后,便成功在树莓派上部署NCS2计算棒的运行环境了。

使用 ffmpeg nginx rtmp 搭建实时流处理平台 - nowgood - 博客园

$
0
0

环境: ubuntu 16.04
问题引入:

使用 opencv 获取摄像头数据帧, 进行处理之后(如进行 keypoint 识别), 将 opencv 中图像的 Mat类型转化为 ffmpeg 的 AvPicture 格式, 然后推送到流媒体服务器上, 本地通过 VLC 播放器查看实时检测效果

ffmpeg

sudo apt-get install ffmpeg -y

然后 /etc/ffserver.conf配置外部可接入地址 在文件的 <feed></feed>部分添加

BindAddress 0.0.0.0
ACL allow 127.0.0.1
ACL allow localhost
# 假设你的网络地址段为 `192.168.x.x`
ACL allow 192.168.0.0 192.168.255.255

然后 ffserver 开启服务器

ffserver -d -f /etc/ffserver.conf

使用 ffmpeg 查看可用视频和音频设备

通用: 通过 ffmpeg -devices查看可用设备类型

linux 查看可用设备

ffmpeg -f v4l2 -list_devices true -i ""
ls -l /dev/video*

macOS 查看可用设备 ffmpeg -f avfoundation -list_devices true -i ""

ffmpeg 基本操作

转播

ffmpeg  -i rtsp://184.72.239.149/vod/mp4://BigBuckBunny_175k.mov -vcodec libx264 -acodec libvo_aacenc  -f rtsp rtsp://9.123.143.116:8090/live.sdp

摄像头直播

ffmpeg -f video4linux2  -framerate 25 -video_size 640x480 -i /dev/video0 -vcodec libx264 -preset ultrafast -acodec libfaac -f flv  rtmp://10.210.107.141/live

本地文件播放

ffmpeg -re -i smurf.flv  -vcodec copy -acodec copy -f flv -y rtmp://9.123.143.116/live

搭建 rtsp 服务器

github 上有现成的开源的封装好的 rtsp 服务器工具, 这里使用 EasyDarwin

git clone https://github.com/EasyDarwin/EasyDarwin

修改配置文件 cfg.js, 将 rtsp_tcp_port端口修改为与 /etc/ffserver.conf中 HTTPPort 相同 (不知道什么原理)

// cfg.js
module.exports = {
    http_port: 10090,
    # I change 554 to 8090 to map /etc/ffserver.conf  http port
    rtsp_tcp_port: 8090,
    defaultPwd: '123456',
    rootDir: __dirname,
    wwwDir: path.resolve(__dirname, "www"),
    dataDir: path.resolve(os.homedir(), ".easydarwin")
}
# /etc/ffserver.conf
# Port on which the server is listening. You must select a different
# port from your standard HTTP web server if it is running on the same
# computer.

HTTPPort 8090

Linux 平台, 执行 start.sh运行服务执行 stop.sh停止服务

一定要将 cfg.js 中的 rtsp_tcp_port 端口号设置与与 /etc/ffserver.confHTTPPort端口号相同

测试代码

ffmpeg -i rtsp://184.72.239.149/vod/mp4://BigBuckBunny_175k.mov -strict -2 -rtsp_transport tcp -vcodec h264 -f rtsp rtsp://9.123.143.116:8090/live/
ffmpeg -f v4l2  -framerate 25 -video_size 640x480 -i  /dev/video0 -strict -2 -vcodec libx264 -acodec libvo_aacenc -f rtsp rtsp://9.123.143.116:8090/live/

搭建 rtmp 服务器

这里是采用比较常用的 nginx 来搭建rtmp 服务器

环境: nginx-1.8.1 + nginx-rtmp-module

nginx服务器的搭建

1.安装依赖

sudo apt-get update
sudo apt-get install libpcre3 libpcre3-dev
sudo apt-get install openssl libssl-dev

2.下载 nginx-rtmp-module 与 nginx-1.8.1

git clone https://github.com/arut/nginx-rtmp-module.git
wget http://nginx.org/download/nginx-1.8.1.tar.gz
tar -zxvf nginx-1.8.1.tar.gz

3.配置并编译 nginx

进入到 nginx-1.8.1 安装目录, 使用 nginx 的默认配置,添加 nginx 的 rtmp 模块。 add-module 为下载的 nginx-rtmp-module 文件路径。

cd nginx-1.8.1
./configure --add-module=../nginx-rtmp-module
make
sudo make install

4.运行测试 nginx

进入安装目录 /usr/local/nginx,运行命令 ./sbin/nginx

注意:以后所有的命令都在/usr/local/nginx目录运行,也nginx配置文件的相对目录。

cd /usr/local/nginx
./sbin/nginx

打开浏览器在地址栏输入:localhost。如果,如下图显示那样就证明您的nginx服务器搭建成功了。

nginx config

步骤如下

  1. 修改 nginx.conf 文件
  2. 重启 nginx 服务
  3. 修改 /etc/hosts, 添加本机地址对应的域名, 如 "9.123.143.116 nowgood"
  4. 打开浏览器查看效果, 注意网址为 http://localhost/stat
sudo vim /usr/local/nginx/conf/nginx.conf
sudo ./sbin/nginx -s reload
#/usr/local/nginx/conf/nginx.conf
#注明:请勿直接覆盖原来的conf文件,这只是部分有关直播的内容
#配置RTMP,这个配置格式在github的readme上有详细说明

worker_processes  1;
events {
   worker_connections  1024;
}
rtmp {                
    server {
        listen 1935;  #服务端口--默认
        chunk_size 4096;   #数据传输块的大小--默认
        #设置直播的application名称是 live
    application live{ 
        live on; #live on表示开启直播模式
        }
        #设置推流的应用名称
    application push{ 
        live on; #开启直播
        push rtmp://rtmp-postbird/live; #推流到上面的直播应用
        }
    }
}

http{
   include       mime.types;
   default_type  application/octet-stream;
   sendfile        on;
   keepalive_timeout  65;
 server {
        listen       80; # 端口
    server_name  nowgood; #设置http服务器监听的域名 hosts中配置了
    
    #下面两个是加上去的,用来配置直播的http访问
    location /stat {    
                rtmp_stat all;
                rtmp_stat_stylesheet stat.xsl;
        }
        location /stat.xsl {
        #注意这里的路径不能错误,直接写绝对路径就可以
        root /home/gbsaa/wangbin/nginx-rtmp-module/;
        }
        location / {
            root   html;
            index  index.html index.htm;
        }
        error_page   500 502 503 504  /50x.html;
        location = /50x.html {
            root   html;
        }
    }
}

测试代码

ffmpeg -f v4l2  -framerate 25 -video_size 640x480 -i  /dev/video0 -strict -2 -vcodec libx264 -acodec libvo_aacenc  -f flv rtmp://nowgood/live/webcam
ffmpeg -i rtsp://184.72.239.149/vod/mp4://BigBuckBunny_175k.mov -strict -2 -vcodec libx264 -acodec libvo_aacenc -f flv rtmp://nowgood/live

推流

这里借用 jkuri大兄弟的代码, 不过不使用他的用 docker 搭建的 nginx-rtmp 的服务器(我没有运行成功, 不过很有借鉴意义)

git clone https://github.com/jkuri/opencv-ffmpeg-rtmp-stream

将代码中的推流地址改为之前我们搭建的 rtmp 服务器的地址后, 使用功能 cmake 编译运行, 就可以将摄像头采集图像进行直播了

一些可能需要安装的依赖

sudo apt-get install v4l-utils
v4l2-ctl -d /dev/video0 --list-formats
sudo apt-get install libgstreamer1.0-dev libgstreamer-plugins-base1.0-dev
sudo apt-get install libavcodec-extra

参考

https://github.com/opencv-ffmpeg-rtmp-stream
http://www.ptbird.cn/nginx-rtmp-module-server.html
https://zhuanlan.zhihu.com/p/28009037


使用树莓派的摄像头 - Trami - 博客园

$
0
0

我目前使用的树莓派是3B+,操作系统是Raspbian-stretch。树莓派官方提供了小型摄像头,用于拍照和录制视频。目前官网上提供了两款摄像头,一个是用于正常的可见光拍摄,另一个带有红外夜视功能,我入手的是这款带红外夜视功能的摄像头,这款摄像头的名字叫PI NOIR CAMERA V2(The infrared Camera Module v2 (Pi NoIR)),具体可以参见 树莓派官网

摄像头的安装与设置


首先准备好树莓派,已经安装好官方的Raspbian系统,如果没有安装好请参考 开始使用树莓派。把摄像头的排线插入树莓派上的"camera"插口。摄像头对静电比较敏感,同时也不要在树莓派运行时插拔摄像头,不然很容爆掉。

树莓派开机后,首先更新源

sudoapt-get update &&sudoapt-get upgrade

然后设置摄像头的使能控制端,即开启摄像头功能,选择Interface Options选项,然后选择P1 Camera开启摄像头


使用摄像头


 设置完成后,摄像头就可以进行工作了,目前提供了三个应用程序,分别为:raspistill、raspivid、raspistillyuv。其中 raspistill 和 raspistillyuv 非常相似,并且都是用于捕捉图像,而 raspivid 用于捕捉视频。

1)用rasptill获取一张图片

raspistill -o image.jpg

2)用raspivid获取视频

raspivid -o video.h264 -t10000

获得10秒H.264压缩格式的视频,存入到文件video.h264。

raspivid 通常会将录制的视频保存为 .h264 格式的文件,而我们使用的很多播放器可能无法正常播放该格式的视频文件。这就需要我们将生成的 .h264 格式的文件封装到播放器能够识别的视频容器格式中(比如封装为 mp4 格式)。有很多视频处理软件可以达到这个目的,可以直接在树莓派上进行封装。这里介绍的是“gpac”中的“MP4Box”。

安装gpac

$sudoapt-get update
$sudoapt-getinstallgpac

将.h264的文件转换成.mp4的文件

$sudoMP4Box -add video.h264 video.mp4

使用omxplayer播放视频

$omxplayer video.mp4

这里仅仅是最基本的操作,如果要更深入的了解,还是要看这两个命令的帮助文档,可以执行

$raspistill --help        
$raspivid --help


使用motion搭建视频监控系统


 motion是Linux下一款轻量级的视频监控软件,motion可以提供网络摄像头的功能,当拍摄过程中画面发生变动时,Motion可以保存动作发生时的图片和视频,这时如果将抓拍的图片或视频上传到百度云或者DropBox中就可以实现一个简单的监控系统。具体实现如下:

安装motion

$sudoapt-getinstallmotion

配置motion选项时,先对配置文件进行备份

$sudocp/etc/motion/motion.conf /etc/motion/motion.conf.bak

修改/etc/motion/motion.conf选项

$sudovim /etc/motion/motion.conf
daemon on                           #开启守护进程(选配)
target_dir/home/pi/motion-images    #文件保存的路径,图像变化时图片保存的路径stream_localhost off                 #允许通过网页查看摄像头        
width  640
height 480
stream_maxrate30framerate30

值得注意的是target_dir选项,默认值为/var/lib/motion。这是motion存储文件的目标文件夹。所存储文件包括了运动捕捉产生的图片或视频。用户motion必须对该目标文件夹有写入权限。这里我们将默认的文件目标进行了修改。同时注意,流媒体的默认端口是8081,这里后面会使用到。

最后,在设置文件中,默认的视频设备(videodevice项)是/dev/video0。如果你连接好了摄像头,却无法在/dev下找到video0,那么可以尝试加载V4L2驱动:

sudorpi-updatesudomodprobebcm2835-v4l2 #加载驱动模块

这样每次启动都要重新加载v4l2驱动,如果你希望开机就加载v4l2驱动可以在/etc/modules文件中加入bcm2835-v4l2,这样每次开机就可以直接加载v4l2驱动模块。


修改/etc/default/motion,更改守护进程的设置:

start_motion_daemon=yes

然后,启动motion

sudomotion

在同一局域网下的其他电脑上,用浏览器打开192.168.23.122:8081,可以直接看到即时拍摄的流媒体:

动作捕捉的图片和视频将存储在目录/home/pi/motion-images下。如果想改变动作捕捉的相关参数,例如动作捕捉的敏感度等,可以在/etc/motion/motion.conf中修改,这里需要参考具体motion的使用。


当拍摄过程中画面发生变动时,Motion可以保存动作发生时的图片和视频


NAT穿透技术详解(udp打洞精髓附代码) - lyztyycode的博客 - CSDN博客

$
0
0

以前自己写的代码都只是在本地进行c/s通信,今天想写一个可以跨越外网的c/s通信,这里我就用udp实现一个点对点的不同外网的通信。用到的技术就是nat穿透技术,这里最直接使用的就是udp打洞技术。文中如有表述不清楚,欢迎提问。

如果你需要nat穿透技术的详解点这里: nat穿透浅析

需要的设备:

一个已知的外网服务器S(ip+port),两个位于不同外网的客户端A, B

首先要知道udp打洞的流程:

1.A客户端发消息给S,B客户端发消息给服务器S。

2.S转发A的ip+port(这里是A的外网ip+port,位于nat转发器上)给客户端B,S转发B的ip+port给客户端A。

这样A,B都知道了对端的ip+port。

3.A发消息给B,这里,B会屏蔽掉这条消息,但是在A的nat映射上加上了一条映射,允许A接收来自B的消息。在A上打洞

B-->A。

4.B发消息给A,这里,由于流程3A能接收到这条消息,同时在B的nat映射上加了一条映射,允许B接收来自A的消息。在B上

打洞,A-->B。

5.到此,A,B打洞成功。

我在学习这块知识的时候看网上的案例和解释大多是相互转发,而且表达不清楚,代码实例拿来用也是问题百出,解决不了实际问题,所以自己也是严格要求自己,有问题的代码不敢贴出来。

下面是代码,实现的是A回射B的消息。

服务器S的代码:

#include <stdio.h>
#include <stdlib.h>
#include <unistd.h>
#include <fcntl.h>
#include <sys/socket.h>
#include <netinet/in.h>
#include <sys/types.h>
#include <string.h>
#include <arpa/inet.h>
#include <errno.h>
#include <error.h>
//中间枢纽获得A客户端的外网ip和port发送给客户端B,获得客户端B的外网ip和port发送给A
//B通过A打的洞发数据给A,这时候A拒收B的消息,因为A的nat映射中没有B的信息,但是这次通
//信却在B的网管中添加了映射可以接受A的
//消息,同理A通过B打的洞发数据给B,这时候由于B可以接受A的消息,所以数据接收成功且在A
//的映射中加入了B的信息,从而A与B可以跨服务器通信。实现p2p
/* 由于已知的外网服务器S可能并没有AB客户端的映射关系,所以要先建立A与S 还有 B与S之间的映射,这样才能进行udp穿透。 */

#define ERR_EXIT(m)\
    do{\
        perror(m);\
        exit(1);\
    }while(0)

/* 用来记录客户端发送过来的外网ip+port */
typedef struct{
    struct in_addr ip;
    int port;
}clientInfo;

int main()
{
    /* 一个客户端信息结构体数组,分别存放两个客户端的外网ip+port */
    clientInfo info[2];
    /* 作为心跳包需要接收的一个字节 */
    /* char ch; */ 
    char str[10] = {0};

    /* udp socket描述符 */
    int sockfd = socket(AF_INET, SOCK_DGRAM, 0);
    if(sockfd == -1)
        ERR_EXIT("SOCKET");

    struct sockaddr_in serveraddr;
    memset(&serveraddr, 0, sizeof(serveraddr));
    serveraddr.sin_addr.s_addr = inet_addr("0.0.0.0");
    serveraddr.sin_port = htons(8888);
    serveraddr.sin_family = AF_INET;    

    int ret = bind(sockfd, (struct sockaddr *)&serveraddr, sizeof(serveraddr));
    if(ret == -1)
        ERR_EXIT("BIND");

    /* 服务器接收客户端发来的消息并转发 */
    while(1)
    {
        bzero(info, sizeof(clientInfo)*2);
        /* 接收两个心跳包并记录其与此链接的ip+port */
        socklen_t addrlen = sizeof(struct sockaddr_in);
        /* recvfrom(sockfd, &ch, sizeof(ch), 0, (struct sockaddr *)&serveraddr, &addrlen); */
        recvfrom(sockfd, str, sizeof(str), 0, (struct sockaddr *)&serveraddr, &addrlen);
        memcpy(&info[0].ip, &serveraddr.sin_addr, sizeof(struct in_addr));
        info[0].port = serveraddr.sin_port;

        printf("A client IP:%s \tPort:%d creat link OK!\n", inet_ntoa(info[0].ip), ntohs(info[0].port));

        /* recvfrom(sockfd, &ch, sizeof(ch), 0, (struct sockaddr *)&serveraddr, &addrlen); */
        recvfrom(sockfd, str, sizeof(str), 0, (struct sockaddr *)&serveraddr, &addrlen);
        memcpy(&info[1].ip, &serveraddr.sin_addr, sizeof(struct in_addr));
        info[1].port = serveraddr.sin_port;

        printf("B client IP:%s \tPort:%d creat link OK!\n", inet_ntoa(info[1].ip), ntohs(info[1].port));

        /* 分别向两个客户端发送对方的外网ip+port */
        printf("start informations translation...\n");
        serveraddr.sin_addr = info[0].ip;
        serveraddr.sin_port = info[0].port;
        sendto(sockfd, &info[1], sizeof(clientInfo), 0, (struct sockaddr *)&serveraddr, addrlen);

        serveraddr.sin_addr = info[1].ip;
        serveraddr.sin_port = info[1].port;
        sendto(sockfd, &info[0], sizeof(clientInfo), 0, (struct sockaddr *)&serveraddr, addrlen);
        printf("send informations successful!\n");
    }
    return 0;
}

客户端A的代码:

#include <stdio.h>
#include <stdlib.h>
#include <string.h>
#include <unistd.h>
#include <fcntl.h>
#include <sys/socket.h>
#include <sys/types.h>
#include <netinet/in.h>
#include <arpa/inet.h>
#include <errno.h>

/* 原理见服务器源程序 */
#define ERR_EXIT(m)\
    do{\
        perror(m); \
        exit(1);\
    }while(0)

typedef struct{
    struct in_addr ip;
    int port;
}clientInfo;

/* 用于udp打洞成功后两个客户端跨服务器通信 */
void echo_ser(int sockfd, struct sockaddr* addr, socklen_t *len)
{   
    printf("start recv B data...\n");
    char buf[1024];
    while(1)
    {
        bzero(buf, sizeof(buf));
        //接收B发来的数据
        recvfrom(sockfd, buf, sizeof(buf)-1, 0, addr, len);
        printf("%s \n", buf);
        //向B发送数据
        printf("send data to B ...\n");
        sendto(sockfd, buf, sizeof(buf)-1, 0, addr, sizeof(struct sockaddr_in));
        buf[strlen(buf)] = '\0';
        if(strcmp(buf, "exit") == 0)
            break;
    }
}

int main()
{
    int sockfd = socket(AF_INET, SOCK_DGRAM, 0);
    if(sockfd == -1)
        ERR_EXIT("SOCKET");
    //向服务器发送心跳包的一个字节的数据
    char ch = 'a';
    clientInfo info;
    socklen_t addrlen = sizeof(struct sockaddr_in);
    bzero(&info, sizeof(info));
    struct sockaddr_in clientaddr;
    memset(&clientaddr, 0, sizeof(clientaddr));
    //实际情况下这里用一个已知的外网的服务器的端口号
    clientaddr.sin_port = htons(8888);
    //实际情况下这里用一个已知的外网的服务器的ip地址,这里保护我的云服务器ip所以没有写出来,自己换一下ip地址。
    clientaddr.sin_addr.s_addr = inet_addr("127.0.0.1");
    clientaddr.sin_family = AF_INET;

    /* 向服务器S发送数据包 */
    sendto(sockfd, &ch, sizeof(ch), 0, (struct sockaddr *)&clientaddr, sizeof(struct sockaddr_in));
    /* 接收B的ip+port */
    printf("send success\n");
    recvfrom(sockfd, &info, sizeof(clientInfo), 0, (struct sockaddr *)&clientaddr, &addrlen);
    printf("IP: %s\tPort: %d\n", inet_ntoa(info.ip), ntohs(info.port));

    clientaddr.sin_addr = info.ip;
    clientaddr.sin_port = info.port;
    
    sendto(sockfd, &ch, sizeof(ch), 0, (struct sockaddr *)&clientaddr, sizeof(struct sockaddr_in));
    echo_ser(sockfd, (struct sockaddr *)&clientaddr, &addrlen);

    close(sockfd);
    return 0;
}

客户端B代码:

#include <stdio.h>
#include <stdlib.h>
#include <string.h>
#include <unistd.h>
#include <fcntl.h>
#include <sys/socket.h>
#include <sys/types.h>
#include <netinet/in.h>
#include <arpa/inet.h>
#include <errno.h>

/* 原理见服务器源程序 */
#define ERR_EXIT(m)\
    do{\
        perror(m); \
        exit(1);\
    }while(0)

typedef struct{
    struct in_addr ip;
    int port;
}clientInfo;

/* 用于udp打洞成功后两个客户端跨服务器通信 */
void echo_ser(int sockfd, struct sockaddr* addr, socklen_t *len)
{   
    char buf[1024];
    while(1)
    {
        bzero(buf, sizeof(buf));
        printf(">> ");
        fflush(stdout);
        fgets(buf, sizeof(buf)-1, stdin);
        //向A发送数据
        sendto(sockfd, buf, strlen(buf), 0, addr, sizeof(struct sockaddr_in));

        //接收A发来的数据
        bzero(buf, sizeof(buf));
        printf("start recv A data...\n");
        recvfrom(sockfd, buf, sizeof(buf)-1, 0, addr, len);
        printf("%s \n", buf);
        buf[strlen(buf)] = '\0';
        if(strcmp(buf, "exit") == 0)
            break;
    }
}

int main()
{
    int sockfd = socket(AF_INET, SOCK_DGRAM, 0);
    if(sockfd == -1)
        ERR_EXIT("SOCKET");
    //向服务器发送心跳包的一个字节的数据
    char ch = 'a';
    /* char str[] = "abcdefgh"; */
    clientInfo info;
    socklen_t addrlen = sizeof(struct sockaddr_in);
    bzero(&info, sizeof(info));
    struct sockaddr_in clientaddr, serveraddr;
    /* 客户端自身的ip+port */
    /* memset(&clientaddr, 0, sizeof(clientaddr)); */
    /* clientaddr.sin_port = htons(8888); */
    /* clientaddr.sin_addr.s_addr = inet_addr("127.0.0.1"); */   
    /* clientaddr.sin_family = AF_INET; */

    /* 服务器的信息 */
    memset(&clientaddr, 0, sizeof(clientaddr));
    //实际情况下为一个已知的外网的服务器port
    serveraddr.sin_port = htons(4399);
    //实际情况下为一个已知的外网的服务器ip,这里仅用本地ip填充,下面这行的ip自己换成已知的外网服务器的ip
    serveraddr.sin_addr.s_addr = inet_addr("127.0.0.1");   
    /* clientaddr.sin_addr.s_addr = inet_addr("127.0.0.1"); */   
    serveraddr.sin_family = AF_INET;

    /* 向服务器S发送数据包 */
    sendto(sockfd, &ch, sizeof(ch), 0, (struct sockaddr *)&serveraddr, sizeof(struct sockaddr_in));
    /* sendto(sockfd, str, sizeof(str), 0, (struct sockaddr *)&serveraddr, sizeof(struct sockaddr_in)); */
    /* 接收B的ip+port */
    printf("send success\n");
    recvfrom(sockfd, &info, sizeof(clientInfo), 0, (struct sockaddr *)&serveraddr, &addrlen);
    printf("IP: %s\tPort: %d\n", inet_ntoa(info.ip), ntohs(info.port));

    serveraddr.sin_addr = info.ip;
    serveraddr.sin_port = info.port;

    sendto(sockfd, &ch, sizeof(ch), 0, (struct sockaddr *)&serveraddr, sizeof(struct sockaddr_in));
    echo_ser(sockfd, (struct sockaddr *)&serveraddr, &addrlen);
    close(sockfd);
    return 0;
}

以上代码经过本人调试测验过的,可以实现跨外网通信,没有任何问题。

在写这个项目的时候遇到的问题:

1.起初,我本地的客户端一直连不上服务器S,即使代码我在本地测试成功的情况下,后来发现是因为我云服务器指定的监听端口8888没有开,不接收外来的消息。把端口开放,成功解决。

2.服务器S能接收AB的连接消息,也可以转发AB的ip和port给对端,AB也能获得对端的ip+port但是,当B发消息给A的时候A阻塞在while(1)循环中的第一个recvfrom上,为什么呢?

原因是打洞过程我少了流程3、4,因为B发送消息给A,A会屏蔽B的消息。此时A应该也给B发送一条消息。

所以我在原来A、B的代码

echo_ser(sockfd, (struct sockaddr *)&serveraddr, &addrlen);

前面都加了一句:

sendto(sockfd, &ch, sizeof(ch), 0, (struct sockaddr *)&serveraddr, sizeof(struct sockaddr_in));

这样无论A还是B先执行这条语句都能打洞成功,如果你在这条语句前面加一句sleep(5)你就能感知到打洞的过程。

到此,问题解决,实现了预期的功能,希望我的文章对你有帮助。如果有表述不清楚,欢迎提问。


Nodejs中利用phantom把html转为pdf或图片格式 - younglao的博客 - CSDN博客

$
0
0

最近在项目中遇到需要把html页面转换为pdf的需求,并且转换成的pdf文件要保留原有html的样式和图片。也就是说,html页面的图片、表格、样式等都需要完整的保存下来。

最初找到三种方法来实现这个需求,这三种方法都只是粗浅的看了使用方法,从而找出适合这个需求的方案:

  • html-pdf 模块
  • wkhtmltopdf 工具
  • phantom 模块

最终使用了phantom模块,也达到了预期效果。现在简单的记录三种方式的使用方法,以及三者之间主要的不同之处。


1.html-pdf

安装:

npm install -g html-pdf

使用命令行:

html-pdf /test/index.html index.pdf

这样便可以把index.html页面转换为对应的index.pdf文件。

使用代码:

var express = require('express');
var router = express.Router();
var pdf = require('html-pdf');

router.get('/url',function(req,res){
    res.render('html',function(err,html){
        html2Pdf(html,'html.pdf');
        //........
   });
});

/**
 * 这种方法没有渲染样式和图片
 * @param url
 * @param pdfName
 */
exports.html2Pdf = function(html,pdfName){
    var options = {format:true};
    pdf.create(html,options).toFile(__dirname+'/'+pdfName,function(err,res){
        if (err) return console.log(err);
        console.log(res);
    });
};

在测试过程中发现,生成的pdf文件中并没有支持样式渲染和图片加载,不能支持通过url直接加载html;但是在分页的支持上很好。

结果如下:

这里写图片描述


2 wkhtmltopdf

wkhtmltopdf在效果上比较html-pdf要好很多,它支持样式渲染,图片加载,还可以通过url直接生成PDF文件。
但是安装上要麻烦得多。具体安装步骤 参考这里

安装完毕之后,使用命令行:

wkhtmltopdf https://github.comgithub.pdf

即可生成对应的PDF文件。

代码使用:

var wkhtmltopdf = require('wkhtmltopdf');
var fs = require('fs');


// URL 使用URL生成对应的PDF
wkhtmltopdf('http://github.com', { pageSize: 'letter' })
  .pipe(fs.createWriteStream('out.pdf'));

除了可以通过URL生成之外,还能通过HTML文件内容生成,就像HTML-PDF一样,只要有HTML格式的字符串就可以生成相应的PDF。

结果如下:
这里写图片描述


3 phantom 模块

phantomjs是基于webkit的无头浏览器,提供相关的JavaScript API,nodejs就相当于对phantomjs的模块化封装,使得它能够在nodejs中使用。

模块安装:

node版本6.X以上的:

npm install phantom –save

node版本5.X的:

npm install phantom@3 –save

node版本4.X及以下的:

npm install phantom@2 –save

以下的例子都是基于node 4.x

代码使用:

var phantom = require('phantom');

phantom.create().then(function(ph) {
    ph.createPage().then(function(page) {
        page.open("https://www.oracle.com/index.html").then(function(status) {
            page.property('viewportSize',{width: 10000, height: 500});
            page.render('/oracle10000.pdf').then(function(){
                console.log('Page rendered');
                ph.exit();
            });
        });
    });
});

代码中,phantom能够通过URL转换为相应的PDF,而且能够通过 page.property('viewportSize',{width:width,height:height})来设置生成的PDF的宽度和高度。

此例phantom中并没有分页,它是以整个浏览器截图的形式,获取全文,转化为PDF格式。

选择phantom的主要原因就是便于设置PDF的宽度,更能兼容HTML的排版。

结果如下:

这里写图片描述

MTCNN人脸及特征点检测--基于树莓派3B+及ncnn架构 - yuanlulu的博客 - CSDN博客

$
0
0

概述

本文尝试在树莓派3B+上用ncnn框架测试MTCNN。

ncnn的基本编译和使用请参考《 在树莓派3B+上编译ncnn并用benchmark和mobilenet_yolo测试》。本文在这个博客基础上进行操作。

操作步骤

下载mtcnn

mtcn-ncnn项目中下载mtcnn子目录,把这个目录放在最新的ncnn源码目录下

添加对mtcnn的支持

修改ncnn最顶层的CMakeList.txt,增加对mtcnn的支持

add_subdirectory(examples)add_subdirectory(benchmark)add_subdirectory(src)# 添加对mtcnn目录的支持add_subdirectory(mtcnn)

重命名mtcnn.cpp

将mtcnn/mtcnn.cpp删除,将mtcnn_new.cpp重命名为mtcnn.cpp

修改mtcnn.cpp源码,把imgproc.hpp那行修改下:

// #include <opencv2/imgproc.hpp>
#include <opencv2/imgproc/imgproc.hpp>

修改ncnn-root-dir/mtcnn/CMakeList.txt, 去掉imgcodecs:

# find_package(OpenCV REQUIRED core highgui imgproc imgcodecs)
find_package(OpenCV REQUIRED core highgui imgproc)

如果不这么改,编译报错:opencv_imgcodecs is required but was not found

因为我本地的opencv库是2.4的,所以不需要imgcodecs这个选项。

编译

$cd<ncnn-root-dir>$sudomkdir-p build
$cdbuild
$ cmake -DCMAKE_TOOLCHAIN_FILE=../toolchains/pi3.toolchain.cmake -DPI3=ON..$make-j4# 生成./src/libncnn.a

生成的二进制文件为ncnn-root-dir/build/mtcnn/mtcnn, 将它复制到ncnn-root-dir/mtcnn目录下。

测试mtcnn

mtcn-ncnn这个项目意见转换好了mtcnn的ncnn模型放在在ncnn-root-dir/mtcnn,所以这里就直接调用了,我没有单独做模型转换。

$ cd <ncnn-root-dir>/mtcnn
# ./mtcnn 1.jpg

测试结果存入result.jpg,取下来看就可以了。

时间测试

测试过程发现,第一次测试的时间会长一些,第二次及以后的时间会缩短。

我在上篇文章 在树莓派3B+上编译ncnn并用benchmark和mobilenet_yolo测试介绍过默认开启openmp加速的方案。本次编译mtcnn也是这么操作的。也就是说我的测试同时使用了neon和openmp加速。

简单汇总(时间是估的,没精确算):

分辨率1920x1080(8个人脸)648x610(2个人脸)324x305(2个人脸)
平均耗时(ms)80143.3

在这里插入图片描述

在这里插入图片描述

在这里插入图片描述

mtcnn.cpp修改后的源码

从上面可以知道,最终编译出的二进制文件是由原始项目里的mtcnn_new.cpp修改的,但是原始文件只测试一次,我需要做多次测试求平均,所以我对这个文件进行了简单修改,每次测试100次,目视就可以估算平均了。

#include <stdio.h>
#include <algorithm>
#include <vector>
#include <math.h>
#include <iostream>
#include <sys/time.h>
#include <opencv2/core/core.hpp>
#include <opencv2/highgui/highgui.hpp>
#include <opencv2/imgproc/imgproc.hpp>

#include "net.h"
using namespace std;
using namespace cv;

struct Bbox
{
    float score;
    int x1;
    int y1;
    int x2;
    int y2;
    float area;
    bool exist;
    float ppoint[10];
    float regreCoord[4];
};

struct orderScore
{
    float score;
    int oriOrder;
};
bool cmpScore(orderScore lsh, orderScore rsh){
    if(lsh.score<rsh.score)
        return true;
    else
        return false;
}
static float getElapse(struct timeval *tv1,struct timeval *tv2)
{
    float t = 0.0f;
    if (tv1->tv_sec == tv2->tv_sec)
        t = (tv2->tv_usec - tv1->tv_usec)/1000.0f;
    else
        t = ((tv2->tv_sec - tv1->tv_sec) * 1000 * 1000 + tv2->tv_usec - tv1->tv_usec)/1000.0f;
    return t;
}

class mtcnn{
public:
    mtcnn();
    void detect(ncnn::Mat& img_, std::vector<Bbox>& finalBbox);
private:
    void generateBbox(ncnn::Mat score, ncnn::Mat location, vector<Bbox>& boundingBox_, vector<orderScore>& bboxScore_, float scale);
    void nms(vector<Bbox> &boundingBox_, std::vector<orderScore> &bboxScore_, const float overlap_threshold, string modelname="Union");
    void refineAndSquareBbox(vector<Bbox> &vecBbox, const int &height, const int &width);

    ncnn::Net Pnet, Rnet, Onet;
    ncnn::Mat img;

    const float nms_threshold[3] = {0.5, 0.7, 0.7};
    const float threshold[3] = {0.6, 0.6, 0.6};
    const float mean_vals[3] = {127.5, 127.5, 127.5};
    const float norm_vals[3] = {0.0078125, 0.0078125, 0.0078125};
    std::vector<Bbox> firstBbox_, secondBbox_,thirdBbox_;
    std::vector<orderScore> firstOrderScore_, secondBboxScore_, thirdBboxScore_;
    int img_w, img_h;
};

mtcnn::mtcnn(){
    Pnet.load_param("det1.param");
    Pnet.load_model("det1.bin");
    Rnet.load_param("det2.param");
    Rnet.load_model("det2.bin");
    Onet.load_param("det3.param");
    Onet.load_model("det3.bin");
}

void mtcnn::generateBbox(ncnn::Mat score, ncnn::Mat location, std::vector<Bbox>& boundingBox_, std::vector<orderScore>& bboxScore_, float scale){
    int stride = 2;
    int cellsize = 12;
    int count = 0;
    //score p
    float *p = score.channel(1);
    float *plocal = location.channel(0);
    Bbox bbox;
    orderScore order;
    for(int row=0;row<score.h;row++){
        for(int col=0;col<score.w;col++){
            if(*p>threshold[0]){
                bbox.score = *p;
                order.score = *p;
                order.oriOrder = count;
                bbox.x1 = round((stride*col+1)/scale);
                bbox.y1 = round((stride*row+1)/scale);
                bbox.x2 = round((stride*col+1+cellsize)/scale);
                bbox.y2 = round((stride*row+1+cellsize)/scale);
                bbox.exist = true;
                bbox.area = (bbox.x2 - bbox.x1)*(bbox.y2 - bbox.y1);
                for(int channel=0;channel<4;channel++)
                    bbox.regreCoord[channel]=location.channel(channel)[0];
                boundingBox_.push_back(bbox);
                bboxScore_.push_back(order);
                count++;
            }
            p++;
            plocal++;
        }
    }
}
void mtcnn::nms(std::vector<Bbox> &boundingBox_, std::vector<orderScore> &bboxScore_, const float overlap_threshold, string modelname){
    if(boundingBox_.empty()){
        return;
    }
    std::vector<int> heros;
    //sort the score
    sort(bboxScore_.begin(), bboxScore_.end(), cmpScore);

    int order = 0;
    float IOU = 0;
    float maxX = 0;
    float maxY = 0;
    float minX = 0;
    float minY = 0;
    while(bboxScore_.size()>0){
        order = bboxScore_.back().oriOrder;
        bboxScore_.pop_back();
        if(order<0)continue;
        if(boundingBox_.at(order).exist == false) continue;
        heros.push_back(order);
        boundingBox_.at(order).exist = false;//delete it

        for(int num=0;num<boundingBox_.size();num++){
            if(boundingBox_.at(num).exist){
                //the iou
                maxX = (boundingBox_.at(num).x1>boundingBox_.at(order).x1)?boundingBox_.at(num).x1:boundingBox_.at(order).x1;
                maxY = (boundingBox_.at(num).y1>boundingBox_.at(order).y1)?boundingBox_.at(num).y1:boundingBox_.at(order).y1;
                minX = (boundingBox_.at(num).x2<boundingBox_.at(order).x2)?boundingBox_.at(num).x2:boundingBox_.at(order).x2;
                minY = (boundingBox_.at(num).y2<boundingBox_.at(order).y2)?boundingBox_.at(num).y2:boundingBox_.at(order).y2;
                //maxX1 and maxY1 reuse 
                maxX = ((minX-maxX+1)>0)?(minX-maxX+1):0;
                maxY = ((minY-maxY+1)>0)?(minY-maxY+1):0;
                //IOU reuse for the area of two bbox
                IOU = maxX * maxY;
                if(!modelname.compare("Union"))
                    IOU = IOU/(boundingBox_.at(num).area + boundingBox_.at(order).area - IOU);
                else if(!modelname.compare("Min")){
                    IOU = IOU/((boundingBox_.at(num).area<boundingBox_.at(order).area)?boundingBox_.at(num).area:boundingBox_.at(order).area);
                }
                if(IOU>overlap_threshold){
                    boundingBox_.at(num).exist=false;
                    for(vector<orderScore>::iterator it=bboxScore_.begin(); it!=bboxScore_.end();it++){
                        if((*it).oriOrder == num) {
                            (*it).oriOrder = -1;
                            break;
                        }
                    }
                }
            }
        }
    }
    for(int i=0;i<heros.size();i++)
        boundingBox_.at(heros.at(i)).exist = true;
}
void mtcnn::refineAndSquareBbox(vector<Bbox> &vecBbox, const int &height, const int &width){
    if(vecBbox.empty()){
        cout<<"Bbox is empty!!"<<endl;
        return;
    }
    float bbw=0, bbh=0, maxSide=0;
    float h = 0, w = 0;
    float x1=0, y1=0, x2=0, y2=0;
    for(vector<Bbox>::iterator it=vecBbox.begin(); it!=vecBbox.end();it++){
        if((*it).exist){
            bbw = (*it).x2 - (*it).x1 + 1;
            bbh = (*it).y2 - (*it).y1 + 1;
            x1 = (*it).x1 + (*it).regreCoord[0]*bbw;
            y1 = (*it).y1 + (*it).regreCoord[1]*bbh;
            x2 = (*it).x2 + (*it).regreCoord[2]*bbw;
            y2 = (*it).y2 + (*it).regreCoord[3]*bbh;

            w = x2 - x1 + 1;
            h = y2 - y1 + 1;
          
            maxSide = (h>w)?h:w;
            x1 = x1 + w*0.5 - maxSide*0.5;
            y1 = y1 + h*0.5 - maxSide*0.5;
            (*it).x2 = round(x1 + maxSide - 1);
            (*it).y2 = round(y1 + maxSide - 1);
            (*it).x1 = round(x1);
            (*it).y1 = round(y1);

            //boundary check
            if((*it).x1<0)(*it).x1=0;
            if((*it).y1<0)(*it).y1=0;
            if((*it).x2>width)(*it).x2 = width - 1;
            if((*it).y2>height)(*it).y2 = height - 1;

            it->area = (it->x2 - it->x1)*(it->y2 - it->y1);
        }
    }
}
void mtcnn::detect(ncnn::Mat& img_, std::vector<Bbox>& finalBbox_){
    firstBbox_.clear();
    firstOrderScore_.clear();
    secondBbox_.clear();
    secondBboxScore_.clear();
    thirdBbox_.clear();
    thirdBboxScore_.clear();
    img = img_;
    img_w = img.w;
    img_h = img.h;
    img.substract_mean_normalize(mean_vals, norm_vals);

    float minl = img_w<img_h?img_w:img_h;
    int MIN_DET_SIZE = 12;
    int minsize = 90;
    float m = (float)MIN_DET_SIZE/minsize;
    minl *= m;
    float factor = 0.709;
    int factor_count = 0;
    vector<float> scales_;
    while(minl>MIN_DET_SIZE){
        if(factor_count>0)m = m*factor;
        scales_.push_back(m);
        minl *= factor;
        factor_count++;
    }
    orderScore order;
    int count = 0;

    for (size_t i = 0; i < scales_.size(); i++) {
        int hs = (int)ceil(img_h*scales_[i]);
        int ws = (int)ceil(img_w*scales_[i]);
        //ncnn::Mat in = ncnn::Mat::from_pixels_resize(image_data, ncnn::Mat::PIXEL_RGB2BGR, img_w, img_h, ws, hs);
        ncnn::Mat in;
        resize_bilinear(img_, in, ws, hs);
        //in.substract_mean_normalize(mean_vals, norm_vals);
        ncnn::Extractor ex = Pnet.create_extractor();
        ex.set_light_mode(true);
        //ex.set_num_threads(4);
        ex.input("data", in);
        ncnn::Mat score_, location_;
        ex.extract("prob1", score_);
        ex.extract("conv4-2", location_);
        std::vector<Bbox> boundingBox_;
        std::vector<orderScore> bboxScore_;
        generateBbox(score_, location_, boundingBox_, bboxScore_, scales_[i]);
        nms(boundingBox_, bboxScore_, nms_threshold[0]);

        for(vector<Bbox>::iterator it=boundingBox_.begin(); it!=boundingBox_.end();it++){
            if((*it).exist){
                firstBbox_.push_back(*it);
                order.score = (*it).score;
                order.oriOrder = count;
                firstOrderScore_.push_back(order);
                count++;
            }
        }
        bboxScore_.clear();
        boundingBox_.clear();
    }
    //the first stage's nms
    if(count<1)return;
    nms(firstBbox_, firstOrderScore_, nms_threshold[0]);
    refineAndSquareBbox(firstBbox_, img_h, img_w);
    printf("firstBbox_.size()=%d\n", firstBbox_.size());

    //second stage
    count = 0;
    for(vector<Bbox>::iterator it=firstBbox_.begin(); it!=firstBbox_.end();it++){
        if((*it).exist){
            ncnn::Mat tempIm;
            copy_cut_border(img, tempIm, (*it).y1, img_h-(*it).y2, (*it).x1, img_w-(*it).x2);
            ncnn::Mat in;
            resize_bilinear(tempIm, in, 24, 24);
            ncnn::Extractor ex = Rnet.create_extractor();
            ex.set_light_mode(true);
            //ex.set_num_threads(4);
            ex.input("data", in);
            ncnn::Mat score, bbox;
            ex.extract("prob1", score);
            ex.extract("conv5-2", bbox);
            if((score[1])>threshold[1]){
                for(int channel=0;channel<4;channel++)
                    it->regreCoord[channel]=bbox[channel];
                it->area = (it->x2 - it->x1)*(it->y2 - it->y1);
                it->score = score[1];
                secondBbox_.push_back(*it);
                order.score = it->score;
                order.oriOrder = count++;
                secondBboxScore_.push_back(order);
            }
            else{
                (*it).exist=false;
            }
        }
    }
    printf("secondBbox_.size()=%d\n", secondBbox_.size());
    if(count<1)return;
    nms(secondBbox_, secondBboxScore_, nms_threshold[1]);
    refineAndSquareBbox(secondBbox_, img_h, img_w);

    //third stage 
    count = 0;
    for(vector<Bbox>::iterator it=secondBbox_.begin(); it!=secondBbox_.end();it++){
        if((*it).exist){
            ncnn::Mat tempIm;
            copy_cut_border(img, tempIm, (*it).y1, img_h-(*it).y2, (*it).x1, img_w-(*it).x2);
            ncnn::Mat in;
            resize_bilinear(tempIm, in, 48, 48);
            ncnn::Extractor ex = Onet.create_extractor();
            ex.set_light_mode(true);
            //ex.set_num_threads(4);
            ex.input("data", in);
            ncnn::Mat score, bbox, keyPoint;
            ex.extract("prob1", score);
            ex.extract("conv6-2", bbox);
            ex.extract("conv6-3", keyPoint);
            if(score[1]>threshold[2]){
                for(int channel=0;channel<4;channel++)
                    it->regreCoord[channel]=bbox[channel];
                it->area = (it->x2 - it->x1)*(it->y2 - it->y1);
                it->score = score[1];
                for(int num=0;num<5;num++){
                    (it->ppoint)[num] = it->x1 + (it->x2 - it->x1)*keyPoint[num];
                    (it->ppoint)[num+5] = it->y1 + (it->y2 - it->y1)*keyPoint[num+5];
                }

                thirdBbox_.push_back(*it);
                order.score = it->score;
                order.oriOrder = count++;
                thirdBboxScore_.push_back(order);
            }
            else
                (*it).exist=false;
            }
        }

    printf("thirdBbox_.size()=%d\n", thirdBbox_.size());
    if(count<1)return;
    refineAndSquareBbox(thirdBbox_, img_h, img_w);
    nms(thirdBbox_, thirdBboxScore_, nms_threshold[2], "Min");
    finalBbox_ = thirdBbox_;
}

int main(int argc, char** argv)
{
    const char* imagepath = argv[1];

    cv::Mat cv_img = cv::imread(imagepath, CV_LOAD_IMAGE_COLOR);
    if (cv_img.empty())
    {
        fprintf(stderr, "cv::imread %s failed\n", imagepath);
        return -1;
    }
    std::vector<Bbox> finalBbox;
    mtcnn mm;
    ncnn::Mat ncnn_img = ncnn::Mat::from_pixels(cv_img.data, ncnn::Mat::PIXEL_BGR2RGB, cv_img.cols, cv_img.rows);
    struct timeval  tv1,tv2;
    struct timezone tz1,tz2;
    # 测试100次
    for (int cnt=0; cnt<100; cnt++) {
        gettimeofday(&tv1,&tz1);
        mm.detect(ncnn_img, finalBbox);
        gettimeofday(&tv2,&tz2);
        printf( "%s = %g ms \n ", "Detection All time", getElapse(&tv1, &tv2) );
    }
    for(vector<Bbox>::iterator it=finalBbox.begin(); it!=finalBbox.end();it++){
        if((*it).exist){
            rectangle(cv_img, Point((*it).x1, (*it).y1), Point((*it).x2, (*it).y2), Scalar(0,0,255), 2,8,0);
            for(int num=0;num<5;num++)circle(cv_img,Point((int)*(it->ppoint+num), (int)*(it->ppoint+num+5)),3,Scalar(0,255,255), -1);
        }
    }
    imwrite("result.jpg",cv_img);
    return 0;
}

参考资料

在树莓派3B+上编译ncnn并用benchmark和mobilenet_yolo测试

MTCNN人脸及特征点检测—代码应用详解(基于ncnn架构)

mtcn-ncnn

MobileNetSSD通过Ncnn前向推理框架在Android端的使用--Cmake编译(目标检测 objection detection)补充篇章(多目标也可以显示) - Che_Hongshu - CSDN博客

$
0
0

一、前言

推荐先把下面这两篇看完再来看这补充的一篇

二、需要修改NDK部分代码以及java部分代码即可(下面有具体板块解释修改)

MobileNetssd.cpp文件修改在后面的Detect函数

// public native String Detect(Bitmap bitmap);
JNIEXPORT jfloatArray JNICALL Java_com_example_che_mobilenetssd_1demo_MobileNetssd_Detect(JNIEnv* env, jobject thiz, jobject bitmap)
{
    // ncnn from bitmap
    ncnn::Mat in;
    {
        AndroidBitmapInfo info;
        AndroidBitmap_getInfo(env, bitmap, &info);
//        int origin_w = info.width;
//        int origin_h = info.height;
//        int width = 300;
//        int height = 300;
        int width = info.width;
        int height = info.height;
        if (info.format != ANDROID_BITMAP_FORMAT_RGBA_8888)
            return NULL;

        void* indata;
        AndroidBitmap_lockPixels(env, bitmap, &indata);
        // 把像素转换成data,并指定通道顺序
        // 因为图像预处理每个网络层输入的数据格式不一样一般为300*300 128*128等等所以这类需要一个resize的操作可以在cpp中写,也可以是java读入图片时有个resize操作
//      in = ncnn::Mat::from_pixels_resize((const unsigned char*)indata, ncnn::Mat::PIXEL_RGBA2RGB, origin_w, origin_h, width, height);

        in = ncnn::Mat::from_pixels((const unsigned char*)indata, ncnn::Mat::PIXEL_RGBA2RGB, width, height);

        // 下面一行为debug代码
        //__android_log_print(ANDROID_LOG_DEBUG, "MobilenetssdJniIn", "Mobilenetssd_predict_has_input1, in.w: %d; in.h: %d", in.w, in.h);
        AndroidBitmap_unlockPixels(env, bitmap);
    }

    // ncnn_net
    std::vector<float> cls_scores;
    {
        // 减去均值和乘上比例(这个数据和前面的归一化图片预处理形式一一对应)
        const float mean_vals[3] = {127.5f, 127.5f, 127.5f};
        const float scale[3] = {0.007843f, 0.007843f, 0.007843f};

        in.substract_mean_normalize(mean_vals, scale);// 归一化

        ncnn::Extractor ex = ncnn_net.create_extractor();//前向传播

        // 如果不加密是使用ex.input("data", in);
        // BLOB_data在id.h文件中可见,相当于datainput网络层的id
        ex.input(MobileNetSSD_deploy_param_id::BLOB_data, in);
        //ex.set_num_threads(4); 和上面一样一个对象

        ncnn::Mat out;
        // 如果时不加密是使用ex.extract("prob", out);
        //BLOB_detection_out.h文件中可见,相当于dataout网络层的id,输出检测的结果数据
        ex.extract(MobileNetSSD_deploy_param_id::BLOB_detection_out, out);

        int output_wsize = out.w;
        int output_hsize = out.h;

        //输出整理
        jfloat *output[output_wsize * output_hsize];   // float类型
        for(int i = 0; i< out.h; i++) {
            for (int j = 0; j < out.w; j++) {
                output[i*output_wsize + j] = &out.row(i)[j];
            }
        }
        //建立float数组 长度为 output_wsize * output_hsize,如果只是ouput_size相当于只有一行的out的数据那就是一个object检测数据
        jfloatArray jOutputData = env->NewFloatArray(output_wsize * output_hsize);
        if (jOutputData == nullptr) return nullptr;
        env->SetFloatArrayRegion(jOutputData, 0,  output_wsize * output_hsize,
                                 reinterpret_cast<const jfloat *>(*output));
        return jOutputData;
    }
}

MainActivity.java修改后后为

package com.example.che.mobilenetssd_demo;

import android.Manifest;
import android.app.Activity;
import android.content.Intent;
import android.content.pm.PackageManager;
import android.content.res.AssetManager;
import android.graphics.Bitmap;
import android.graphics.Canvas;
import android.graphics.Color;
import android.graphics.Paint;
import android.net.Uri;
import android.support.annotation.NonNull;
import android.support.annotation.Nullable;
import android.support.v4.app.ActivityCompat;
import android.support.v4.content.ContextCompat;
import android.support.v7.app.AppCompatActivity;
import android.os.Bundle;
import android.text.method.ScrollingMovementMethod;
import android.util.Log;
import android.view.View;
import android.widget.Button;
import android.widget.ImageView;
import android.widget.TextView;
import android.widget.Toast;

import java.io.BufferedReader;
import java.io.IOException;
import java.io.InputStream;
import java.io.InputStreamReader;
import java.util.ArrayList;
import java.util.Arrays;
import java.util.List;


import com.bumptech.glide.Glide;
import com.bumptech.glide.load.engine.DiskCacheStrategy;
import com.bumptech.glide.request.RequestOptions;


public class MainActivity extends AppCompatActivity {

    private static final String TAG = MainActivity.class.getName();
    private static final int USE_PHOTO = 1001;
    private String camera_image_path;
    private ImageView show_image;
    private TextView result_text;
    private boolean load_result = false;
    private int[] ddims = {1, 3, 300, 300}; //这里的维度的值要和train model的input 一一对应
    private int model_index = 1;
    private List<String> resultLabel = new ArrayList<>();
    private MobileNetssd mobileNetssd = new MobileNetssd(); //java接口实例化 下面直接利用java函数调用NDK c++函数

    @Override
    protected void onCreate(Bundle savedInstanceState) {
        super.onCreate(savedInstanceState);
        setContentView(R.layout.activity_main);
        try
        {
            initMobileNetSSD();
        } catch (IOException e) {
            Log.e("MainActivity", "initMobileNetSSD error");
        }
        init_view();
        readCacheLabelFromLocalFile();
}

    /**
     *
     * MobileNetssd初始化,也就是把model文件进行加载
     */
    private void initMobileNetSSD() throws IOException {
        byte[] param = null;
        byte[] bin = null;
        {
            //用io流读取二进制文件,最后存入到byte[]数组中
            InputStream assetsInputStream = getAssets().open("MobileNetSSD_deploy.param.bin");// param:  网络结构文件
            int available = assetsInputStream.available();
            param = new byte[available];
            int byteCode = assetsInputStream.read(param);
            assetsInputStream.close();
        }
        {
            //用io流读取二进制文件,最后存入到byte上,转换为int型
            InputStream assetsInputStream = getAssets().open("MobileNetSSD_deploy.bin");//bin:   model文件
            int available = assetsInputStream.available();
            bin = new byte[available];
            int byteCode = assetsInputStream.read(bin);
            assetsInputStream.close();
        }

        load_result = mobileNetssd.Init(param, bin);// 再将文件传入java的NDK接口(c++ 代码中的init接口 )
        Log.d("load model", "MobileNetSSD_load_model_result:" + load_result);
    }


    // initialize view
    private void init_view() {
        request_permissions();
        show_image = (ImageView) findViewById(R.id.show_image);
        result_text = (TextView) findViewById(R.id.result_text);
        result_text.setMovementMethod(ScrollingMovementMethod.getInstance());
        Button use_photo = (Button) findViewById(R.id.use_photo);
        // use photo click
        use_photo.setOnClickListener(new View.OnClickListener() {
            @Override
            public void onClick(View view) {
                if (!load_result) {
                    Toast.makeText(MainActivity.this, "never load model", Toast.LENGTH_SHORT).show();
                    return;
                }
                PhotoUtil.use_photo(MainActivity.this, USE_PHOTO);
            }
        });
    }

    // load label's name
    private void readCacheLabelFromLocalFile() {
        try {
            AssetManager assetManager = getApplicationContext().getAssets();
            BufferedReader reader = new BufferedReader(new InputStreamReader(assetManager.open("words.txt")));//这里是label的文件
            String readLine = null;
            while ((readLine = reader.readLine()) != null) {
                resultLabel.add(readLine);
            }
            reader.close();
        } catch (Exception e) {
            Log.e("labelCache", "error " + e);
        }
    }


    protected void onActivityResult(int requestCode, int resultCode, @Nullable Intent data) {
        String image_path;
        RequestOptions options = new RequestOptions().skipMemoryCache(true).diskCacheStrategy(DiskCacheStrategy.NONE);
        if (resultCode == Activity.RESULT_OK) {
            switch (requestCode) {
                case USE_PHOTO:
                    if (data == null) {
                        Log.w(TAG, "user photo data is null");
                        return;
                    }
                    Uri image_uri = data.getData();

                    //Glide.with(MainActivity.this).load(image_uri).apply(options).into(show_image);

                    // get image path from uri
                    image_path = PhotoUtil.get_path_from_URI(MainActivity.this, image_uri);
                    // predict image
                    predict_image(image_path);
                    break;
            }
        }
    }

    //  predict image
    private void predict_image(String image_path) {
        // picture to float array
        Bitmap bmp = PhotoUtil.getScaleBitmap(image_path);
        Bitmap rgba = bmp.copy(Bitmap.Config.ARGB_8888, true);
        // resize
        Bitmap input_bmp = Bitmap.createScaledBitmap(rgba, ddims[2], ddims[3], false);
        try {
            // Data format conversion takes too long
            // Log.d("inputData", Arrays.toString(inputData));
            long start = System.currentTimeMillis();
            // get predict result
            float[] result = mobileNetssd.Detect(input_bmp);
            // time end
            long end = System.currentTimeMillis();
            Log.d(TAG, "origin predict result:" + Arrays.toString(result));
            long time = end - start;
            Log.d("result length", "length of result: " + String.valueOf(result.length));
            // show predict result and time
            // float[] r = get_max_result(result);

            String show_text = "result:" + Arrays.toString(result) + "\nname:" + resultLabel.get((int) result[0]) + "\nprobability:" + result[1] + "\ntime:" + time + "ms" ;
            result_text.setText(show_text);

            // 画布配置
            Canvas canvas = new Canvas(rgba);
            //图像上画矩形
            Paint paint = new Paint();
            paint.setColor(Color.RED);
            paint.setStyle(Paint.Style.STROKE);//不填充
            paint.setStrokeWidth(5); //线的宽度


            float get_finalresult[][] = TwoArry(result);
            Log.d("zhuanhuan",get_finalresult+"");
            int object_num = 0;
            int num = result.length/6;// number of object
            //continue to draw rect
            for(object_num = 0; object_num < num; object_num++){
                Log.d(TAG, "haha :" + Arrays.toString(get_finalresult));
                // 画框
                paint.setColor(Color.RED);
                paint.setStyle(Paint.Style.STROKE);//不填充
                paint.setStrokeWidth(5); //线的宽度
                canvas.drawRect(get_finalresult[object_num][2] * rgba.getWidth(), get_finalresult[object_num][3] * rgba.getHeight(),
                        get_finalresult[object_num][4] * rgba.getWidth(), get_finalresult[object_num][5] * rgba.getHeight(), paint);

                paint.setColor(Color.YELLOW);
                paint.setStyle(Paint.Style.FILL);//不填充
                paint.setStrokeWidth(1); //线的宽度
                canvas.drawText(resultLabel.get((int) get_finalresult[object_num][0]) + "\n" + get_finalresult[object_num][1],
                        get_finalresult[object_num][2]*rgba.getWidth(),get_finalresult[object_num][3]*rgba.getHeight(),paint);
            }

            show_image.setImageBitmap(rgba);


        } catch (Exception e) {
            e.printStackTrace();
        }
    }

    //一维数组转化为二维数组(自己新写的)
    public static float[][] TwoArry(float[] inputfloat){
        int n = inputfloat.length;
        int num = inputfloat.length/6;
        float[][] outputfloat = new float[num][6];
        int k = 0;
        for(int i = 0; i < num ; i++)
        {
            int j = 0;

            while(j<6)
            {
                outputfloat[i][j] =  inputfloat[k];
                k++;
                j++;
            }

        }

        return outputfloat;
    }

    /*
    // get max probability label
    private float[] get_max_result(float[] result) {
        int num_rs = result.length / 6;
        float maxProp = result[1];
        int maxI = 0;
        for(int i = 1; i<num_rs;i++){
            if(maxProp<result[i*6+1]){
                maxProp = result[i*6+1];
                maxI = i;
            }
        }
        float[] ret = {0,0,0,0,0,0};
        for(int j=0;j<6;j++){
            ret[j] = result[maxI*6 + j];
        }
        return ret;
    }
    */
    // request permissions(add)
    private void request_permissions() {
        List<String> permissionList = new ArrayList<>();
        if (ContextCompat.checkSelfPermission(this, Manifest.permission.CAMERA) != PackageManager.PERMISSION_GRANTED) {
            permissionList.add(Manifest.permission.CAMERA);
        }
        if (ContextCompat.checkSelfPermission(this, Manifest.permission.WRITE_EXTERNAL_STORAGE) != PackageManager.PERMISSION_GRANTED) {
            permissionList.add(Manifest.permission.WRITE_EXTERNAL_STORAGE);
        }
        if (ContextCompat.checkSelfPermission(this, Manifest.permission.READ_EXTERNAL_STORAGE) != PackageManager.PERMISSION_GRANTED) {
            permissionList.add(Manifest.permission.READ_EXTERNAL_STORAGE);
        }
        // if list is not empty will request permissions
        if (!permissionList.isEmpty()) {
            ActivityCompat.requestPermissions(this, permissionList.toArray(new String[permissionList.size()]), 1);
        }
    }

    @Override
    public void onRequestPermissionsResult(int requestCode, @NonNull String[] permissions, @NonNull int[] grantResults) {
        super.onRequestPermissionsResult(requestCode, permissions, grantResults);
        switch (requestCode) {
            case 1:
                if (grantResults.length > 0) {
                    for (int i = 0; i < grantResults.length; i++) {
                        int grantResult = grantResults[i];
                        if (grantResult == PackageManager.PERMISSION_DENIED) {
                            String s = permissions[i];
                            Toast.makeText(this, s + "permission was denied", Toast.LENGTH_SHORT).show();
                        }
                    }
                }
                break;
        }
    }


}
   

三、运行结果

在这里插入图片描述在这里插入图片描述在这里插入图片描述

具体解释

.cpp端不需要过多解释给出的代码有相应的注释
.java中需要解释一些
首先通过前向推理最后输出的数据格式为
6位, label+概率(置信度)+左+上+右+下
当然最后你可以在上图中也发现为小数,其实他是为对应的长或宽的比例
比如上图result 中的现实的数据前六位
13.0 0.99939597 0.40525293 0.18877083 0.839892715 0.943314

  • 13.0就是对应所有label之前在label文件中定义过的,0为backgroud以此列推
  • 0.999就为概率
  • 0.4则为对应 宽长×0.4的位置
  • 0.188 则对应于 高长×0.188的位置
  • 以此列推,这个时候再对应于前面的代码做一下消化就没问题了
  • 所以处理这种数据首先需要每6个做一下区分,所以也就有了下面我自己写的 public static float[][] TwoArry(float[] inputfloat)函数,回过头看一下一切舒服了
    这边我又加入了一些颜色和框的粗细的改变以及框的旁边的txt文本label的添加

代码地址

已在我的github上,希望大家给个star follow
https://github.com/chehongshu/ncnnforandroid_objectiondetection_Mobilenetssd/tree/master/MobileNetSSD_demo

Viewing all 532 articles
Browse latest View live


<script src="https://jsc.adskeeper.com/r/s/rssing.com.1596347.js" async> </script>